How to Make Tissue Holders out of Polluting Plastic Bottles.


From a Plastic Bottle to A Tissue Holder.
This is another hub which shares ideas about how to change plastic bottle waste which is widely considered as one of the main causes contributing to environment pollution, into something useful : A Rolled-Tissue Holder. (I'd rather call it rolled-tissue since it sounds more aesthetics and connotes its wider use).
Tools and Materials Needed.
A used-1500 ml bottle of mineral water.
PVA glue
Scrap paper.
Scissors
Rubber spatula.
Paint
Compound powder.
Sandpaper
Step By Step of the Project.
1. Prepare A Plastic Bottle.
The bottle should be clean, so wash it first to make sure it's clean and safe. Cut the bottle into three parts, we'll use the lower part and the upper part. The lower part will be used as container and the upper part as lid of tissue holder. When you cut the bottle, consider the size/height of the lower part not too short to accommodate the height of tissue roll we want to hold inside it.


2. Prepare Paper Pulp.
Soak some scrap paper for one to two days, it depends on kind of paper you use, the harder the paper the longer it takes to soak. You'd better tear the paper into smaller pieces first so that it eases you in making paper pulp. After 1 or two days of soaking, knead the paper so that it becomes evenly soft and tender. Add some PVA glue into paper pulp in 2 (paper pulp) : 1 (pva glue) composition. Mix it thoroughly.


3. Paste It With Paper Pulp .
Paste your tissue holder with paper dough. Apply the pasting on the outer side, if you have difficulty in pasting the whole side all at once because of very soft paper dough , you can do it on half side of the bottle first. After the first pasting has hardened a little bit, you may continue pasting on the other side, then on bottom part. After the whole side walls thoroughly pasted, let it dry. It takes some days to completely dry.
While waiting for the paste to dry completely,do day by day checking to find if there are parts that need trimming up, additional pulp or give slight pressings on some other parts to make it more neatly when it's completely hardened.

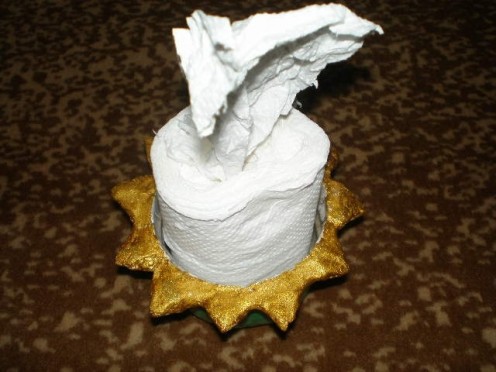
4. Give Your Tissue Holder Ornaments.
Ornaments can be made of any amaterials: beads, mosaic, metal, ornamental stones, etc. Here I use paper pulp also to make ornaments considering that it is very flexible to be shaped into many interesting things, so that all people at home can take part in the project.

5. Let the Ornaments Dry.
It takes another 1 day for ornamental paper pulp to dry.

6. Smooth the Surface.
Some people like the holder's surface looks as natural as it does in dried paper pulp although it gives rough appearance, but if you want to have it in smooth glossy looks, then you can use compound powder to make it so. Put some grams of compound powder in a small-flat-bottomed container, add some water and mix it thoroughly so that it becomes light dough. apply the dough on your tissue holder using a rubber spatula thinly and evenly. Don't hasitate to use your bare hand to help apply the dough for more even, neater application. Compound stains on your hands can be washed easily with tap water.
7. Color It.
Before color is applied on your tissue holder you'd better sand it first using sand paper, to get more satisfactory result. Paint the holder in any color you like, repeat the paint application after the first application's dried if you find it's not thick enough (the compound still see-trough).
8. How to Load Tissue Paper into the Holder.
First pull the tissue core out of the roll then pull the tip of tissue roll in the middle, pass it through the outlet of the tissue holder's lid. Finally put the holder's lid in place.