How to Make Cloth Dust Bunnies-Frugal Cleaning Made Fun. Sewing Tutorial and Recipe


Reusable Cleaning Cloths With a Twist
Have you ever wanted your very own dust-bunny? No, I'm not talking about how to grow the fuzzy rodents under your bed. These bunnies are guaranteed not to multiply, (without your approval, at least), but they do offer a fun alternative to dusting with boring dust rags or old socks.
Using what you have on hand, you can make these silly cleaning puppets too. They are eco-friendly, reusable, and free. What a great way to save a few pennies.
All it takes to make a dust bunny is a piece of old, soft clothing, a little sewing, and some basic sewing supplies. When you are done, simply toss them in the wash with towels or other rags. They are a must for the eccentric house-keeper and can make cleaning into a game if you have babies or toddlers around.


What You Will Need
Assemble all of your materials ahead of time. These are small, quick projects, so you might want to make several at a time. Use old clothes or materials to re-purpose. Tee-shirts, sweatshirts, and flannel all make nice, soft cloths for dusting that won't scratch your furniture.
Tee-shirt material works best because it doesn't ravel. If you are using fleecy material or flannel, you might want to cut the edges with pinking shears or serge the edges later to prevent fraying.
Materials:
- Fabric to re-purpose. Use a variety of prints for homely-cute or funky bunnies
- Sewing machine. Or needle and thread if you will hand sew
- Scissors and pinking shears
- Straight pins
- Embroidery floss or permanent marker for faces
- Washable marker for marking your seam-lines
- Felt for ears. (optional. Cloth ears are fun and floppy!)

Tip!
If you want to top stitch after the puppet is turned for a nicely finished look, draw outline at least a half inch large than your hand.
Get Started-Draw Your Bunny
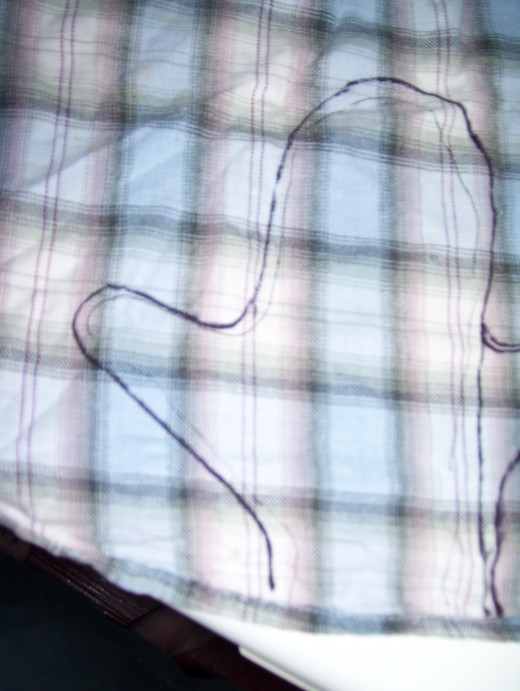
On the wrong side of the fabric, use the washable marker to trace around whichever had you normally use for dusting. Hold your fingers together and extend your thumb, so that your pattern resembles an oven mitt. If you want you can then lay your other hand over the pattern and draw a second thumb across from the first, so that the mitt can be used on either hand. (and looks more like a puppet.)
If the material has any stretch, you can trace close to your hand. If it is non-stretchy, like flannel, you might want to come out a 1/4 inch or more, to give your hand plenty of room.When I made this flannel bunny, I used the hem at the bottom of the shirt to create the opening of the mitt, so that I wouldn't have to hem or serge. Cutting with the pinking shears would also work. You won't have to do this if you use tee shirt.
If you want the puppet to be longer, trace the shape of your arm as far as you would like the puppet to reach. You might want to flare this part out a little to make it easier to get on and off. This extra material is a great place to add decorative buttons for a really silly look.

Time Saving Tips:
- If you are going to make more than one puppet; trace, cut and pin all the pieces first. Then it only takes a few minutes to sew them.
- While you have the scissors out, cut the remainder of your fabric into plain squares for plain cleaning rags.
- Anytime you are cutting fabric for a project, use small sections to make dust rags. Simply trace, cut and pin the pieces. These can be tossed in a sewing basket for later when you have more time.
Pin and Sew
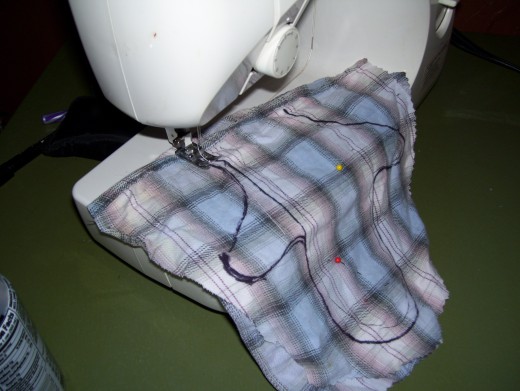
Now that you are satisfied with your bunny outline, lay it on top of another piece of material. This can match the first fabric, or be completely different. Just make sure the wrong sides are facing. Pin the two pieces together. It should only take two or three pins.
Now it is time to cut out the pieces. Leave 1/4 to 1/2 inch seam allowance. Again you can pink these edges to reduce fraying with multiple washings.
Sew:
Once your shape has been cut out, take the bunny to the sewing station to get stitches. Sew around the shape, starting at one side of the opening. Use the smallest stitch that is appropriate for the fabric choice. Be sure you don't sew your opening!
Trim up the seams.
If you are an absolute perfectionist, you will need make notches around the rounded edges taking care not to cut the stitches. When you turn the fabric, the notches will help keep the rounded shape. Since this bunny is only going to be a cleaning rag, I just cut very close to the stitches, which makes an almost perfect curved seam
Now turn your bunny inside out. Use a pencil or your marker to push the seams into place. It helps to flatten him a little bit with a warm iron if your fabric is light weight. Otherwise the weight of the seams will pull inward and he won't hold his shape very well.


Tip!
Use a washable Crayola or other magic marker to mark seams on light colored cloth. The ink washes out very easily, and it is much cheaper than fabric markers. use chalk or a colored pencil for darker colors.
Time to Decorate Your Dust Puppet!
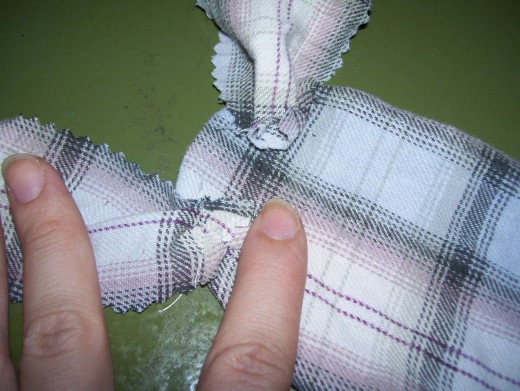
The sewing part isn't quite over, so I hope you didn't pack up the machine. Now you need to cut two strips of fabric, in your choice of colors, for the ears. You can make these as short or long as you like, but in our house we believe that sillier is better, so we used 4" by 1/2" strips for our ears.
I used the pinking shears to cut the ears. Other options would be to serge the edges ( or zig-zag stitch), sew two strips of fabric per ear and turn, or to use felt. I like the way the floppy cloth ears help with the dusting, so I went with that choice here.
Again, since these are essentially dust rags, I didn't go through the extra trouble of setting the ears inside the seam on the body. Here, I fan folded the cloth at the bottom of each strip and sewed across the "pleats". You could also mitre the corners and sew.
Before you attach the ears, decide if your puppet will be facing up or down. This one will be a facing down sort of bunny, so the ears are sewed on the part of the body that goes across the back of my hand. Place your ears wherever you like them and stitch across. I used double seams to help them stay on longer in case they are subjected to a lot of tugging.
Face:
If you are going to embroider a face on, draw your pattern first with the washable marker. This might be easier to do before you cut and sew your pieces. If you are going to draw a face on, use a permanent marker, and go wild with your silly faces. Permanent markers come in a variety of colors, so you aren't limited to just black. Add eye-shadow and lipstick to your bunny!
To avoid the ink bleeding through the fabric, insert a thin piece of cardboard between the pieces before drawing. This is the fun part of the whole process. Look online for silly faces to use as inspiration.


Enjoy Your Dust Bunny!
Now you have a completed dust bunny that is ready to help you with your housework. Simply spray with your favorite furniture polish and enjoy.
My daughter had to have a dust bunny too. If you want to make some toddler or child-sized puppets, trace around your child's hand or a mitten that fits them well. My daughter doesn't like thumb-holes so I made her one that she can slip on and off easily by herself. Remember to add a little extra room around the hand when drawing the outline.
Warning!: If you add fancy trims to your child's puppet, such as buttons or pom pom tails, be sure they are well secured and supervise your child while they play. If puppets become ragged it is better to throw them away and make new ones than risk a choking hazard.


Other Ideas
Get creative! These make wonderful silly-time puppets as well as dust-cloths. They can also be taken in the bathtub for fun water play. Made with soft enough fabric they can be used as body scrubbers even for delicate skinned babies. Just use floss for the face instead of ink.
Here are some more ideas:
- Don't limit yourself to bunnies! Make dust ducks, cats, dogs, or rag dolls!
- Add a band of elastic at the opening if your puppet falls off easily.
- Use yarn to create wild hair-styles
- For a housewarming or other occasion gift basket, make about six of these and stuff with rolled up dishtowels or dishcloths. Make bunnies from fabric that coordinates with the person's home. Add a can of furniture polish, some potholders, and a scented candle. Make a bow for the basket out of your fabric scraps.
- Make a few extra bath puppets for your babies and toddlers. Consider using washcloths or outgrown terry baby towels so the puppets will be soft.

Recipe For Dust Bunnies
If you are interested in creating a few real dust bunnies to keep your puppets company, this is an excellent starter recipe. As soon as the bunnies have matured you can divide them and give half to a friend, or simply use to get a bunny colony started in another room.
Ingredients
- 1 pea sized fuzz ball, perferably dryer lint
- 2 cups cobwebs, loosely packed
- 1 handful hairbrush cleanings
- 1/2 tsp Molasses, cold
Instructions
- Mix dry ingredients gently by rolling hair and cobwebs around fuzzball in the palm of your hand.
- Dip ball into molasses and allow to drain until just the sticky remains
- Place in a dark place, such as under the bed, or in the corner of a closet.
- Allow to ferment for ten days to a year, depending on the size bunny you want. Whenever ball has doubled in size, you may divide and move the daughter cell to another location.
- Harvest by using a dust cloth or yard rake to gently scrape bunnies from hiding places.
| Nutrition Facts | |
|---|---|
| Serving size: 1-2 | |
| Calories | 100 |
| Calories from Fat | 0 |
| % Daily Value * | |
| Fat 0 g | |
| Saturated fat 0 g | |
| Unsaturated fat 0 g | |
| Carbohydrates 0 g | |
| Fiber 100 g | 400% |
| * The Percent Daily Values are based on a 2,000 calorie diet, so your values may change depending on your calorie needs. The values here may not be 100% accurate because the recipes have not been professionally evaluated nor have they been evaluated by the U.S. FDA. | |

More Helpful Household Articles
- Eureka Powerline Vacuum Cleaner Review
The Eureka Powerline vacuum is an affordable bagless vacuum with user-friendly features and excellent cleaning power. Before you buy an expensive vacuum, consider the Eureka. - Affordable, Effective Cleaning Products Review-Five Cleaners I Couldn't Live Without
With hundreds of cleaning products to choose from, all promising the best results for your money, a trip to the store can be overwhelming. Here are few reviews of house hold cleaners that I have found to be affordable and effective. - Household Uses for Storebought and Homemade Baby Wipes
Baby wipes aren't just for diaper changing. Use these, cheap, products for a variety of frugal personal and household uses. - Make Your Own Carpet Freshener--Easy and Cheap


