How to Make a Custom Pokémon Sprite

Introduction to Pixel Art
This tutorial is going to be a bit difficult because I can't get these sprites to display at their actual resolution; hubpages is showing them significantly larger than they actually are. However, the finished pieces can be viewed on my Deviantart here: http://takocos.deviantart.com
Now, to the meat of the tutorial. If you want to get into Pixel Art, custom sprites are a great way to begin. You have an idea of what you want, and it allows you to check your work against similar art and see how you stack up. The great thing about custom sprites from popular games like Pokémon is that you can even pull a sprite from the game to use as a base using an emulator, or searching the internet because most of the sprite sheets have already been ripped by nice people who are willing to help people build resources.
Step 1
The first thing that you need to do is build a base. I like to draw my base and scan it in, but you can easily use a sprite that you've ripped from the game. You'll need to open a new document in photoshop or any graphics editing program that will allow you to use layers. The sprites that we're working with today won't be larger than 80x80, but a better size to work with would be 64 x 64, so that's the size of the new file that you need to open. Go ahead and import your base image, and get it prepared. Crop it as close as you can, and scale it down to 64x64.
Now you're going to trace over the outline of the base pixel by pixel.
Step 1

Step 2: Redefining your outline
Now, we're going to get into the meat of the customization. I decided I wanted this sprite to be female, so I adjusted the body accordingly, adding a few pixels to make it a bit curvier. In particular it only takes a slight variation to round out the buttocks or add breasts.
In addition, I put in the outlines for the clothes I want my sprite to wear.
Step 2

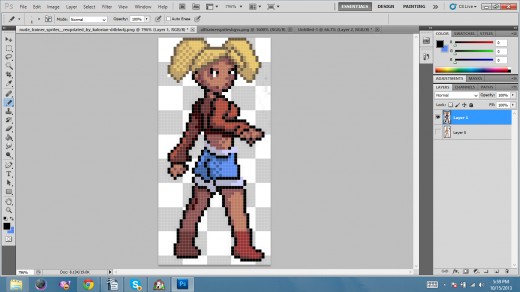
Step 3
This is the easiest step and the one that requires the least explaining. Just color in your outline. I like to color with the pencil tool, rather than the pain bucket because it gives me more control. You know how to do this without instruction; you've been coloring inside the lines since you were a toddler with a coloring book. You can take this step to experiment with your color scheme to see what you like. For this example, I decided to go with primary colors.
Something that you might notice here is that when I made the hair, I used a colored outline, rather than black. You don't have to do this, but I find that for things that need to be kind of ethereal and fluffy, a black outline is too heavy and weighs the image down visually.
Step 3
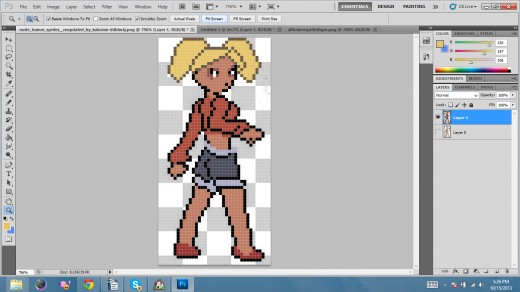
Step 4: Shading and Finishing
Now to give the sprite some depth we're going to shade it. First, pick a direction for your light source. My light is coming in from the upper left.
There are two types of shading that most pixel artists use: anti-aliasing and dithering.
I use mostly dithering because I like the retro look and feel it gives the finished piece. Dithering is like pointillism. You use just a few colors and space them out, pixel by pixel to create graduations of shade. You can see examples of this on the shorts and pigtails.
I rarely use anti-aliasing because I dislike the way it looks. It tends to blur together on me, but many modern pixel artists use it and love it. In this method you use several different shades to achieve the graduation, creating a sort of chiaroscuro effect. The closest I came to that in this example is in her back, and in her back arm especially.
You may notice that I decided to change her shoes. There's no real reason for this, I just thought that boots would look cuter than slippers.
Step 4
Final Image
When you save your image, either in .gif or .png format, make sure that you turn the anti-aliasing off, or you'll get a blurry image when you view it actual size.
Now you're finished! Enjoy!
© 2015 blargablarga


