- HubPages»
- Arts and Design»
- Crafts & Handiwork»
- Jewelry Making
Beautiful Wire Wrapped Jewellery - How to Make a Gold or Silver Wire Wrapped Cocktail Ring

To twist or not to twist
Wire wrapping, or wire jewellery as it is sometimes called, is a very old but fairly simple form of jewellery making that gained popularity during the Victorian era, and produced the ever popular and beautiful cameos. In order to pass this craft on to apprentices, patterns were copied down so the master craftsman's work could theoretically not be told apart from his students work.
I'm not sure how accurate that last bit is, but once you actually see a pattern or two, you will know how to wrap wire jewellery like a pro!
A Brief History
History books and scholars credit the Phoenicians with the invention of wire wrapped jewellery around 1250 BC. However, biblical records mention the "Breastplate of Aaron" which was set in gold filigree, a process where gold or silver was hammered into thin sheets, cut into strips and filed to make wire which was then woven.
Religious experts have dated this event close to 1446 BC, placing the roots of wire wrapping approximately 1000 years before that of the Phoenicians. Egyptian history shows that between 1900 and 1800 BC the adornments on sarcophagi underwent a change from the traditional style of layering thin sheets of gold, to one that incorporated woven strands of silver and gold. This coincides with the Hebrew's migration to Egypt to avoid the famine in Israel, suggesting that they brought this art form with them.
In the late 1800's , Bohemian necklaces of wire strung glass and stone chips gained popularity with the European aristocracy; a love affair that would last approximately 50 years. These became status symbols and opened the door for craftsmen to produce imitations, much the way it is today.

Let's get down to business
Something to keep in mind when making any kind of twisted or unusual wire wrapped jewellery are the costs involved. Making silver wire jewellery is generally less expensive than creating gold wire jewellery, simply because silver wire is easier to find, and obviously, less costly than gold. However, you don't want to be 'practicing' with precious metal wire, as mistakes deplete your stock and your wallet won't like making the replacements!
Once you feel confident enough to try a more expensive wire, I would suggest you start with silver, then move on to gold.
This is one of the first patterns I learned when starting out, and one of the most popular. When I listed them for sale the first time, I sold out and had to make more. I will caution you however, if you are making these for sale, you will need to have a good selection of sizes.
Tools
Here is a list of tools you should have before starting the project.
- flat nose pliers
- chain nose pliers
- pin vise
- wire cutter or flush cutter
- ring mandrel
- marking pen
- ruler
Cut one 8 inch length of 21
gauge rolled gold round or square half hard wire. Dead soft is not advisable to use for making a ring as it can lose its shape easily.
Take your marking
pen and mark the middle of the wire.
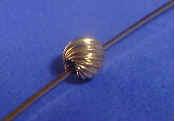
String a gold-filled, or gemstone bead on the wire and place it in the middle of the wire.

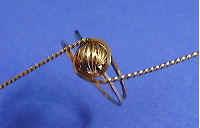
Hold the wire on a ring
mandrel with the bead directly over one size smaller than the ring size you
are making. If you are making a size 7 ring, then place the bead right on size 6.
Then bend both ends of the wire downward
(note: check your ring size first, before committing to a size on the mandrell - once the ring is finished it will stretch somewhat, but you don't want it to be uncomfortable to wear)
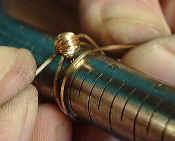
Bend each wire around the mandrel on opposite sides of the bead, as shown in the picture on the right.
Gently pull the wire to tighten the ring shank.
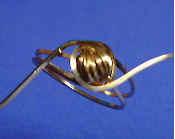
Bend each wire in a clockwise direction halfway around the bead. At this point you can remove the ring from the
mandrel.
If needed, you can shape the ring with your hands and press the two wires of the ring shank together using your chain nose
pliers.
Clip each of the extending wires about 2 inches from the ring.
With a pin
vise,
twist each of these wires.
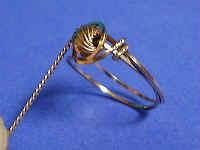
If you are using round wire for the ring, skip this step. You will not be able to twist it, due to the way it is manufactured. You can only twist square wire.
As mentioned above, if you are using round wire, you will be not able to complete this step.
This is how your ring should look at this stage. When twisting the wire, be careful not to over twist as this will cause it to break.
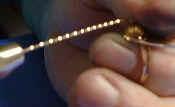
Wrap one of the twisted wires around the ring shank starting next to the bead and wrapping outwards. Make two or three complete
wraps around the shank and clip off the excess wire on the inside of the ring shank. Using your chain nose
pliers press the cut edge of the wire down against the shank. File
smooth if necessary.
Repeat the same procedure on the other side of the bead.

Mark the center of the 15
inch length of 21 gauge rolled gold half round wire. Using your flat nose
pliers make a 180 degree bend on the center of the wire.
Place the hook of the bend on the ring shank and began wrapping each wire in the opposite direction towards the bead until you reach the wrap wires.
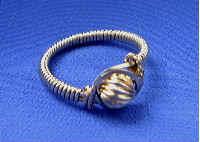
Snip off excess wire and secure the end to the shank. Remember to clip off
the wires on the inside of the ring shank. Make sure to either file the edges smooth, or use your flat nosed pliers to crimp the ends well so they don't catch when the ring is worn.
Your finished cocktail ring!


