ArtsAutosBooksBusinessEducationEntertainmentFamilyFashionFoodGamesGenderHealthHolidaysHomeHubPagesPersonal FinancePetsPoliticsReligionSportsTechnologyTravel

How to Make a Simple Beaded Wire Bangle. Free Wire Work Tutorial for Beginners

Updated on January 19, 2015
Learn how to make a beaded wire wrap bangle with clasp
Learn how to make a beaded wire wrap bangle with clasp | Source

There is something very rewarding about making your own jewellery from scratch, and being able to say 'I made that'. Handmade jewellery makes great gifts for family and friends. It is also a fun way to keep the children occupied during the school holidays.

This easy yet versatile pattern will show you the basics of how to make your own bangles out of wire and beads. I will also show you how to make a decorative clasp to keep your bangle in place
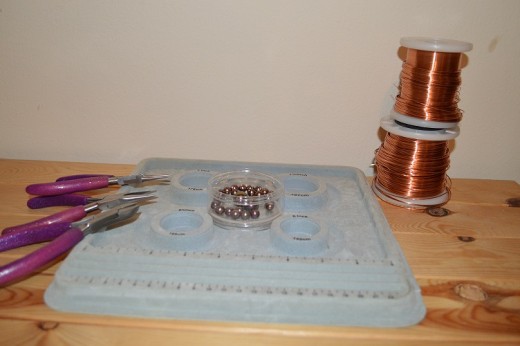
You will need:

1mm gauge wire (18 gauge)

0.6mm gauge wire (22 gauge)

A selection of beads

Wire snippers, Flat nose Pliers and Round Nose Pliers

Optional: A bracelet making board for measuring out and planning your bracelet/bangle

Popular Wire Gauge Conversion Chart

UK
US


0.25mm
30G
 
0.45mm
26G
 
0.6mm
22G
 
1.00mm
18G
 

Thicker wire is best for structure, while thinner wire adds detail or is used for attaching beads with narrow drill holes

Planning the design on a bracelet board

Making the bangle

1. Measure your wrist using a soft or fabric tape measure.

Layout your beads on a bracelet making board (or alternatively lay a tape measure out flat and place your beads next to that), until you achieve a design you are happy with.

Here I have used 8mm round beads and a larger 20mm focal round bead in the middle of the design. I have made my intended design 7" long (including small gaps between the beads). This length is about 1/2" longer than I need, as the design will shrink a little once I start wrapping the beads onto the frame.

Cut a length of the thicker gauge wire that is about 4" longer than your wrist size. So here I have cut a 11" length. This will make the frame.

Making a loop in the wire using the round nose pliers

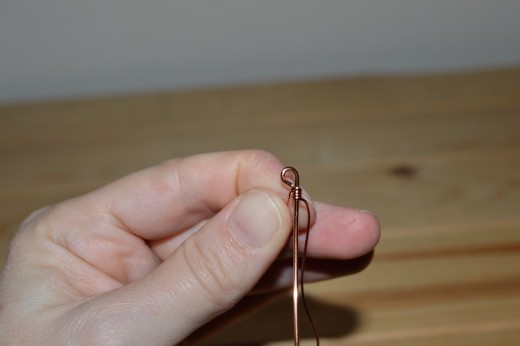
2. Using the round nose pliers, wrap one end of the wire around one prong of the pliers to make a loop about 1" from the end.

Holding the loop with the flat nose pliers

3. Now hold the loop with the flat nose pliers, and wrap the short excess around the base of the loop.

Wrapping the excess around the base of the loop
Trimming the excess
Trimming the excess

4. Once you have wrapped the excess around the base of the loop a few times it will become too difficult to wrap it anymore, leaving you with a small amount sticking out. Trim this down using the wire snippers.

Smoothing the jagged end

5. You will notice that when you trim the wire, it leaves a jagged end. Using your flat nose pliers, use a half pinching/half rotating in the direction that the wire is wrapped motion. Essentially you are trying to flatten the end down so that it lies neatly against the wrap you made under the loop, so that the jagged end is made safe. Run your fingers over it, if you can still feel a sharp/jagged part then you need to smooth it out some more. Remember this will be against your skin, and you won't want to be irritated or cut by a sharp piece of wire.

Tip - you might find it easier to 'tuck' the end under the wrap you made using the flat nose pliers. Do whichever you find easiest.

Holding the 0.6mm gauge wire in position before securing it into place

6. Cut a 1m length of the thinner gauge wire. (Be careful of your eyes when using a long length of wire like this)

Hold the wire in position across your frame, just under the loop as shown in the picture. Leave about 1" - 2 " excess (you can just see it under my thumb)

Securing the thinner wire in place by coiling

7. Now start to wrap the longer end of the wire around your frame, just under the loop, making a small coil as shown. Ignore the excess for now, we will tidy that up later. (Just be careful that it doesn't scratch you while you work)

Threading the beads onto the frame

8. Now thread the first bead from your design onto the thin wire, thread it all the way down to the frame, and hold it in position. Pull the wire so that it comes out of the top of the bead, and down the back.

Securing the bead in place

9. Now wrap the long length of wire around the frame making a very neat coil. Try to make sure that each time you wrap around it lies next to, rather than on, the previous wrap. I coiled the wire around 7 times. You can make it more or less if your beads are bigger or smaller than mine. You want the beads to sit in place with even spaces between them, so however many times you coil the wire around at this point, you need to repeat for each subsequent bead you attach to the frame. On the last coil, finish with the wire pointing up, ready to thread on the next bead.

Attaching more beads to the bangle

10. Thread on the next bead and repeat the last step.

Keep threading and wrapping until you have added all the beads from your design

Closing gaps in the coil

Tip

If small gaps begin to appear between the coils, gently pinch them together using the flat nose pliers. This will help to keep your coils neat and professional.

Also, remember once you have threaded on a bead, to always take the wire down behind the bead and frame. This will mean that the little bit of wire that shows will always be on the same side, and will become a feature of the design.

This is the halfway point on my design. See how I have attached the larger bead in exactly the same way.
Measuring the finished frame, as you can see the design has shrunk to just under 6" - once I had a loop at the opposite end the frame will measure 6" exactly, adding a clasp will add a further 1/2"
Adding a loop to the other end

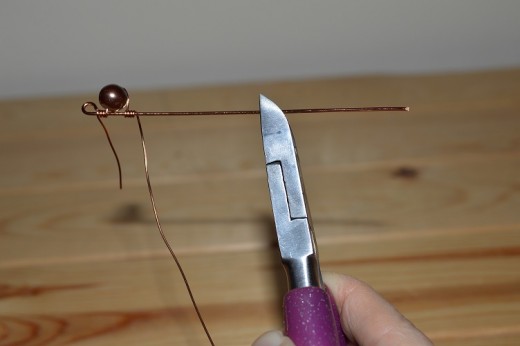
11. Using the round nose pliers, make a loop close to the last coil.

Trim the frame wire leaving approx 1" excess

Repeat steps 3, 4 and 5 wrapping the excess around the base of the loop, trimming it and smoothing it

Tidying up the thinner wire

12. Now you need to tidy up the thinner wire that you used to attach the beads.

Trim the wire so that it is approximately the same length as the excess you have left at the beginning end of the frame.

Now wrap the excess wire around the base of the loop, trim and smooth just like with the thicker wire. Repeat for the other end.

The finished frame, now put this to one side while you make the clasp.

Making the clasp

1. You should have enough of the thicker wire left over from making the frame to make the clasp. About 3" is enough

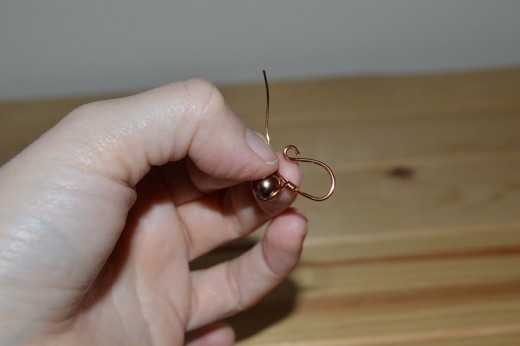
Using the round nose pliers, make a loop in one end of the wire - make it right on the end this time with no excess. Just place the tip of the wire between the prongs of the pliers and roll the pliers down until it produces a loop.

Making a loop in the clasp.

2. Now attach a small length (approx 6") of the thinner gauge wire to the clasp, in exactly the same way as you did in steps 6 and 7 above.

3. Leave a small amount of excess, and coil the end neatly just below the loop you just made.

Add a bead, in the same way as you added them to the frame, and coil the wire some more to secure it in place

Attaching a bead to the clasp

4. If you allowed extra wire to make the clasp, now is the time to trim it. Trim it 2 inches from the end of the coil

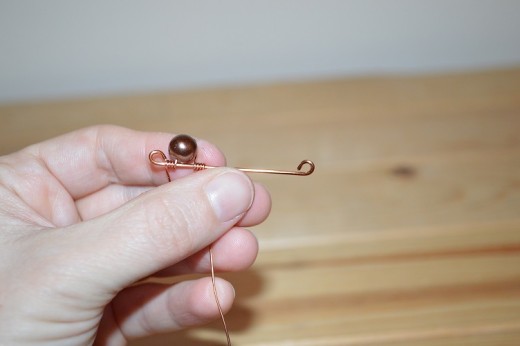
5. Make a loop in the opposite end, repeating step 1, and ensuring the loop rolls up to face the same direction as the first loop.

Then curl the wire around the handle of one of your pliers to make the clasp shape - see photo below.

Curl from the point after the bead, so that the two loops do not meet, but leave an opening instead

Curling the wire around the handle of the pliers to make a clasp shape

6. Tidy up the end of the thinner wire in the same way as you did on the frame (see step 12 above)

Leave the beginning end of the wire for now


Open the first loop, using one set of pliers to hold the clasp still, and the others to twist the loop towards you. Please see video link below for instructions on how to correctly open a loop

How to open a loop or jump ring

Attaching the clasp to the bangle

7. Thread the open loop of the clasp through one loop of the bangle frame, and close the loop

Now you can tidy up that last bit of excess wire by wrapping it around the loop you just closed, trimming it and smoothing it with the flat nose pliers

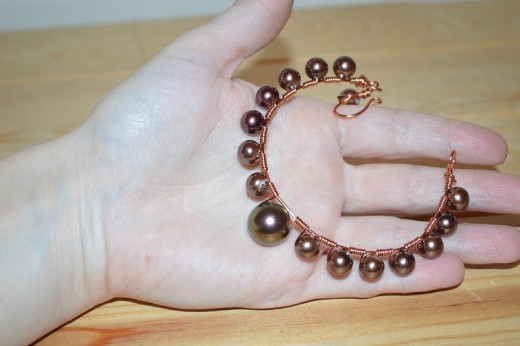
8. Curve the bangle frame around your wrist, or use a jar or can, and the bangle is complete!

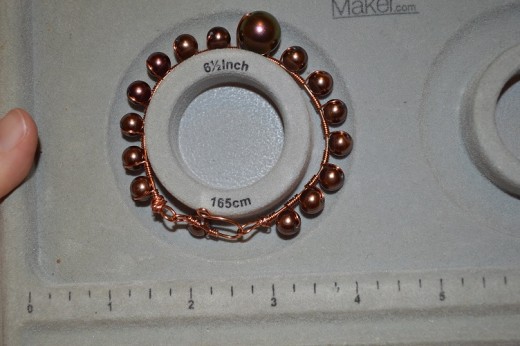
If you are making the bangle as a gift, it is always worthwhile double checking the finished length on your bracelet board

Remember you can change the look of this bracelet by using different beads, or different colour wire. I used little cuboid/rectangular beads in this alternative design, and they naturally sat diagonally over the frame which looked very pretty
working

This website uses cookies

As a user in the EEA, your approval is needed on a few things. To provide a better website experience, hubpages.com uses cookies (and other similar technologies) and may collect, process, and share personal data. Please choose which areas of our service you consent to our doing so.

For more information on managing or withdrawing consents and how we handle data, visit our Privacy Policy at: https://corp.maven.io/privacy-policy

Show Details
Necessary
HubPages Device IDThis is used to identify particular browsers or devices when the access the service, and is used for security reasons.
LoginThis is necessary to sign in to the HubPages Service.
Google RecaptchaThis is used to prevent bots and spam. (Privacy Policy)
AkismetThis is used to detect comment spam. (Privacy Policy)
HubPages Google AnalyticsThis is used to provide data on traffic to our website, all personally identifyable data is anonymized. (Privacy Policy)
HubPages Traffic PixelThis is used to collect data on traffic to articles and other pages on our site. Unless you are signed in to a HubPages account, all personally identifiable information is anonymized.
Amazon Web ServicesThis is a cloud services platform that we used to host our service. (Privacy Policy)
CloudflareThis is a cloud CDN service that we use to efficiently deliver files required for our service to operate such as javascript, cascading style sheets, images, and videos. (Privacy Policy)
Google Hosted LibrariesJavascript software libraries such as jQuery are loaded at endpoints on the googleapis.com or gstatic.com domains, for performance and efficiency reasons. (Privacy Policy)
Features
Google Custom SearchThis is feature allows you to search the site. (Privacy Policy)
Google MapsSome articles have Google Maps embedded in them. (Privacy Policy)
Google ChartsThis is used to display charts and graphs on articles and the author center. (Privacy Policy)
Google AdSense Host APIThis service allows you to sign up for or associate a Google AdSense account with HubPages, so that you can earn money from ads on your articles. No data is shared unless you engage with this feature. (Privacy Policy)
Google YouTubeSome articles have YouTube videos embedded in them. (Privacy Policy)
VimeoSome articles have Vimeo videos embedded in them. (Privacy Policy)
PaypalThis is used for a registered author who enrolls in the HubPages Earnings program and requests to be paid via PayPal. No data is shared with Paypal unless you engage with this feature. (Privacy Policy)
Facebook LoginYou can use this to streamline signing up for, or signing in to your Hubpages account. No data is shared with Facebook unless you engage with this feature. (Privacy Policy)
MavenThis supports the Maven widget and search functionality. (Privacy Policy)
Marketing
Google AdSenseThis is an ad network. (Privacy Policy)
Google DoubleClickGoogle provides ad serving technology and runs an ad network. (Privacy Policy)
Index ExchangeThis is an ad network. (Privacy Policy)
SovrnThis is an ad network. (Privacy Policy)
Facebook AdsThis is an ad network. (Privacy Policy)
Amazon Unified Ad MarketplaceThis is an ad network. (Privacy Policy)
AppNexusThis is an ad network. (Privacy Policy)
OpenxThis is an ad network. (Privacy Policy)
Rubicon ProjectThis is an ad network. (Privacy Policy)
TripleLiftThis is an ad network. (Privacy Policy)
Say MediaWe partner with Say Media to deliver ad campaigns on our sites. (Privacy Policy)
Remarketing PixelsWe may use remarketing pixels from advertising networks such as Google AdWords, Bing Ads, and Facebook in order to advertise the HubPages Service to people that have visited our sites.
Conversion Tracking PixelsWe may use conversion tracking pixels from advertising networks such as Google AdWords, Bing Ads, and Facebook in order to identify when an advertisement has successfully resulted in the desired action, such as signing up for the HubPages Service or publishing an article on the HubPages Service.
Statistics
Author Google AnalyticsThis is used to provide traffic data and reports to the authors of articles on the HubPages Service. (Privacy Policy)
ComscoreComScore is a media measurement and analytics company providing marketing data and analytics to enterprises, media and advertising agencies, and publishers. Non-consent will result in ComScore only processing obfuscated personal data. (Privacy Policy)
Amazon Tracking PixelSome articles display amazon products as part of the Amazon Affiliate program, this pixel provides traffic statistics for those products (Privacy Policy)
ClickscoThis is a data management platform studying reader behavior (Privacy Policy)