How to Make a Wooden Stable and Nativity Figures

Nativity Stable
Scope of Project
©joaniebaby 11-30-2012
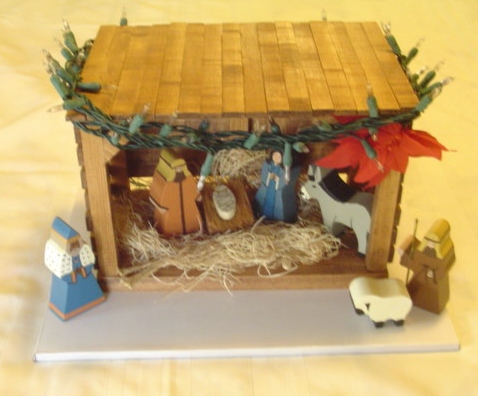
This wooden nativity set was made by me some ten years ago. The project was interesting and took quite some time, but was fairly simple in design. I did have a pattern but can not find it now so will try to explain the different steps I used to complete it.
There is a wooden stable with slats for sides and top. The figurines were made from 1½" wood and then sanded, painted and finished with shellac or other coating.


Materials Needed
For this nativity set you will need some ¼" slats, some 1" wood and some 1½" wood, along with sandpaper to smooth the wood. Then you will also need different colors of paint for the different figurines, shellac to finish the figurines and stain for the wood of the stable. One more item would be straw (fake or real) for the bottom of the stable and for the crib/manger for the baby Jesus. To make the staff for the shepherd, I just used a small piece of a wire coat hanger and bent it to shape.
The ¼" slats are for the sides, back and top of the stable. The 1" wood is used for the bottom of the stable and for the posts in the corners and center back support of the stable. The 1½" wood is used to make the different figurines. You could probably use the 1" wood for these also if you prefer. That way you would only need two different sizes of wood. I just happened to have all of this material on hand in my workshop so used what I had.
For the bottom of the stable: one 7x12x1" piece of wood
For the sides of the stable: fourteen 6¼x¼" slats
For the sides of the stable-at the top: two 5x¼" slats
For the back of the stable: nine 11x¼" slats
For the top of the stable: sixteen 9x¼" slats
For the corners of the stable: four 1x1x7" posts
For the top at the back of the stable: two 1x1x5½" support beams
For the middle of the back of the stable: one 1x7½" post
For the top at the front of the stable: one 1x1x12¼" support beam
For the angle beam at the corners of the front of the stable: two 1x1x2" pieces, mitred to fit
Approximately 3 ft. of 1½" or 1" wood for the figurines (use whatever size you prefer)
As you can see from the pictures, I wrapped a set of miniature lights around the top of the stable to light at Christmas, put a poinsettia on the corner and I add some greenery on the top.

Constructing the Stable
Once you have your materials on hand, the next step is to cut out the pieces and assemble them. After you cut the pieces, sand them smooth and stain. Attach the support posts in the four corners, to the top of the front, and the center of the back with glue and small nails to the bottom piece of the stable. Or whatever method you prefer. Next glue the slats to the sides, top and back of the stable. Mitre the corner support beams and glue/nail them in place.
Once you have it all assembled, you can finish the wood with a lacquer if you wish. I left mine just sanded and stained to give it a more primitive look.

Finishing the Figurines
Once you have the figurines cut out, the hardest part is to sand them smooth, paint and shellac or lacquer them. Since I am not very artistic, mine do not look the best; but, as I said, it is "primitive."


Related

How to Make a Reed Curtain, Step-by-Step Instructions

How I Turned “Alice’s Adventures in Wonderland" Into a Wooden Engraved Book

Woodworking Made Simple with Decking Offcuts

How to Restore a Cane Walking Stick and Make a New Handle

Add-on Pocket to Bespoke Wooden Remote Control Holder to Hold More Remotes