How to Keep Facial Features Straight When Painting Portraits.
Portrait Painting
While surfing the web, I have come across many drawings and paintings that would be great except for the fact that the facial features are not aligned correctly. Getting facial features aligned correctly can be a tricky process, but if you want to paint great portraits this is a must. I am going to show how to keep facial features aligned correctly while painting a portrait. I used Corel Painter 13 to paint this portrait because it is like using natural mediums. I painted it using my Samsung Galaxy Note 10.1 tablet hooked up to my big PC via the Splashtop Remote HD app. My model was made using Poser Debut.
Poser software are programs that have digital models that you can arrange in any pose. You can also add hair and a variety of clothes. There 3D environments you can put your model in and there are also different creatures to pose.
There are several different versions of Poser software. My version, Poser Debut, is the simple version made mainly for artists to use for models. It has several characters, creatures, and 3D environments. You can also create animations. The bigger versions have more characters and environments and more effects. The latest versions of these are Poser 9 and Poser 10.
Poser Debut
Painter 13
Splashtop Remote HD App.
This app allows me to use my Samsung Galaxy Note 10.1 tablet to make paintings in large painting programs such as Corel Painter 13, ArtRage, SketchBook Pro 6, and Twisted Brush. With this app you can hook up to your large PC and use most of your programs and you have lots of storage because you are using the PC's storage. I like to paint this way because I can paint directly on the screen instead of looking up at it like I have to do with my regular graphics tablet.
Step 1
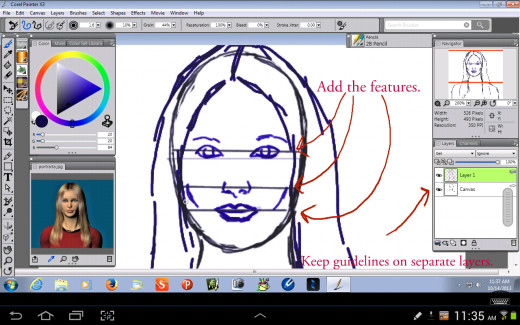
Step 1: Proportions of the Face
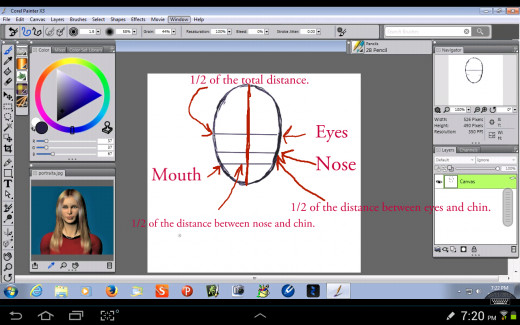
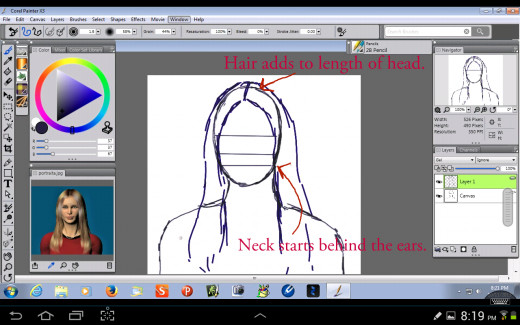
I started this portrait by drawing an oval for the head. The human head is roughly an oval shape with the eyes located at the halfway point between the top of the head and the chin. The nose is located halfway between the eyes and the chin and the mouth is situated between the nose and chin. On a separate layer, I added the outline of the hair after I drew the oval for the face because hair makes the head bigger and can throw off your proportions. I then drew the neck and shoulders. One thing to remember when drawing the neck is that it starts behind the ears. Too many times people get the necks in their drawings too thin because they don't know where the neck starts.
After I finished with the outline, I drew in the features of the face on the guidelines. I kept these guidelines on a separate layer, so that I wouldn't lose the original outlines and proportions.
My Tools
I used my Samsung Galaxy Note 8 and 2012 10.1 tablets to create this painting.
Step 2
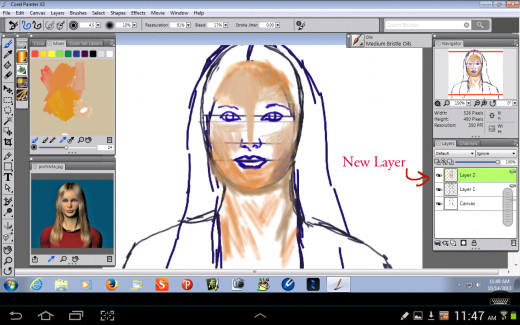
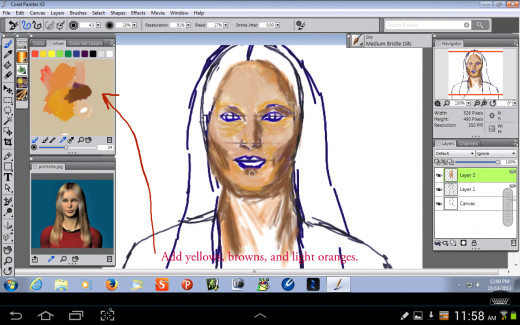
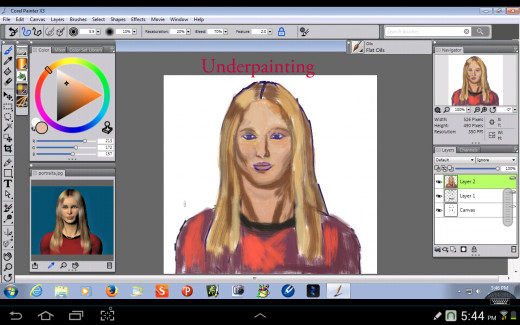
Underpainting the Portrait.
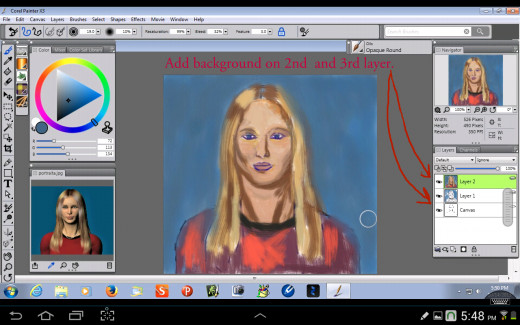
I started a new layer for the underpainting and kept the guide layers separate. I learned the hard way to do this because you can lose your sense of proportion if you paint over your original sketch.
I used the mixer palette to mix pale yellows, light oranges, and light browns to paint the skin. Mixing a light yellow green and a red with white added makes a good flesh color. You can add yellows and browns to lighten or darken the flesh. For the shadow colors you can use browns, purple, blues, and greens. I used the Medium Bristle Oils brush for the majority of the underpainting.
I also added the background on the 2nd and 3rd layers. I painted on the 2nd layer because I didn't want to get the background color on the figure so I painted behind her. This is an advantage of digital painting, but when traditionally painting I just paint the background first before the figure.
Step 3
Making Guidelines.
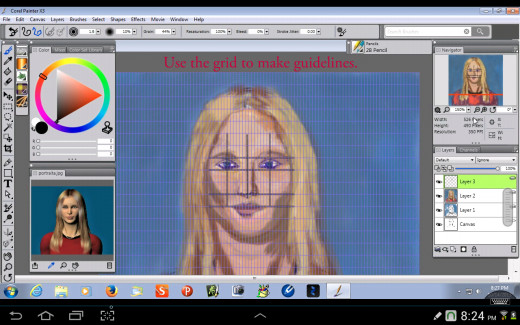
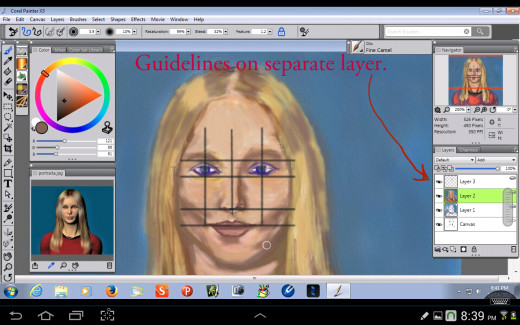
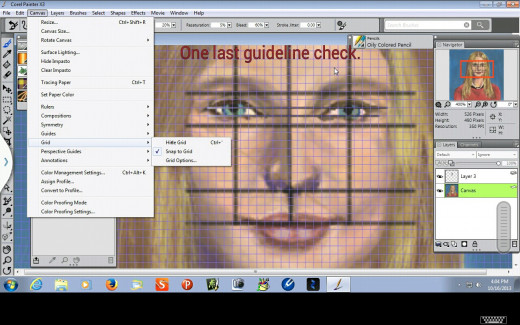
In this step, I used the grid function in Painter 13. This function creates a grid that overlays your painting and you can customize the lines on the grid. Using this grid, I created guidelines for the facial features on my portrait. This helped keep the facial features straight. For traditional painting, you can create a guide on a sheet of plastic and overlay it on your canvas. I use a t -square to check if the features are straight when I am painting on canvas. I made these guidelines on a separate layer so that I can turn them on and off. If you will notice, I drew the lines from the corner of the mouth through the pupils of the eyes. This is how the eyes and mouth are proportioned in relation to each other on the face. The other guidelines are for keeping the eyes, nose, and mouth level.
Step 4
Midway point.
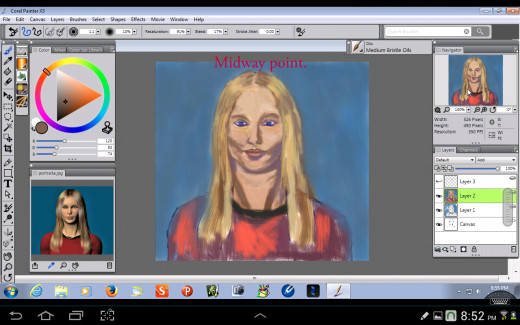
At this point, the portrait is about half done. I've underpainted everything and the shadows are roughed in. I alternated between using the Medium Bristle Oils and the Fine Camel Brush. I also used the Oily Blender to blend the strokes. Now, this is the point in the painting where things don't look so pretty. DON'T PANIC! This is the natural progression of painting. Something that the layman may not understand. They may say that the portrait doesn't look right at all, but they don't understand the process. At this point you have not made all the refinements or added the final details which make a polished portrait. This is why the late great portrait painter, Helen Van Wyk, always said to keep people from looking at your painting until you are almost finished.
Helen Van Wyk

Another Great Teacher
Step 5
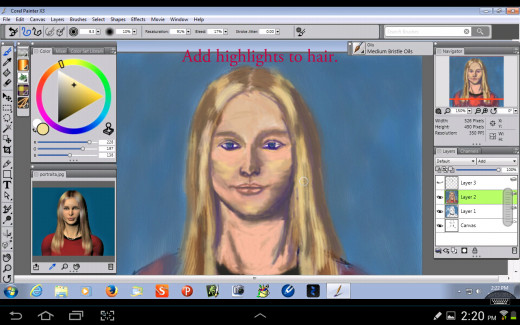
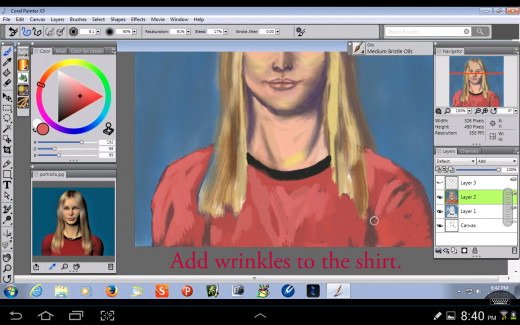
Refining the features and working on the hair.
So in these steps, I blended the skin colors more, added some highlights, and smoothed out the shadows. I refined the eyes, mouth, and nose and started adding highlights to the hair. I used large masses of color to underpaint the hair and I added the individual strands later. I also added highlights and wrinkles to her shirt. One thing that Poser isn't too good on is wrinkles, so I would suggest looking at other photo references to see how clothing lays on the human form. However, for this portrait the focus is on the face and not the clothes, so I didn't make the shirt too detailed.
A Good Foundation

Step 6
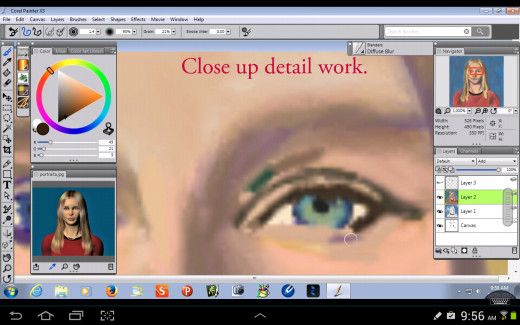
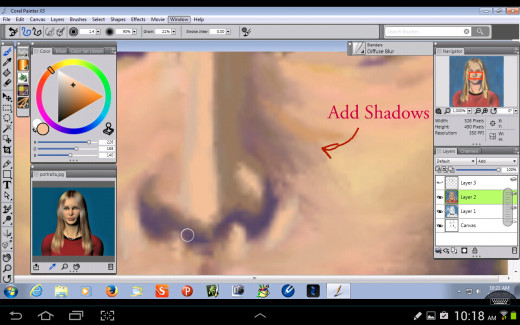
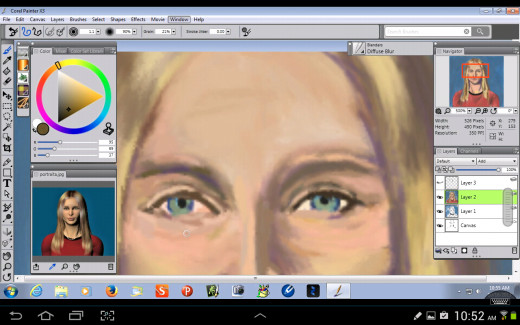
Detail Work
This is the point where the detail work begins. I zoomed in on the eyes and added color to the irises. I added blues and greens. Most eyes are kind of a mixture of different colors and not just a flat color. I added highlights to the eyelids, worked on the skin color above the eyebrows, added shadows along the nose, also added a darker brown for the eyelashes, and worked on the highlights on the cheekbones. At this point in your portrait you just have to keep working on the forms of the features by adding shadows and highlights.
Step 8
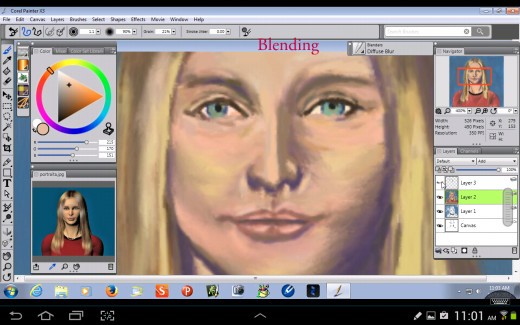
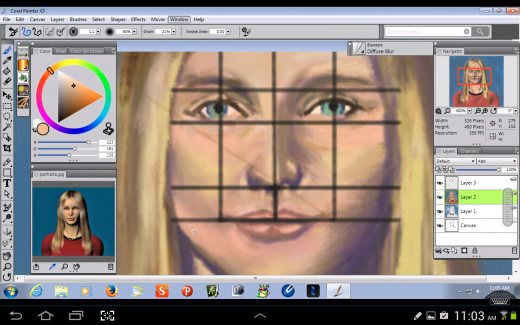
More Blending.
More blending was needed on the face, so I used the Diffuse Blur brush to further blend the skin tones. The Diffuse Blur brush seems to act like a pastel stomp and I use it a lot. Then I used my grid to check and make sure the features were still straight. At this point the painting is getting close to finished.
Step 9
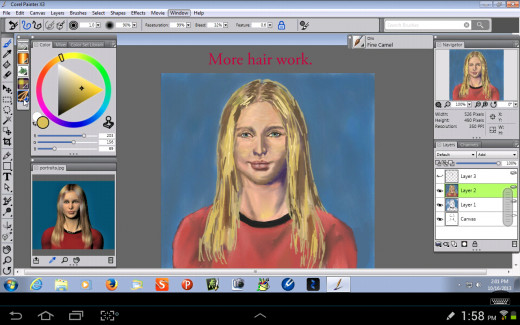
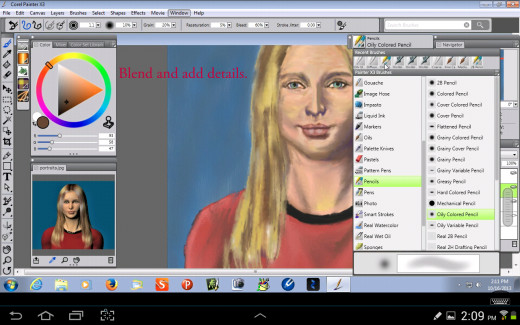
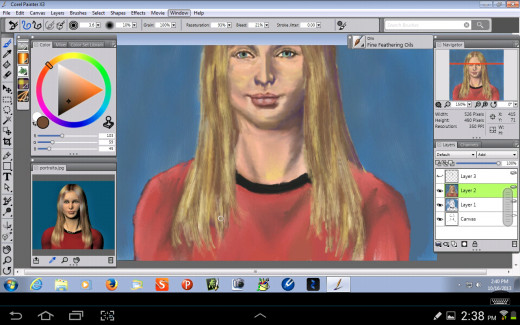
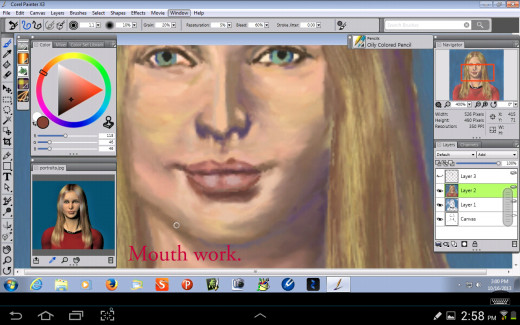
Finishing Touches on the Hair and Face.
For the finishing touches, I used the Oil Pencil to draw individual strands of hair and blended them with the Diffuse Blur and Oily Blender brush. Then to finish off the hair, I used the Fine Feathering Oils brush. This brush gives a marvelous dry brush effect. When painting on canvas I use a dry brush stroke to paint hair and I use a script brush to make individual strands. I also worked on the shadows and highlights of the neck and adjusted the shape of the mouth. I also added the pearl necklace.
Step 10
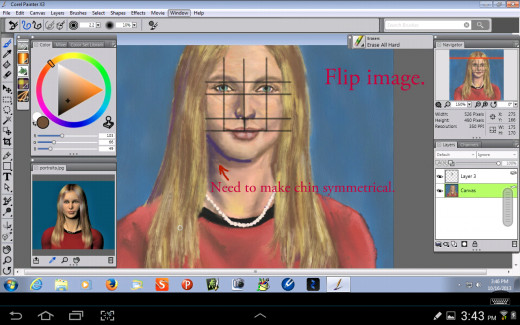
Flip the Painting.
Now we come to the moment of truth. The painting looks pretty good, but it needs one final check. I flipped the image horizontally to see if the face is symmetrical. Using the guidelines, I saw that the eyes and nose were still all aligned. I saw that the chin was not symmetrical and I used a dark purple shadow color to adjust it. I also adjusted the mouth to be more symmetrical. Of course, when painting on a real canvas you can't flip the image, but you can look at it in the mirror. This will show the areas that need to be fixed just as well as the digital method.
Step 11
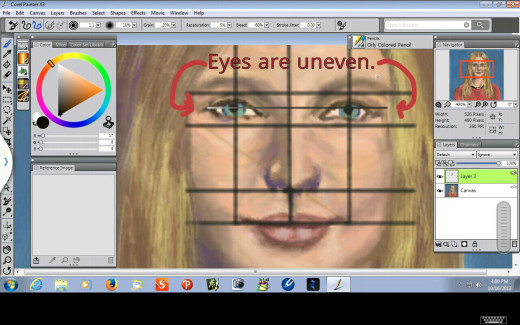
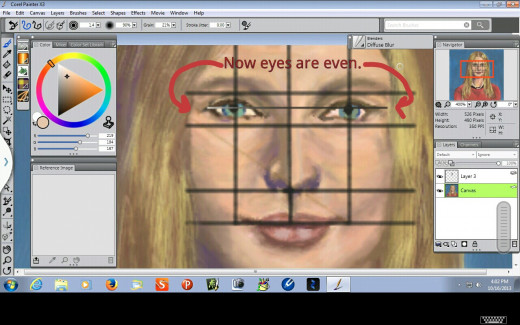
Final check on the eyes.
The eyes were looking pretty good at this point and were even with each other on the top and bottom, but there was one more check to perform. I turned the grid on again and on my guidelines layer, I drew a line from the corner of the left eye to the corner of the right eye. When I did this, I saw that the eyes were not quite symmetrical that way, so I painted out the corner of the right eye and painted it in under the guideline. This made the eyes even. On a traditional canvas, I use a t-square to measure this.
Step 12
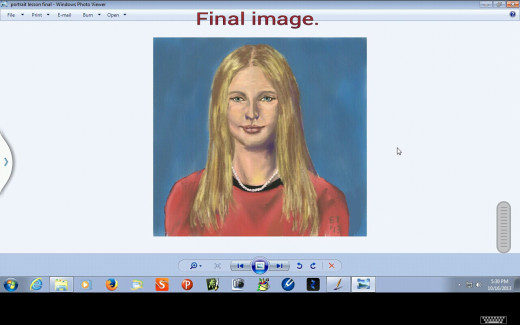
The final image.
I flipped the painting back to its original position and did a final guidelines check. I did some final touch ups on the neck and called it good. As you can see it takes some time to paint a good portrait and a lot of double checking. In real life people's faces are not always perfectly symmetrical, but they are close enough to symmetrical that if you don't paint the portrait features evenly people will notice.
Final Thoughts
Portrait painting can be very frustrating and rewarding. It does take some time and effort, but when you finally capture the essence of your subject, it is very satisfying. This lesson also showed that you can take a Poser Debut model and use it to make a nice painting that looks like a real person.
The point of this lesson was to show how to paint a portrait from start to finish, but if you don't want to do that Poser 9 and 10 have ready made models that are more complex than Poser Debut. You can add skin layers and customize the expressions. A lot of people make animations with these characters. You can also render your model and export it as a jpeg file into Painter 13 or another painting program and paint on top of your rendering. A lot of digital artists do this as a shortcut when they want a painterly look to their characters.


