How to Paint wet into wet

There are several proponents of wet into wet oil painting, such as Bob Ross, Frank Clarke and Wilson Bickford. The technique was developed out of the frustration with traditional oil painting, where the artist has to wait weeks for oil paints to dry in between layers of paint. This technique allows the artist to paint into wet oil paint.
Recently a friend asked me to paint a picture of her house and land, so I thought I'd give this technique a whirl. This is my first attempt, and I thought I'd share some of the techniques here.
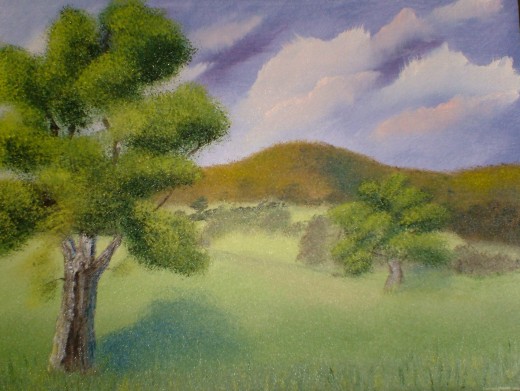
Almost Finished Wet into Wet Oil Painting
The first stage of wet into wet painting
The first part of the process is to cover the whole canvas, or board with a thin layer of white paint. The wet into wet artists often have their own preferred type of white paint, but I used a layer of zinc white, which is a translucent white paint. squeeze out a good amount of paint and load up a 2" blending paintbrush. Use long vertical and horizontal strokes until the canvas is evenly covered.
You have the right amount of paint when a finger dabbed into the surface has a 'fingerprint' of white paint on it. If the paint fills the ridges of your fingerprint, there is too much paint and you need to scrape it off the canvas using a palette knife.
Wet Into Wet Oil Painting
How to Paint Sky
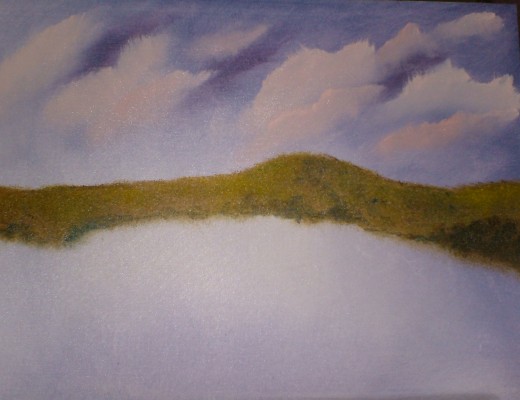
First of all, decide where your light source is coming from, the centre, left or right of the painting. My light source is coming from the left of the painting, so that portion of the canvas will be lighter.
For the sky, use Pthalo Blue with alizarin crimson, and mix them well with a palette knife. Using a 1" foliage brush, tap the bristles into the paint, so that you have an even amount of colour on the brush, then apply the paint to the canvas with short criss-crossing brush strokes, beginning at the darker side of your work, working toward the lighter side.
The strokes should be firmer on the darker side and lighter toward the light source. It's important that the application of paint is uneven as the areas with 'gaps' or less blue paint will look like clouds.
I blended my blue paint all the way down the canvas, as I intended the shadows on my work to be blue, which is why the hills of the background look as if they are at the water's edge.
Wet Into Wet Oil Painting

How To Paint Clouds
Mix up some titanium white with just a speck of cadmium red. Use a fan brush well loaded with paint. Touch just the corner of the fan brush to the canvas and make circular movements to create a cloud shape. Then use a clean blending brush and blend the BOTTOM of the cloud into the sky until it almost disappears. Once this is done use a clean blending brush again and very lightly stroke the tops of the clouds upwards in a few places.
Add clouds in layers, adding a touch more cadmium red to your pool of cloud mix each time, to create depth of colours, or why not experiment with adding a little yellow, or a tiny amount of burnt sienna.
Continue until you are satisfied with your sky.
Background Hills
Mix titanium white with a speck of van dyck brown and a speck of sap green, then tap a dry foliage brush into the paint and dab the brush along the hill line. Creat shadows in the hills by dabbing the brush into ultramarine blue and tapping the brush on the areas of hill away from your light source and at the base of the hills. Create highlights by using a dry foliage brush again and dabbing it into a mix of cadmium yellow with a little titanium white and applying it to aeas that would be in the sunlight. Very few highlights are needed, so don't go mad.
How To Paint Meadow
There are two elements to painting the grass in this scene. Firstly, the meadow will appear lighter towards the back of the picture, and secondly, there will be more detail in the foreground of the picture.
Start with titanium white with a speck of sap green and a speck of cadmium yellow. Dab a clean foliage brush into this and stipple the paint from the background down an inch or so.
Add a little more sap green to your pool of meadow paint and stipple this below the stripe of meadow already painted, blending the edges well.
Add still more sap green and maybe a touch of ultramarine blue and repeat again. Continue in this way until the meadow is completely covered. What you should have is a nice even gradient of colour from light in the background to darker in the foreground.
At this stage, you could take a thin liner brush (a script liner is ideal as it has nice long bristles), mix a shade of green slightly lighter than your basic meadow grass, thin the paint well with thinners and paint vertical strokes at the foreground of your painting to suggest blades of grass. Do this with a few colours for texture.
However, I wished to paint the oak trees first in my work, as I wanted the bases of them to blend in.
Wet Into Wet Oil Painting

How to Paint Deciduous Trees
Mix sap green with a small amount of ultramarine blue and a speck of van dyck brown, to create a nice dark green. Use a clean foliage brush, dab it into the paint, then stipple the basic shape of the tree, leaving gaps here and there, so that you can see the sky through. Try to make the stippling a little darker on the side away from your light source.
Next, use a 1/2" flat brush loaded wil van dyck brown and thinned so that it paints easily, draw in the trunk of the tree, and a few branches. There don't need to be many branches, just a few, and they don't need to be solid lines all the way down to the trunk - break them up a bit.
So, now you have a smooth brown tree trunk and it needs some bark. Most wet into wet painters advocate using a palette knife to add texture. To do this, mix up titanium white with a speck of van dyck brown. Pull the knife through the paint so that the paint is spread out. Clean the knife and pull it gently through a small amount of paint, leaving the merest ribbon of colour on the knife. Use this to make vertical lines suggesting bark on the tree trunk on the side where your light source is.
Mix ultramarine blue with titanium white and using the same palette knife technique, make vertical lines on the dark side of the tree trunk, to suggest texture and reflected light. If you wish, you can then mix a little titanium white with a speck of cadmium yellow and just put one or two lines on the trunk to suggest bright highlights.
I did use the palette knife technique, but as it's my first time, felt the paint was too thick and wasn't happy with the finished result, so used a palette knife to scrape it all off again! I then reapplied the colours using the edge of a 1/2" flat brush, over which I had a little more control. You can see the difference between the third picture in this sequence, and the 'Almost Finished' picture. The thick paint is much whiter, and probably looks better on computer, but didn't in real life.
To finish the tree you need to put highlights on the leaves. Mix cadmium yellow, titanium white and a speck of sap green. Dab a foliage brush evenly into the paint and stipple this colour over your dark green foliage, concentrating on areas facing the light source
The trees in this picture need some shadow, so stipple a clean foliage brush in to ultramarine blue paint and stipple this on the grass at the dark side of the tree to create a pool of shadow.
Using thinned paint in various green colours, paint the illusion of clumps of grass around the base of the tree.
Wilson Bickford
Almost Finished Wet Into Wet
This painting is not quite finished, and I'm going to cheat a bit here; I'm going to let the paint dry for a week or so, before painting my friend's farmhouse in the background, with surrounding shrubs, and then creating more detail on the grass in the foreground. The reason for this is that I want those items to be really sharp and clear, and I'm not sure I'd achieve that with wet into wet. That's not a comment on the technique, rather a comment on my skills as a painter using the technique for the first time!
So, watch this space for the finished article... and watch this video of Wilson Bickford. I think he's my favourite wet into wet teacher, as he's so generous with his information.


