How to Photograph People Floating on Air

I am sure that at some point you have seen images of people that appear to be flying or even levitating in mid air with absolutely no support and no matter how closely you look at the photographs , you cannot tell how it is that the photographer managed to take these shots since the laws of nature clearly tells us that people do not fly under their own power or at least not yet, maybe in the future or so we can hope!
Off course by now you should have realized that you can easily do this by using a digital editing program like Photoshop or Gimp or virtually any other so long as it allows you to use layers and merge photographs.
The beauty of this project is that it can easily be done and you really do not need any specialized equipment or any out of the ordinary props.
Simply put, you need to take two shots of the same scene; one with the model and one without. It helps if you set up your camera gear on a sturdy tripod and use a remote shutter release since once you set up the gear it is wise not to touch it again until the photos have been taken.
First take the shot of the empty scene, Second position something where your model will stand upon or lay on top of. A bar stool works really well. make sure that the stool or the surface where your model will stand on is sturdy enough not to tip over or that it will create an uncomfortable surface for your model. It is very important that you set the model in almost the exact location, preferably the center, before the empty scene is disturbed by the wind or anything else.
By attentive to the ground or surface where the prop was placed. Often many people end up editing the model and everything else and forget to pay attention to the surface therefore allowing the indentation caused by the stool, ladder etc to be visible in the final image.
Proceed to pose the model and it is better if she or he stands on their tip toes or if laying (as if flying) that the clothing flows smoothly over the body. A fan aimed at the model from the direction opposite where she is "flying" to makes the effect that much better.
Once you have both sets of photographs done, then it is time to use the computer and your photo editing program. The first thing is to drag both images to the program and open the photo of the empty scene (it helps if you make a copy and re-name it).
Then open the shot that features the model. Use a cloning tool or layers to do the digital editing. Select Command A to select, command C to copy and command B to paste. You are basically pasting the photograph that contains the model onto the empty scene.
The next step is to select a small to medium brush size and click on the layers mask. Actually it is better to select the masks first and then the brush.
Make sure to select the black layer mask because it is the one used to hide as opposed to the white layer mask which is used to reveal.
Once you are done digitally removing the prop used to stand or lay upon, then zoom in and by using a smaller size brush repeat the erasing on the finer/smaller details until you have completely eliminated all portions of the prop. Click save and you are done.
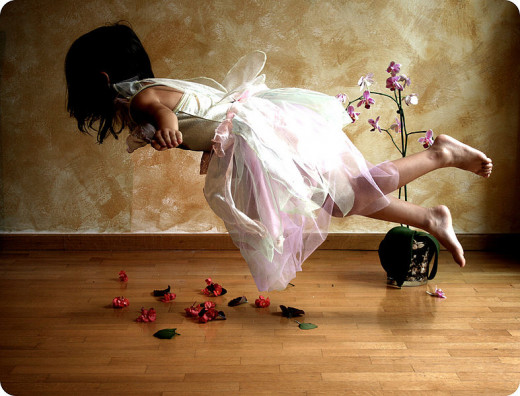
The end result are photographs that show people in situations which makes them seem to be floating, flying or levitating.
You do not have to solely captures images of levitating people, the project also lends itself real well for floating objects. The main difference with using objects instead of people is that you should focus more on the object and present the person behind the object in a slight out of focus or in a shallower depth of field than the object itself. In other words the object needs to be in the forefront of the photograph and be the center of attention in it.

Levitation photography samples
- Levitation Photography: 65 Stunning Examples & Tutorials
Many says floating in the air, or so called levitation is impossible. Well, in fact everything is possible, all you need to do is believe yourself, seriously,
Levitation Tutorial
Have you tried this technique?

© 2013 Luis E Gonzalez


