How to Sew Wings


What would you like to use these for?
The first pair of fabric wings I ever made were done while I was studying abroad in Florence, Italy. I was very interested in phoenixes at the time and was intrigued by all the artwork of angels with beautiful colourful wings (apparently white-winged angels is a fairly new concept). I was taking a soft sculpture class and decided making a pair of phoenix coloured angel wings would be too awesome.
At first I was really nervous about the project, how the heck was I going to pull this off? With my professor's guidance, however, I found the project was a lot easier than I thought it would be and enjoyed it so much that I made several simplified versions of the design for my youth group's fashion show.
So here is a guide to the process I went through to create these wings. I'm sure it could be adapted to any kind of wings you would like to create.
These wings are so comfortable and so fun you could wear them for a costume or just for the heck of it (my friend wore the quilted ones around campus for a week and my sister wore the simplified ones to her High School prom haha).


Straps Alternatives
Instead of doing the ribbon and elastic straps you can try these methods:
- Sew wings directly on to hoodie, shirt, or costume.
- Sew only elastic band on and ditch the ribbon.
- Sew four strips of ribbon on to back of wings; top-right, top-left, bottom-right, bottom-left. Use ribbons to tie wings on.
- Depending on how large you made your wings, you could also use safety pins or brooch pins to pin wings on.
Quilted Wings
Materials
- Large paper to make pattern (I used that large brown paper that comes in rolls)
- Scrap Paper
- Pencil
- Scissors
- Straight Pins
- Safety Pins
- Fabric (starting with white makes details easier to see)
- Needle and thread
- Fabric paint in desired colours and brushes
- Elastic band
- Wide ribbon (must be wider than elastic band) or extra fabric
- Quilt batting
- (optional, but recommended) Sewing machine
Instructions
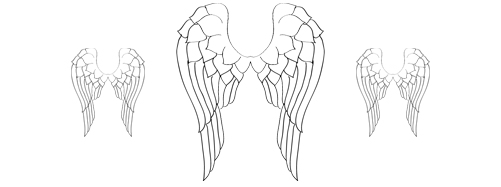
- Using a wing reference draw some wings on your scrap paper until you get a feel for how wings look and move. Once you're ready simplify the design a bit for your wings. I made my wings folded because the batting would not stand up well if they had been extended--plus they would be really large and cumbersome.
- When you have a design you're satisfied with, draw them on your pattern paper the size you'd like your wings to be and cut out design.
- Pin pattern on to fabric and cut out four panels (leaving about a 1/2 inch seam allowance), two facing one direction, two facing the other.
- Draw feather design on the front of wings with a pencil.
- Pin the pattern to the batting (leaving about a 1/2 inch seam allowance) and cut out four panels.
- Loosely stitch feathered fabric panels to one batting each and stitch feather in feather designs. I did this by hand, which took awhile, but if you can do this on a sewing machine it'd probably go a lot faster. Remove the loose stitch you did in the beginning as you go along, this was just to secure the fabric to the batting.
- Pin the other fabric panels to the other sheets of batting and stitch an inch and a half down around the outer edge of the wing, a little more than halfway down. this is to secure the fabric to this sheet of batting. If you were to add lots of detail to this side the wings would get floppy, and no one would really get to see it anyway, so it'd be a loss.
- Match up the wing panels and pin together, right side of fabric facing each other, batting facing out.
- Sew the edges leaving the back part and a little bit of the inner side of the wing open.
- Turn wing right side out and invisible stitch the inner side of the wing, but not the area where the two wings will meet.
- Paint the wings, leaving the seam allowance to connect the wings free from paint so it isn't too difficult to put together later. Add as much or little detail as you want. I added details to my small fluffy feathers on the top, but kept the long feathers one solid colour with just a little highlighting for dimension. Let each side dry completely (I'd say give it a day), before turning over and working on the other side.
- Use an invisible stitch to sew the wings together down the middle. Then set your wings aside.
- Cut two strips of elastic band, making sure they fit comfortable, but snugly around wearer's shoulders.
- Cut four strips of ribbon almost twice the length of the elastic.
- Sew two strips of ribbon together, to create a sleeve. Repeat with other strips of ribbon.
- Attach a safety pin to the end of the elastic band and slide through ribbon sleeve. Stitch ends of ribbon to the end of elastic so the elastic band doesn't retreat into the ribbon.
- Safety pin straps to wings and see how they fit. Adjust as needed and when you are satisfied with the placement sew them to the wings.
- Have fun flying around town!


Wing Headband
Using this design you can also make a winged headband.
Materials
- White fabric
- Paper
- Pencil
- Scissors
- Needle & thread
- Foam
- Hot glue
- Wide headband
- Straight pins
- (optional) Sewing machine
- (optional) Fabric paint
Instructions
- Follow steps 1 - 6 of the costume wings, but use a pattern that has been drawn at a much smaller scale.
- Sew wings closed.
- Hot glue wings to headband.
- Embellish with ribbons, beads, and feathers if desired.
Simplified Sewn Wings
Here is a simpler sewn wing design if you are pressed for time or do not want to add a lot of detail or for certain characters (many anime characters have wings like these so these would be good for cosplay)
Materials
- White fabric
- Needle and white thread
- Foam batting
- White elastic band
- Large sheet of paper
- Scissors
- Pencil
- Straight pins
- Safety pins
- (optional) Sewing machine
- (optional) Shiny white fabric paint
Instructions
- Draw wing design on large sheet of paper and cut out leaving about a half inch seam allowance where the wing meets the back.
- Pin Pattern to fabric and cut out 4 wings, leaving little more than a half inch seam allowance; if there is a right and wrong side to the fabric make sure you flip the pattern so you have 1 set of cut outs facing one direction and the other set facing the other direction.
- Pin pattern to foam and cut out two wings, leaving little less seam allowance than with the fabric cut out.
- Sew two sides of the wings together, wrong side out.
- Sew foam to wings.
- Turn wings right side out and adjust as needed to fix any puckering around feather areas.
- Using invisible stitch sew wings together down the middle.
- If you want to paint wings do that now. Let them dry completely before continuing.
- Measure elastic band to fit around the wearers shoulders snugly. Cut two strips.
- Safety pin strips of elastic to wings and try on, adjust as needed then sew on.
DIY Screenprinting


Phoenix Designs
At the same time I was working on my wings, I also patterned, printed, and sewed a dress featuring a phoenix feather design.
I don't know if you can get fine lines of details like the ones in my feather design from DIY methods of screenprinting (unless you use fabric pens), but you can create your own feather designs and fashion to go with your wings.
The reason I keep my tutorials so open and general is because I really want to encourage people to make these projects their own. Rather than make an exact replica of my design, I really want you all to make something entirely new and entirely yours. There no way to describe the pride that comes with making something beautiful all by yourself--even if it takes a few failed attempts to get there.
Have fun and be fearless! I'd love to see what you create so please feel free to share in the comments below!


