ArtsAutosBooksBusinessEducationEntertainmentFamilyFashionFoodGamesGenderHealthHolidaysHomeHubPagesPersonal FinancePetsPoliticsReligionSportsTechnologyTravel

How to Smooth Skin in Photoshop the Easy Way
Updated on April 19, 2012
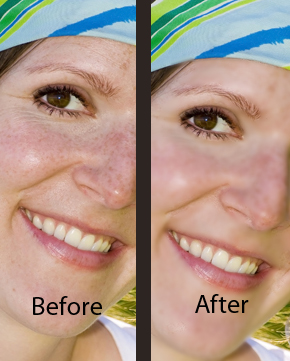
Notice how the crows feet around her eyes and freckles have all been smoothed away.

Smoothing Skin in Photoshop

If you are a wedding photographer or plan to take senior class pictures, you will likely find this tutorial helpful. Many people suffer with skin discoloration, bumps, wrinkles, scars, and sun spots, but now you as a photographer can minimize the appearance of these features. With a few simple steps, you can smooth out your clients skin. Your clients will have glamorous, smooth skin in every photo with this easy Photoshop tutorial.

For this tutorial I am using Photoshop CS4. The photo that is being used was taken from stock.xchng. If you would like to follow along with the same photo you will be able to find it here.

Photoshop Tutorial on Skin Smoothing

Step 1: The first thing you need to do is open the file you would like to work off of and create a duplicate layer. To create a duplicate layer right-click on the background layer and select duplicate layer.

Step 2: Click on the "Quick Mask" button located at the bottom of the tools menu. Now make sure that you have the colors black and white selected. If you don't you will need to click on the small icon above the "Quick Mask" button that looks like a black square and white square.

Step 3: Now click on the "Paintbrush" tool and begin to paint the skin of the person in your photo. Even though you have the color black selected it should appear as the color red. When painting avoid the eyes, mouth, facial hair, eyebrows, and anything else that isn't skin.
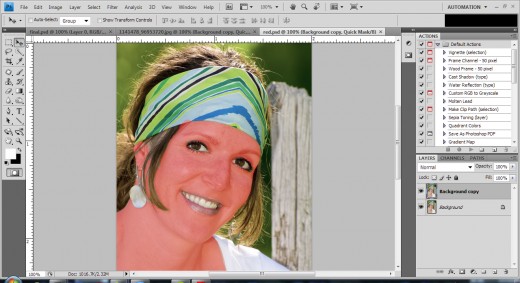
When you are done applying your mask it should look something like this.

Step 4: When you done painting the skin red you will need to click the "Quick Mask" button again to deactivate the tool. Remember the "Quick Mask" button is located at the bottom of the tool menu. Clicking the "Quick Mask" button again will cause a dotted line to appear that outlines your selection.

Step 5: Now choose any of the selection tools and right-click on the image and choose "Select Inverse".

Step6: You now have the correct areas selected and it is now time to apply the surface blur filter. You can find the surface blur filter in the top menu. Choose Filter --> Blur--> Surface Blur.
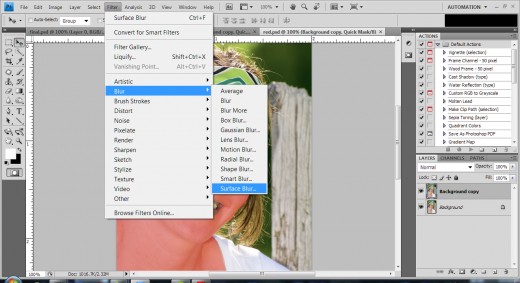
Filter --  Blur --  Surface Blur
Filter -- Blur -- Surface Blur
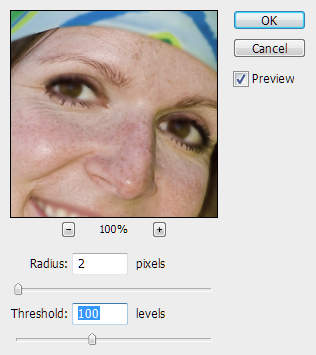
Try to take it easy with these sliders so that you have a more realistic finished product.
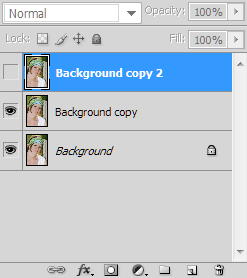
To take your photo to the next level, make sure your layers look like this.

Completed Photo

She now has nice, smooth skin.

Step 6: Once you have selected the Surface Blur filter a new window should appear. In this window you will need to adjust the radius and threshold sliders. These sliders basically tell Photoshop how you want to blur the photo. The Radius slider is what tells Photoshop how much blur you want and the threshold slider determines how many tones you would like to include in the blur. Personally, I recommend that you take it easy with these sliders and try to use the lowest value that you can. If you go overboard with the sliders your photo can look over-worked and fake.

Step 7: When you are done with adjusting the sliders, click the "OK" button. Now make sure you are still using a selection tool and right-click on your selection and choose "Deselect".

Step 8: At this point you can either be done or you can take your photo a bit further. To take the photo a bit further you will want to create a duplicate layer of the duplicate that we created at the beginning of this tutorial. When you have done that click the eye on the left side of the new layer bar. You should now have something that looks like the picture shown to the right.

Step 9: At this point we will delete portions of the layer away to make it look more realistic. When doing this make sure you have the middle layer selected (the first duplicate layer that we created). To start you will need to use the eraser tool found in the tool menu. You are going to want to erase away portions of the image that show the major lines. For instance, the nose, eye lids, or a cheek line created by a smile are all major lines you will want to erase. By erasing these portions of your photo it will begin to look much more realistic.

Step 10: When you are done deleting portions of the picture you can delete the extra layer we created unless you needed it when you made a mistake (see video for more information). Now save your image and you are done!

You Made Smooth Skin In Photoshop!

You should now have a portrait photo of a person with silky, smooth skin. If your photo looks a bit too blurry, you may need to go back and adjust the sliders. That is why it is so important to not go overboard on those sliders. I hope you have found this tutorial easy and helpful, and I'm sure your clients will enjoy looking younger in all your photos.

working

This website uses cookies

As a user in the EEA, your approval is needed on a few things. To provide a better website experience, hubpages.com uses cookies (and other similar technologies) and may collect, process, and share personal data. Please choose which areas of our service you consent to our doing so.

For more information on managing or withdrawing consents and how we handle data, visit our Privacy Policy at: https://corp.maven.io/privacy-policy

Show Details
Necessary
HubPages Device IDThis is used to identify particular browsers or devices when the access the service, and is used for security reasons.
LoginThis is necessary to sign in to the HubPages Service.
Google RecaptchaThis is used to prevent bots and spam. (Privacy Policy)
AkismetThis is used to detect comment spam. (Privacy Policy)
HubPages Google AnalyticsThis is used to provide data on traffic to our website, all personally identifyable data is anonymized. (Privacy Policy)
HubPages Traffic PixelThis is used to collect data on traffic to articles and other pages on our site. Unless you are signed in to a HubPages account, all personally identifiable information is anonymized.
Amazon Web ServicesThis is a cloud services platform that we used to host our service. (Privacy Policy)
CloudflareThis is a cloud CDN service that we use to efficiently deliver files required for our service to operate such as javascript, cascading style sheets, images, and videos. (Privacy Policy)
Google Hosted LibrariesJavascript software libraries such as jQuery are loaded at endpoints on the googleapis.com or gstatic.com domains, for performance and efficiency reasons. (Privacy Policy)
Features
Google Custom SearchThis is feature allows you to search the site. (Privacy Policy)
Google MapsSome articles have Google Maps embedded in them. (Privacy Policy)
Google ChartsThis is used to display charts and graphs on articles and the author center. (Privacy Policy)
Google AdSense Host APIThis service allows you to sign up for or associate a Google AdSense account with HubPages, so that you can earn money from ads on your articles. No data is shared unless you engage with this feature. (Privacy Policy)
Google YouTubeSome articles have YouTube videos embedded in them. (Privacy Policy)
VimeoSome articles have Vimeo videos embedded in them. (Privacy Policy)
PaypalThis is used for a registered author who enrolls in the HubPages Earnings program and requests to be paid via PayPal. No data is shared with Paypal unless you engage with this feature. (Privacy Policy)
Facebook LoginYou can use this to streamline signing up for, or signing in to your Hubpages account. No data is shared with Facebook unless you engage with this feature. (Privacy Policy)
MavenThis supports the Maven widget and search functionality. (Privacy Policy)
Marketing
Google AdSenseThis is an ad network. (Privacy Policy)
Google DoubleClickGoogle provides ad serving technology and runs an ad network. (Privacy Policy)
Index ExchangeThis is an ad network. (Privacy Policy)
SovrnThis is an ad network. (Privacy Policy)
Facebook AdsThis is an ad network. (Privacy Policy)
Amazon Unified Ad MarketplaceThis is an ad network. (Privacy Policy)
AppNexusThis is an ad network. (Privacy Policy)
OpenxThis is an ad network. (Privacy Policy)
Rubicon ProjectThis is an ad network. (Privacy Policy)
TripleLiftThis is an ad network. (Privacy Policy)
Say MediaWe partner with Say Media to deliver ad campaigns on our sites. (Privacy Policy)
Remarketing PixelsWe may use remarketing pixels from advertising networks such as Google AdWords, Bing Ads, and Facebook in order to advertise the HubPages Service to people that have visited our sites.
Conversion Tracking PixelsWe may use conversion tracking pixels from advertising networks such as Google AdWords, Bing Ads, and Facebook in order to identify when an advertisement has successfully resulted in the desired action, such as signing up for the HubPages Service or publishing an article on the HubPages Service.
Statistics
Author Google AnalyticsThis is used to provide traffic data and reports to the authors of articles on the HubPages Service. (Privacy Policy)
ComscoreComScore is a media measurement and analytics company providing marketing data and analytics to enterprises, media and advertising agencies, and publishers. Non-consent will result in ComScore only processing obfuscated personal data. (Privacy Policy)
Amazon Tracking PixelSome articles display amazon products as part of the Amazon Affiliate program, this pixel provides traffic statistics for those products (Privacy Policy)
ClickscoThis is a data management platform studying reader behavior (Privacy Policy)