- HubPages»
- Arts and Design»
- Photography»
- Digital Photography
How to Use Lightroom (A General Introduction)

When I first opened up Lightroom, I was overwhelmed by the program. Prior to Lightroom I was working in Photoshop for processing my RAW images and never really thought I needed anything different. However, now that I've used Lightroom and understand the basics and uses of the program, I've fallen in love with the ease and benefits of using Lightroom to process my photos.
Before going any further though, here's a small comparison to consider before switching to Lightroom. If you don't need the extra features, just use what you have until you grow enough to want the added benefits of a more focused program. For a more in-depth comparison, I've written a hub about it which you can find here: Should You Use Photoshop or Lightroom to Process Your Photographs?
Brief Comparison between Lightroom & Photoshop
Lightroom
| Photoshop
| |
|---|---|---|
Builds a lasting photo catalog.
| Yes
| No
|
Ability to copy presets and settings to multiple photographs.
| Yes
| Yes, but very limited
|
Easily exports multiple photos.
| Yes, with multiple settings and adjustments.
| No
|
Preview different effects and looks on your photos.
| Yes
| No
|
Ability to shoot from camera and save files on computer (shooting tethered)
| Yes
| No
|
Ability to flag, edit, reject and sort through multiple photos
| Yes
| No
|
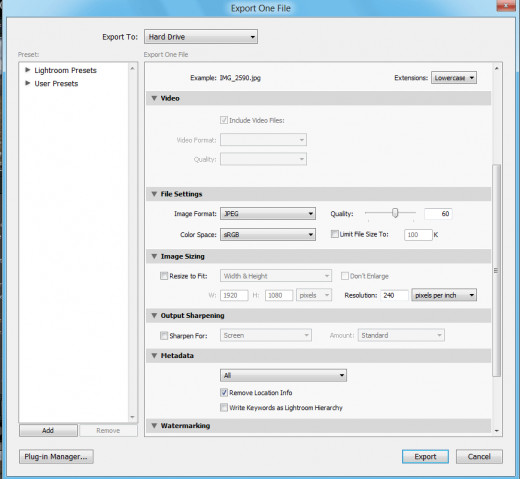
How to Export Your Photographs
If you're unfamiliar with the program, like I was. You may be staring at the screen wondering how you're supposed to get your photo out of the program. Instead of a "save" option, you'll need to export the photo.
Instructions for Exporting
- Select the files you want to export. (Hold down shift to select multiple)
- Go to File > Export
- Select the folder you would like to export the photos to.
- Scroll through and select any of the adjustments you would like to have done to your photos. If you're planning on uploading them to Facebook or somewhere that doesn't need the full resolution, use the image re size option to save yourself disk space and upload time.
- Click on export. Your photos will now be exported to your selected folder.

The Library Window
This window is the central area for importing and viewing your collection. Lightroom builds a catalog of your photos as you import them and automatically backs them up as well.
- There are also sections to select your last import, all the photos imported within the month and options to select different collections that you've named and created.
- You can also search by text, look through the metadata (and edit it) as well as sort your photos by different colored flags you've placed on them.
- There's also an option to quickly adjust exposure and change the white balance for a quick fix, instead of having to change into the develop window.

The Develop Window
By far, this is the most powerful and best section of Lightroom. If you're shooting RAW, you'll be able to easily adjust all of your settings within this window. There's even an option to turn on a split screen where you can see the before and after of the photo you're editing.
- To copy the settings from one photo to the other, right click on the photo that you want the settings to be copied.Go to Develop Settings > Copy Settings and select all that you want to copy. Then select the photos you want the settings to be copied onto (select multiple by holding down shift) and right click > develop settings > paste settings.
- To add filter and effects, scroll through and place your mouse over each of the filter in the left panel. You'll be able to preview the effect in the small window above this panel.
- To undo an effect, scroll down to "History" in the left panel and select the previous option.
In the right panel, scroll through all the options and play around with them if you're unsure what they do. You can always reset the settings if you don't like it - it's the easiest way to learn!

The Map Window
If you're a travel photographer or go on a lot of vacations, the map window will allow you to keep your photographs organized. You can tag your photos by GPS and be able to view your photos by location.
Setting the GPS is as easy as selecting the photos you want to tag, right clicking on the map after navigating through it and selecting "add GPS to selected photos."

The Book Window
If you need a portfolio or need to put together a photo book for a special occasion, this feature will allow you to drag and drop your photos into a template. You can change the orientation, margins and different settings for your book.
You have the option to save the book as a pdf, as well as a JPEG. You can also add text, background image and change the quality and settings of your book.

The Slideshow Window
This is the perfect for creating presentations for weddings, graduations or even client proofing. It's easy to adjust the settings, display and background color. There's even an option to add background music within the program.

The Print Window
Easily create different layouts of your photos. You can choose from the different selection of printing templates such as 5x7 or Wallets, or you can easily create your own by dragging and dropping photos onto the printing screen. Adjusting the size is as easy as selecting the corner of each photo.
- Drag and drop photos from a selection of templates. Standard sizes and photo collages are easy to create.
- Create customized templates by adjust the photos after dropping them on the print window.

The Web Window
If you're running your own photography business, this will allow you to create customized webpages to show your clients.
- Upload your photos straight to the web from Lightroom.
- Export your webpage's HTML and images to your web host.
- Choose from a selection of templates to customize your own photo gallery.
A more visual introduction to Lightroom.
How to Learn Lightroom
If you're just learning the program, the best way is to experiment and go through each setting one by one. See what each setting does. This will allow you to become familiar with the program and open up all the possibilities of what Lightroom can do for your photographs.
The above was just a basic introduction to what each window does and some of the little tidbits that I enjoy about the program. Have fun!


