How to Use Picnik: Make Regular Photos Beautiful

What is Picnik?
Picnik is a free browser photo editing program that anyone can use. For people who don't have the money or time to buy or learn how to use complex programs like Photoshop or Paint Shop Pro, Picnik is the perfect tool. All you do is enter URL into your browser, upload your photo, and start editing! There are a wide range of tools that one can use to make their photos look clean and professional. In this Hub, I will show you how to use some of those tools, so you can start editing your own photos.
Getting Started
When you first visit Picnik, you might be intimidated. At first glance, there seem to be a lot of options. Sign up, make a collage, print, share your photos; the choices seem limitless. It's okay. There are a lot of choices, but that is what makes Picnik so great.
My first question when visiting Picnik was: should I make an account? It's a fair question, and one that can only be answered by you. If you are visiting Picnik for the first time, then don't worry about making an account. Upload your photo, or choose one of the sample photos they have available, and get started.
For this Hub, we will only be using the photo editor. I will be turning a regular photo into something wonderful - I suggest you play along with me!
Edit
The first tab you land on after uploading your photo is the Edit tab. Underneath there are lots of buttons, and you may not know what all of them mean! Never fear. That is what I am here to explain.
To zoom in, simply use your mouse wheel. If you do not have a mouse wheel, there is a zoom slider in the lower right hand corner. If you ever need to undo or redo, those are located in the upper right.
Auto-Fix: I do not really recommend this tool. It works wonderfully with the Picnik sample photos, but I would recommend editing the photo manually. However, it's always worth a shot - when you first upload your photo, go ahead and click it. If you like the changes, then keep them. If not, just hit 'undo' and do it yourself.
Rotate: I bet you can figure out what this means. With this tool you can rotate, flip, and reverse your photo by varying degrees. It's straight-forward and easy to use. The changes are not saved until you hit the "OK" button in the upper right corner.

Crop and Resize: If you crop the photo, you are cutting out everything outside of the Crop box. You can use the pre-set dimensions, or enter the size into the Actual Size boxes if you know the exact size you want it to be. You may also just eyeball it by clicking and dragging the circles on the corners of the photo. If you resize the photo, you will make the whole photo whatever size you want. You can enter the exact size you wish the photo to be, or change it by percentages. By default, the 'keep proportions' box is checked. This prevents the photo from looking stretched or squished, but you can always uncheck it if you wish. As usual, you must click the 'OK' button in the upper right to save any changes.
Exposure and Contrast: The Exposure of the photo is the amount of light allowed in the photo. If you pull the slider to the left, you will notice your photo grow darker; lighter when pulled to the right. The contrast is the difference between the light and the dark. Higher contrast will make the colors of the photo more vibrant. If you slide it to the left, you might notice the photo growing grayer. These tools are best used together, to find the perfect balance.

Saturation and Temperature: The Neutral Color picker, located under 'colors' will allow you to select which color is default, the way white or grey usually is. The rest of the picture will adjust. Saturation is the amount of color that is displayed on a photo. Like contrast, saturation brightens or darkens your colors. If you want to make your photo greyscale this is the tool to use! Just slide it all the way to the left. Temperature adjusts the white balance; dragging the slider to the right will make it more orange or red, to the left, blue or green.
Sharpen: Sharpening tightens your photo, making it less blurry or fuzzy. You can use the slider at the top to sharpen the entire photo, or you may try the advanced options. With these, you can effect the strength of the sharpness, and also the size, or radius, so that it will only effect a smaller area of the photo.
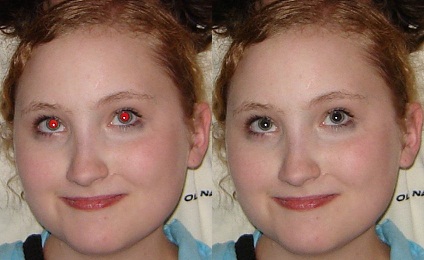
Red Eye: This tool is wonderful! If your photo has the dreaded red eye, you can fix it with a single click. Simply click the effect area, and Picnik should fill in the red spot with the proper black of a pupil.
Create & Save
Create
With the Create tab, you can add text, frames, and photo effects! Some of these are premium features, but a lot of them are free to use, and all of them are very simple. Play around with them; most are point and click, and require little explanation.
Save and Share
The save and share feature of Picnik is wonderful, and one of the best parts. You can save the photo directly to your computer as a variety of different file types, but that's not all. You can also email, print, or upload the photo to almost any website you can think of. You just link Picnik to your Facebook, Twitter, Photobucket, whatever, and the website uploads it for you. If you sign up, the website will stay linked with those sites and remember email addresses you have used in the past.
The Finished Product!

So Now What?
Hopefully you've discovered what a great tool Picnik is, and now you have a pretty great photo to show for it. So what do you do now that you're done?
Sign Up: Registration with Picnik is free, and helpful. It remembers your last five uploaded pictures, so you can go back and change something if you want. It keeps you linked to all your websites and remembers email addresses. And if you sign up for premium, you get access to new fonts, stickers, and touch up effects.
Add to Apps: If you use Picnik often, the way I do, and you're also a Chrome user, you can add Picnik to your application bar. That way, you don't even have to type in the web address. All you have to do is click the link when you open a new tab. One more point for laziness!
Keep Editing! Photo editing is fun and it doesn't have to be hard. With just a few minutes, you can turn a washed out, boring picture into something people will really notice. Impress your friends. Show off. Go ahead. You deserve it.


