- HubPages»
- Arts and Design»
- Graphic Art & Design»
- Design Software
How to Whiten Teeth in Photoshop
Using Photoshop to Whiten Teeth
So many people in today's world are sensitive about the way their teeth look. As a photographer you can alleviate this worry, by giving your clients a nice, white smile. It is actually incredibly fast and simple to whiten teeth in Photoshop. I am sure any client will appreciate that you have taken a few extra moments to whiten their smile with this simple tutorial.
Step-by Step Tutorial
(For this tutorial I am going to be using Photoshop CS4. The image was found at www.sxc.hu if you would like to follow along with the same photo.)
Step 1: First you will need to open the file you would like to work on in Photoshop.
Step 2: Now, right click on the background layer and select "duplicate layer". Click the OK button on the window that pops up. This will create a new layer called "Background Copy". This is the layer that we will work off of for this tutorial.
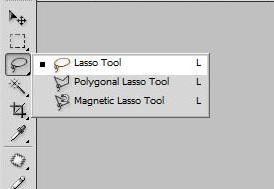
Step 3: Now find the "lasso selection tool" in the tools menu. We will use the "lasso selection tool" to make our selection.
Step 4: Take the lasso tool and make a very quick and rough selection around the mouth. You will want to zoom in on the mouth so that you can see what you are selecting. When you make your selection be careful to not include any of the skin and be sure to include all of the teeth.

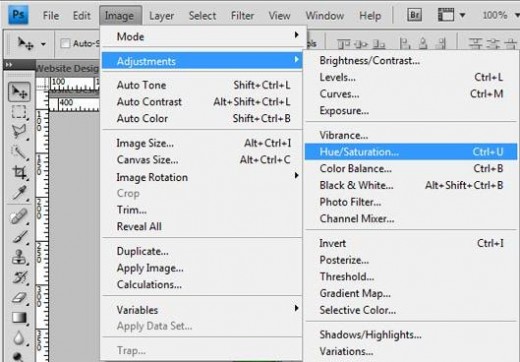
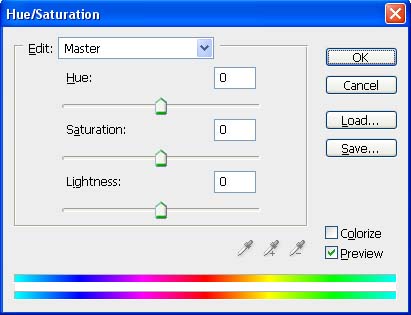
Step 5: When you have completed your selection around the mouth go to the menu located at the top of Photoshop. Make the following menu selection: Image --> Adjustments --> Hue/Saturation
Step 6: A new window will appear with several sliders and a drop down menu that says "Master". You will want to click on that drop down menu and select "Yellows". The drop down menu should no longer say "Master" and should now say "Yellows".
Step 7: Now move the saturation slider to the left until you are happy with how white the teeth are. When you are done click on the OK button.
Step 8: You should now have an image with very white teeth with a dotted line around the mouth. Right click anywhere on the photo and click "deselect" from the menu that appears. If the menu does not appear, please be sure you are still using a selection tool.
Step 9: You are now done with whitening teeth in Photoshop. You can now continue to edit your photo or save and close if you are done editing.
Compare Result

Other Ways to Use this Tutorial
This same tutorial can be used in a variety of ways. Below are a few examples of how it can be used:
- Whiten Eyes: You can use the tutorial to remove yellow, blue or red hues from the whites of eyes. People look healthier when their eyes are pure white.
- Clothing: This tutorial can make clothing appear whiter. If someone is wearing an old shirt that has a yellow or pink hue to it; you can make it look brand new with this tutorial.
- Walls/Interiors: If you are taking a photo of a wall that has gone yellow due to people smoking indoors you can remove the yellow hue in most cases with this tutorial. This tutorial works best on white walls.


