- HubPages»
- Arts and Design»
- Graphic Art & Design»
- Design Software
How to create a good looking business card design with Adobe Photoshop from scratch
Introduction to the tutorial
Creating a simple business card might sound an easy task, until you try to do so. Building a design is not just getting parts together, it is more than that, making a design is actually making a good looking art piece that will represent whatever you are promoting in it.
We have decided to create a video, image and text full tutorial on how to make a basic, but still, good looking business card design file from scratch, that could still look good in a couple more years.
Remember this is a basic business card tutorial where basic steps and functions are being used just for an introductory idea about Photoshop used and functions that can recreate a nice final looking for your design. If you are interested in jumping all the written details and jump directly to the video tutorial, it is found at the end of this article.
Step #1 – Open Photoshop
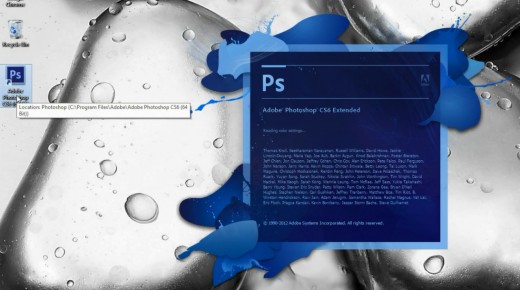
In our tutorial we are going to be using Photoshop CS6, which is not the latest version of Photoshop but isn’t either the outdated or obsolete version of the same. Many of the core functions are still located in the same exact place even in the latest versions of this software.
Note: Mobile versions of Photoshop are totally different than desktop versions.
Step #2 – Create New Design File
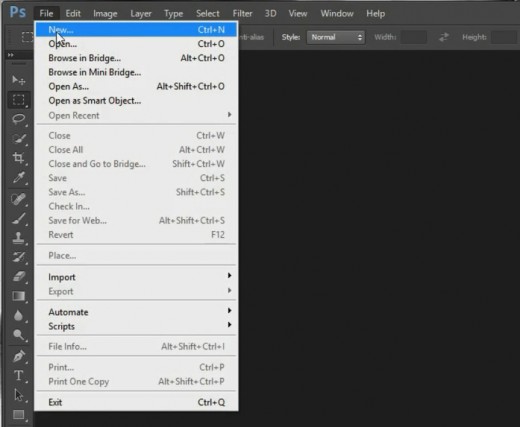
In the top of the Photoshop software, we will find a list of core functions like File, Edit, Image, Layer and others, where you can find most of the functions needed to create anything no matter how complex it is, options goes from as simple as printing to your local printer connected to your computer, all the way up to 3D modeling and complex functions that could become very handy for a designer.
In this tutorial, we are just going to use a few of these options, here in the first step, we will use FILE by clicking one time on it, a dropdown full of options will provide us the choice of creating a NEW design file, lets click again over NEW.
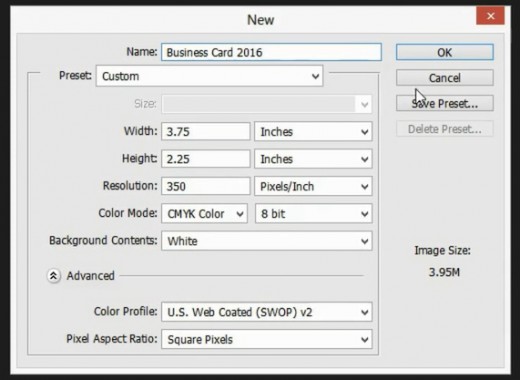
Step #3 – Image settings
Not much to fill in, but crucial at the time of building a graphic design file that will be compatible with a printer of your choosing. Remember we will be using inches as our measurement of preference, so the width and height should be change into inches first.
Size: A regular business card size is 2” x 3.5”, but at the time of typing down the size of the design file, we have to go a bit bigger to allow what we call the bleed zone, area found after the cutting edge of the design to allow margin of error at the time of cutting. You may add anything from 1/8 to ¼ of an inch, for this tutorial we will use the ¼ for a bigger margin, for a final size of 2.25” x 3.75”.
Resolution: DPI, which means dots per inch, should be no less than 300 for a professional looking design to maintain the quality at the time of printing, the more dpi you use, the better quality the design will carry. Maximum DPI recommended for printing projects is 350 (Most used on smaller products like business cards, club flyers, postcards, brochures and others). So anywhere from 300 to 350, your design will come just perfect.
Color Settings: Change to CMYK, which refers to the color separation process used by the offset printing technique which is the preferred method for state-of-the-art print output as for now. Images will look a little pale and different than the RGB color setting as RGB is the perfect color combination for screen display but not for printing.
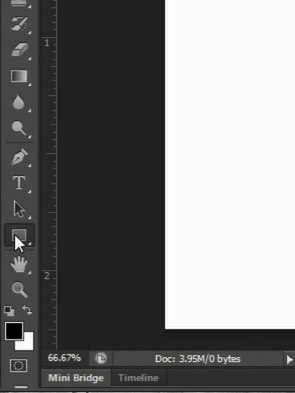
Step #4 – Creating a box
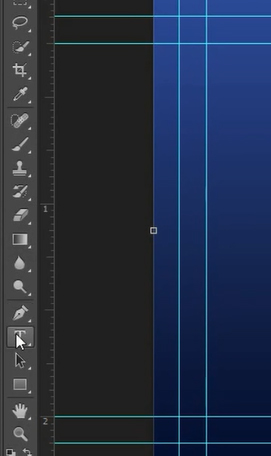
This box we are about to create will facilitate us many functions, serving as a base ruler inside the image twice and then serving us as the background. The way to go on creating this box is selecting the “SHAPE CREATOR” commonly found on the left of the software (see image).
After selecting the square shape tool, drop a click in the middle of the image and drag it a little enough to create a box, don’t worry about the size, we will choose the size for this box on further steps.
Step #5 – Size and align the box
After we created the box, a line of settings with positioning coordinates, rotational angle, size and other. We will go to the right click on top of the W: (Width) and H: (Height), options on measurement type will come out, we will click on INCHES for both fields. We will then introduce the exact size of the business card we are about to design, the way that we recreate the space that will come off the paper after the cutting, W: 3.5” H: 2”, the box will adjust its size and it is now time to align it to the center of the image.
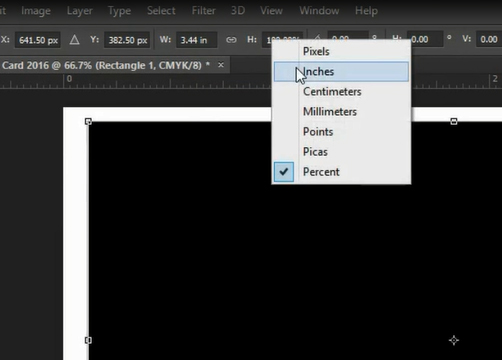
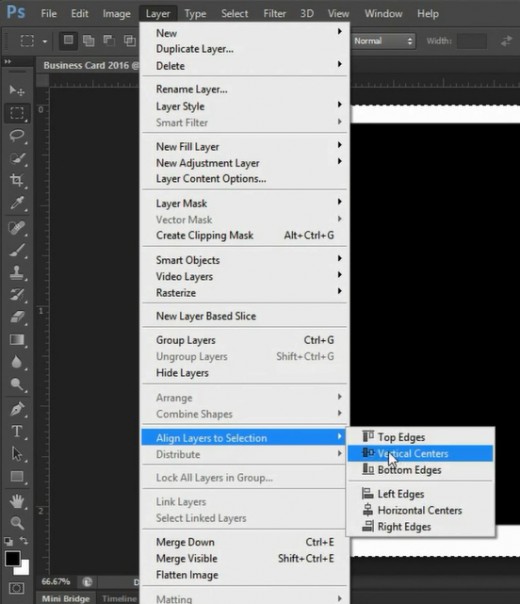
Step #6 – Align the box to the center
Now click on the “SELECTION TOOL” (second option from top to bottom on the left hand tool column) and dragging a selection of the whole design area to cover 100% of the available space In the desing as a way of selection of the area that we want to use for alignment.
With the box shape selected, and a selection of the whole design area also done, we are now going to proceed with the alignment, clicking “LAYER” then click on “ALIGN LAYERS TO SELECTION” then do the vertical center alignment and the horizontal centers alignments so our shaped box comes to a complete center of the image.
Step #7 – Using the box edge as guide for guidelines
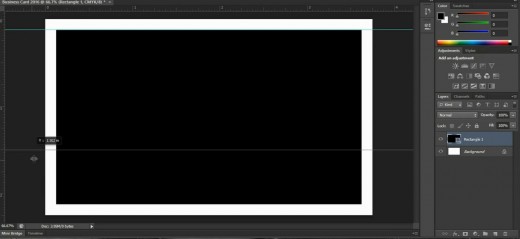
Once the box is centered, you may notice that the edges of the box are right where the cutting guidelines should go, leaving an even space all around. There are several ways to use this as our base guideline as for where not to include text or images that has to show up within the design, in our tutorial we are using ruler lines which are the most common method of marking zones in Photoshop.
Note: If your Photoshop is not showing the ruler, don’t panic, this is easy to fix, just click on the top option called “VIEW” and from the drop down click again on “RULERS” and the rulers should show up on your design by now.
The way the ruler will help us here, is by clicking over one of them and dragging a Cyan (light blue) line over owner design and snapping it to the edge of the box, release the click once here. Repeat the process for vertical and horizontal edges of the box until you cover the 4 sides.
Step #8 – Safe Zone Margin
By the end of step #6, we already have marked down where the cutter machine will trim out our business card, this is an edge that we should consider at the time of creating text or images as we need to keep them a bit far from the borders. For this we can go an extra mile and create a Safe Zone margin.
The safe zone margin can be considered imaginary or we can create additional guidelines out of our ruler for better understanding and visualization.
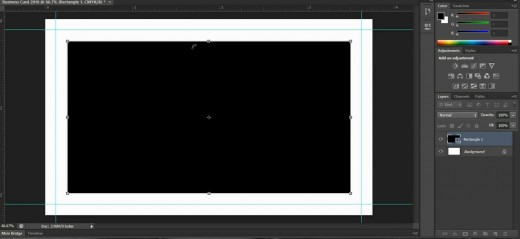
To proceed with the creation of the safe zone margin, we are going to select the box one more time, and for the size, we will modify it to a final size of W: 3.25” x H: 1.75”, leaving us with another 0.25” total height and width margin away from the trimming line.
Repeat the centering process to align the box once again to the middle (if needed), drag and drop guidelines out of the ruler one more time for all 4 side edges.
Step #9 – Background Gradient Look
As promised before, the same box has helped us in building the trimming line, as well as the safe margin zone line, now, it will also serve us as a background gradient color for our business card.
You may just drag the size of the box to the edge of the image to fill up to a 100% of the available working space.
Note: If you don’t see the little boxes on the corners of the box after selecting it, you might need to activate what is called “Show Transform Control” which shows on the top section of Photoshop just after you select the box.
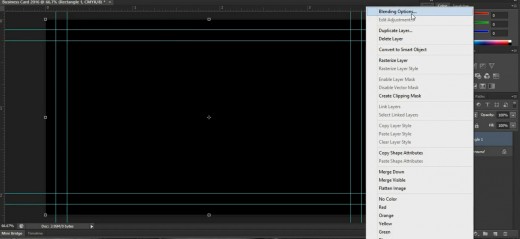
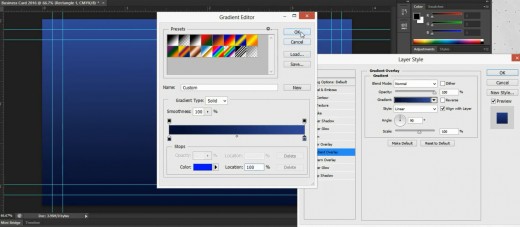
Once the box fills 100% of our workspace, we will go to the layer panel (on the right) and right click on top of the box layer, then hit “Blending Options”. Here we will have many choices like Shadows, Stoke line and my favorite, the Gradient Overlay.
Step 10 – Gradient overlay settings
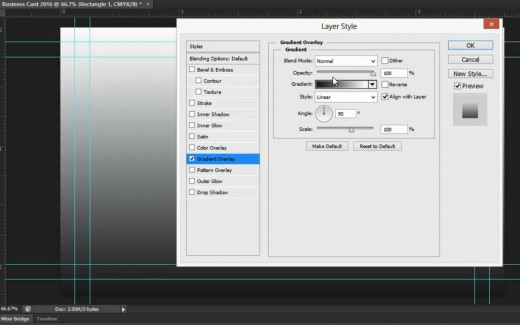
Inside of the Gradient overlay, we will find many choices and stuff you can play with until you get the desired effect, in our tutorial we will just adjust the colors for the gradient to keep it simple.
The 3rd option from top to bottom is the gradient option where you are able to select the style of the gradient, but here we are just interested in changing the colors. Once you click on this bar, an additional setting box will open with more options and we will focus on the bottom gradient bar that shows a sample on from which color to which color are we transforming the gradient? By clicking on the corner boxes of the horizontal gradient rectangle, we are able to change the exact from (start) color and to (Finish) colors. Play with the colors until you get a gradient of your choice. For our tutorial we have chosen from darker blue, to a lighter blue.
Step #11 – Creating text
Now that we have a background color for our business card, we can start adding text. Let’s get started with the company name.
On the left hand side, in the vertical tool bar, we can find a “T” representing the word “TEXT” which is our text creator tool. We click on this tool and click again in the middle of our work zone to start writing.
Note: If you don’t see your writing, it’s possible that the layer where the text is being placed, is under the layer used as the background image, you may just re-arrange the text layer to a higher level than the background layer, by clicking and dragging the text layer.
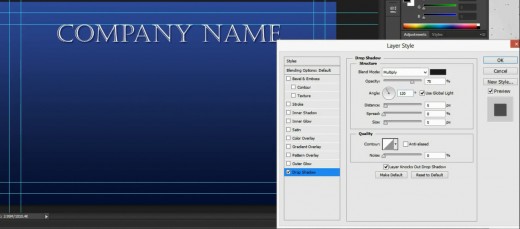
Type the company or service name and then, in the select text font, style and type of letters you are giving to the title, for our tutorial, we have selected a bigger lettering for the title (19pt) and a particular font that will only look good on bigger size letters, font type called “Castellar”. So it can read over a dark blue background, we are selecting a white color and also giving it a small shadow (Found in the blending options as shown before for the gradient effect) to make it pop out a bit more.
Step #12 – Continue with contact information
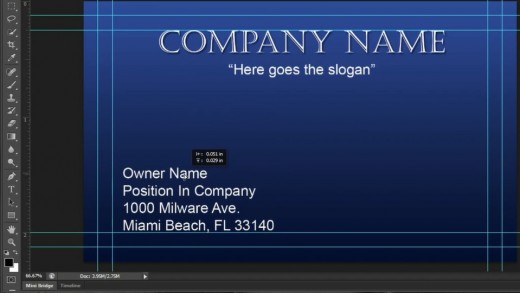
For the contact information we use a contact name, title for that person, address where that person can be located, website, phone number, email and as many details as possible without clustering our design too much. You may also add a slogan if you have one.
The text settings for the information, are based on an easier to read fond (Arial) and readable but not too small text size (9pt) which will look very good after printed. For the tutorial we continued using the white color for the lettering, remember that for your particular case, you may play around with colors until you get what you are looking for.
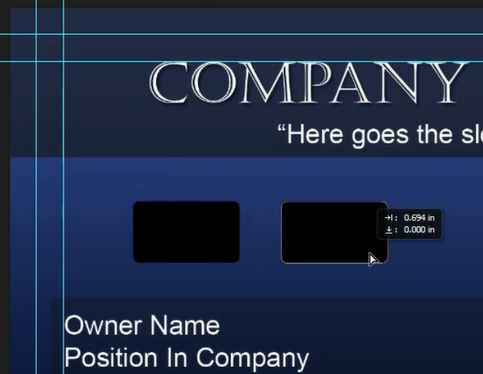
Just for the tutorial, we have added an extra darker box with rounded corners in the back of the contact information. This will help to separate this section from the rest of the card. The way we get a rounded box created is by clicking and holding the click for the box creation tool on the left, it will pop out different choices like line creation, pentagon creation and the round corner box as well. Once we select to create a round corner box, an additional option will show up in the top menu called “Radius” which refers to how hard the angle of the round corner will be (our value for the radius will be 18pt).
Step #13 – Add images
This is a simple business card, but it still can contain some related images in the center, and we have the space for them, why not just add them?
You probably have images about previews work you have done, or pictures from customers or you can also buy related images online. This helps identify the purpose of your business card in a glance.
If you don’t own any images but you are interested in adding a few quality images to your business card, we recommend using 123rf.com which is an image provider for a very low cost ($1 per image). Avoid downloading and using images from the google search as this may bring legal problems if the owner of the image caught up about your practices. As the business cards are small, the images you are buying will be small too, so you can go for the smaller resolution/cheaper options as well.
Step #14 – Saving the design
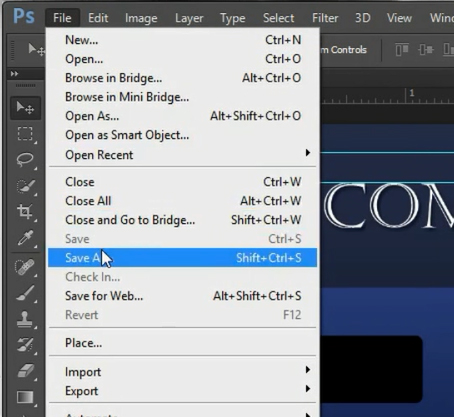
Most important part, saving the design to your computer, on the video tutorial we have jumped to save the design into a generic JPEG format that every computer or device in the world can read, but here, we want to tell you to first save the file on PSD format first, and then save to JPG so you have both files, keeping the original and editable version of the business card available for future changes.
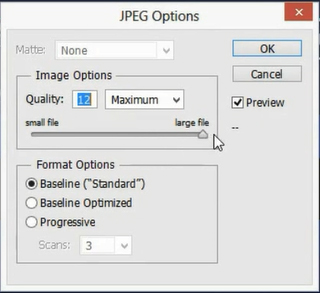
Once you saved the PSD version, let’s now save the JPG version which is the file that you will submit to the printer. Under the file name selection you will find a dropdown box that will provide you with many options on what file type you want to save your design. Select the JPEG and click save. An additional box with JPEG options will pop up and you have to be very careful here.
The quality of a JPEG is usually set to 8 out of 12, which means the design will look good, but still will be optimized to take a smaller amount of space. For printing, we need to set the quality to the maximum available, in this case 12/12, and hit OK.
With this final step, we have completed our basic business card design. Hope you have found this tutorial useful and if we missed a step, please let us know on the comment box.
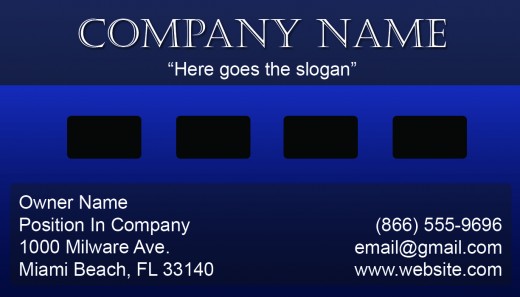
Final Business Card Design Sample
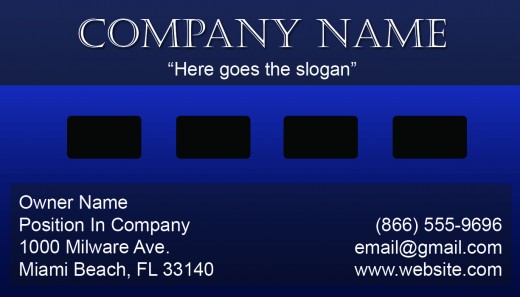
Full tutorial on how to build a basic business card design in Photoshop
Related Hubs
Business cards are the base of any business now a day, but in the other hand, at some point, any business or service provider will need another way of promoting different than the business card, If you are interested in how to build a club flyer template design file from scratch as well, this hub can be found at another hub published by me, it also includes, video and images for your guidance.
Small comparison for Photoshop VS Illustrator
Photoshop
| Illustrator
| Plus for:
|
|---|---|---|
Organizing elements in Photoshop is easier because of the way it handles the layers.
| Photoshop
| |
Photoshop is considered very precise for pixel based photo and image creator functions.
| Photoshop
| |
Illustrator is chosen one when it comes to creating vector based logos and other sort of line artrokws
| Illustrator
|
What version of Adobe Photoshop would you prefer?
Small quiz:
view quiz statisticsResources
- Club Flyer Printing | Cheap Club Flyers Print
Four Color Printing
