- HubPages»
- Arts and Design»
- Crafts & Handiwork»
- Paper Creations
How to make water polo scene using paper

INTRODUCTION
School projects given in schools nowadays means loads of work, be creative and do your best to get the best grades and an overall standout appearance.
I recently helped one of my student to create this beautiful school project who is in grade 6, the topic was shapes in water polo. Sometimes when we see certain topics that raises our eyebrows as our knowledge on the subject is basically nil, what do we do? I will suggest to accept the challenge as these topics are challenging and at the same time increases our knowledge about something which otherwise we would never be looking for or searching for. Like this one where my knowledge on the subject was zero but it was challenging as well. Here we will not be learning details about water polo as a sport but how to make an appealing school project with some drawing skill and waste paper in different colors. So let's begin.
MATERIALS REQUIRED -
One full size chart paper in green color, here pastel chart paper will be better for its good quality.
Pastel sheets in color blue to show water, needs to be al least an A3 size.
A4 size sheet in skin color, red, white , orange, black and yellow.
Textured brown sheet to make table and textured blue sheet to make the pool border. Try to use waste paper left out pieces to make small things to save paper.
Scissors, colors and glue.


HOW TO MAKE
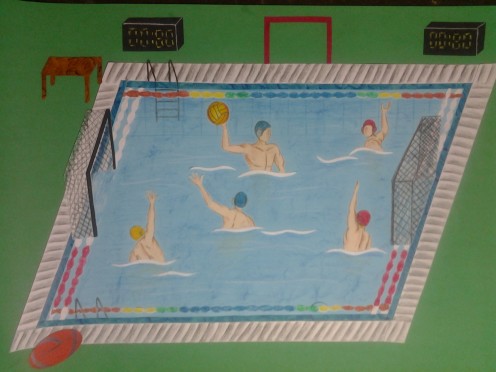
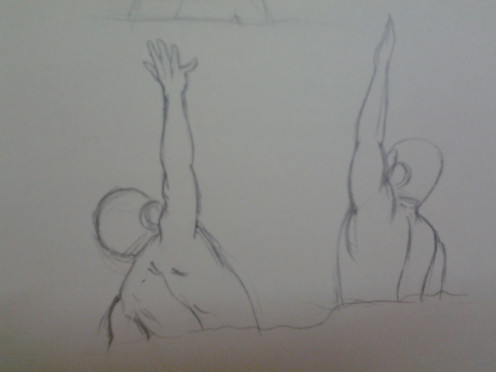
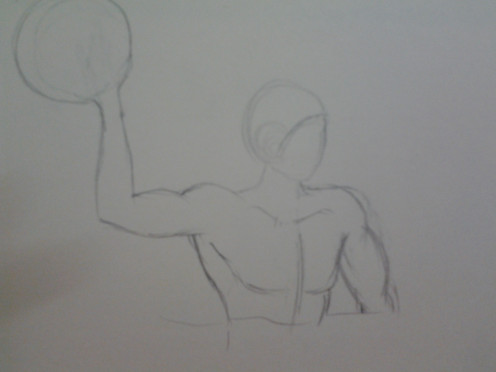
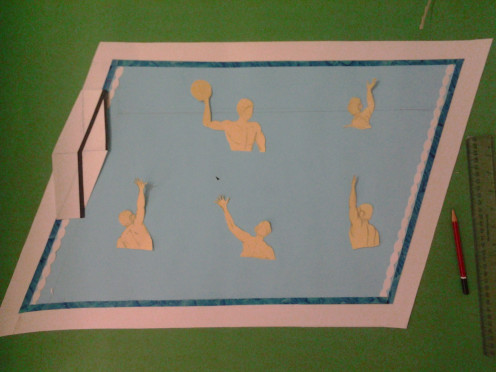
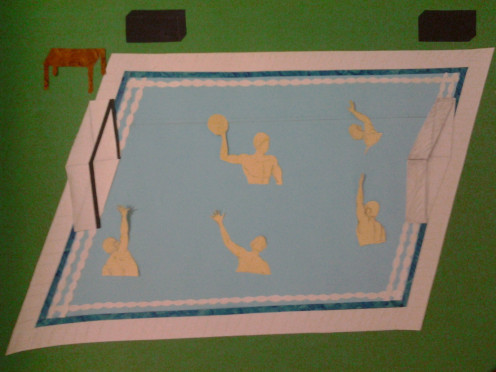
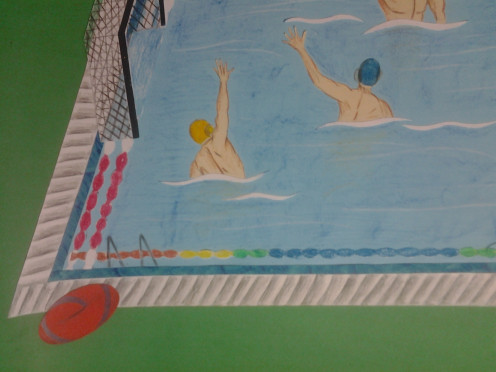
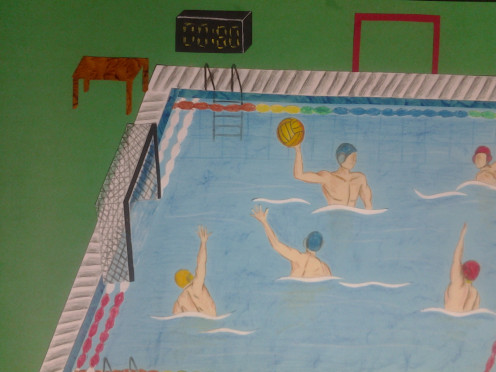
- Draw the human figures in different actions on the skin color sheet. 5 figures are enough and cut them out.
- Now cut the blue paper 1 1/2 feet x 1 feet parallelogram shape for the pool.
- Cut white pastel sheet to make the boundary of the pool. Paste both the blue and white pieces cut on green chart paper.
- Cut another border in blue texture handmade paper and paste this in between the white and blue papers pasted before.
- Now as you can see four sided chain pasted on all four sides, for this take white sheet and make 4 chain cut outs to be pasted vertically and 2 cutouts to be pasted horizontally. These are very easy to make just draw continuous oval shapes and cut them out of the required length. Paste the chains as seen in the images.
- Now the pool is ready, draw two nets for both the sides, shapes will be cuboid but the angle in which they are drawn will be different. The left side net will be front facing but the right one will be back facing. Make the cutouts in white and paste in position.
- Now paste the cutouts of players in different positions as seen in the image.
- Make two cuboid cutouts for the timers and paste them one right and one left. Write digital number using yellow color.
- To show the water waves cut out the small wavy pieces in white and paste few below the players and few here and there.
- Draw stairs using black pencil color or sketch pen.
- Make orange color cut out for the water tube and color it with blue. Paste this on the left side bottom.
- Add yellow color cutout of ball on one of the player's hand and color it as it looks in real with some shading with orange color
- Make brown texture paper table cut out and paste this left side top.
- To make the ball i have used yellow sheet with some shading.
- Color and shade the players, water and side chain as seen in the image.
- Now all this is done draw a logo of water polo on right side top and write some information about the sport beneath that.
Few tips
Adding a fluorescent color to the timers digits using just oil pastel sticks was a great idea as it looks so real.
I must say that experimenting with things easily available is a wise idea as the total cost of making this project was close to nothing.
You can also add full chart paper border in texture blue color that will secure the work and will give it a nice contrast look.
Level is of course a little difficult specially the drawing part and it is time consuming. In such projects color contrast and composition has to be good to give a stand out look in exhibitions. Hope you guys enjoyed learning this as i enjoyed making this.


")
