DIY: Make Your Body Double Mannequin

DIY vs. Buying Online
I have seen wonderful mannequins or dress forms sold online. There are adjustable mannequins available for children, adult petite, adult medium, and adult large bodies. Being 5'3" and 105 lbs. I am right on the edge of the petite sizes. I could have bought one for over $100 that would have worked sufficiently for creating clothes for my body. Since I mostly alter clothes from thrift stores, I wanted a mannequin that had all of my individual quirks, including my mild scoliosis and rotated hip. That is something you cannot buy.
Creating your own quirky dress form will also save you tons of money!
Materials
You will NEED:
- Paper tape
- Scissors
- Water
- 1 or 2 Trash bags or an old large T-shirt
- Duct tape or masking tape
- Newspaper
- Your body (obviously)
- A helping hand
You may WANT:
- A large sheet pan
- An old lamp pole
- A decent amount of fabric
- A hot glue gun
- Pins
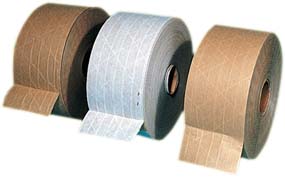
Paper Tape!
I have seen mannequins made out of duct tape, but they do not hold their shape nearly as well as paper tape. Paper tape can usually be found in Wal-Mart, Staples, or any store like those. I found mine in the packing and shipping section at staples for $8. They didn't have any smaller rolls in stock for $4. I have enough left over to make ten more mannequins!
It may also be called gummed paper tape. It is not sticky when it is bought. You must wet the side with dry glue before it becomes sticky.
Preparations for the DIY Project
Once you have all of your materials and somebody willing to help you, you should cut your paper tape into strips. I cut maybe 60 strips. The strips should be about the length from your should to your hip, but don't worry much about exact measurements and perfect strips. If your roll of paper tape is wide, you may want to cut the strips down the middle for thinner strips that conform to your curves more easily.
Once the strips are cut, you should be in a bra that you wear often, and underwear, unless you are a boy and do not wear a bra! Then you will put on your old T-shirt or put a trash bag over yourself with holes for your head and arms. Using duct tape or masking tape and perhaps some scissors, form the bag or shirt to tightly fit your body. Whatever you have on should cover your shoulders, one inch up around your neck, and should go about an inch below your butt.
WARNING: You will get hot and uncomfortable standing there with tape and plastic covering you for an hour or two.
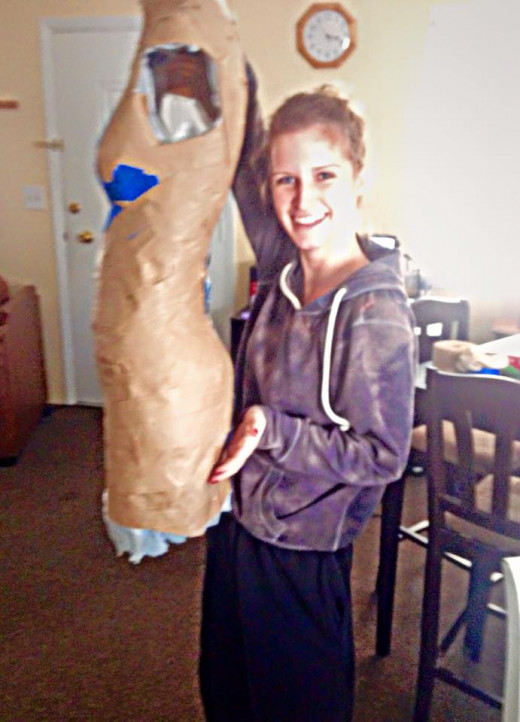
Recreate Your Body
This is where you have to stand completely still for an hour or two and your super helpful partner does all the work!
Your partner will wet the strips with a soaked rag and once the gum on the paper becomes sticky they will place them all over your body. Starting with diagonal strips makes it easy to begin to see the shape of curves. They will want to hold down each strip for a few seconds and if they are really wet, maybe even blow dry them. Do two layers over your trashbag or long shirt. If corners don't stay down, they can be snipped in the middle to curve to your body. Some edges may come up a bit when drying.. which is why I have regular tape over top of some parts of paper tape in the video above.
Getting Out of Your Dress Form
After the second layer, or third if you want it to be really sturdy and aren't too tired of standing there with plastic and glue all over you, let it dry for a few minutes. It is still possible to get out of the mannequin shell once it completely dries, but it might be a bit harder to cut.You'll want your partner to cut through the layers of tape and the shirt or trashbag underneath in a straight line from the bottom to top of the back.
ATTENTION PARTNER! Be careful not to cut their bra strap! Or stick them with the scissors :)
Finish Up or Make a Stand
FINISH UP
At this point you can stuff the shell of paper tape with newspaper and tape the back up. You can tape cardboard on the bottom, neck, and arm holes to keep all of the paper inside. Then you will have a dress form that will just sit on a surface!
OR
MAKE A STAND
You can continue to read this instructional and learn how to make a mannequin on a stand as shown in the very beginning of the article.
Putting the Mannequin on a Stand
If you have an old tall lamp that you no longer use, you're in luck! If not, you can find one at a goodwill for $5-$15. There is also a site called FreeCycle that you can make an account on. My mom found an old lamp for free in 24 hours on freecycle, I found mine at Goodwill.
I used an old binder to keep my mannequin from slipping down the pole, but you could also use a thick piece of cardboard.
I cut my binder in half and then made a cut diagonally from one corner to the center. I bent the piece of binder and put it around the pole where I wanted the bottom of my mannequin to sit.
I duct taped the binder in place (you can't use too much) and sat the shell of my dress form on top.
I taped the dress form shut and taped the form to the binder. Afterwards, I cut the binder down so that its edges were even with the dress form and added even more tape.
Then, I stuffed the dress form with about five whole newspapers, each page individually crumpled and shoved through the neck or arm holes.
You should occasionally reach into the holes and pack the newspaper in so that your shell of paper tape doesn't bend over time.
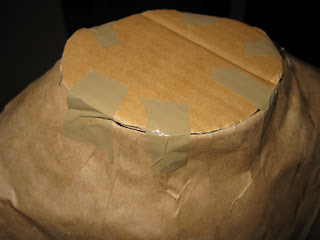
Once it is completely stuffed, you can put the cardboard over the neck and arm holes and tape it on.
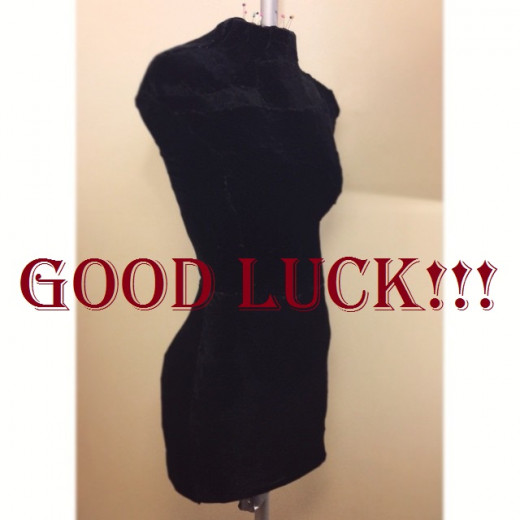
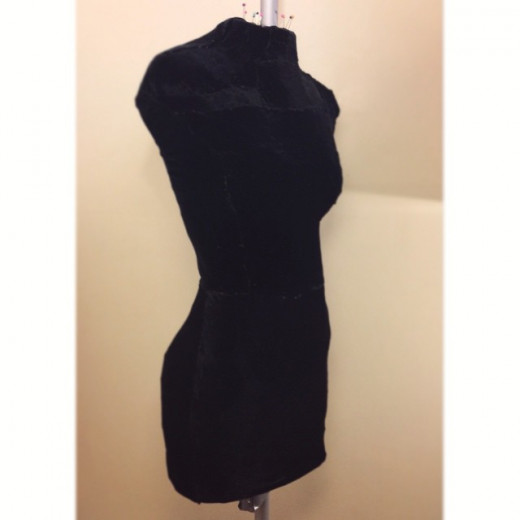
Again, you can choose to stop here and have a perfectly functioning mannequin on a stand, but I chose to make mine look a bit more store bought by adding fabric.
Finish it Off With Fabric
As I mentioned before, I go to goodwill a lot. I had a black velvet skirt in my closet from goodwill that had white out spilled on it. I decided to cut it up and hot glue it to my mannequin.
You will need to cut smaller sections of fabric for different areas on the body.
You will also need pins to keep fabric in place and make sure it doesn't wrinkle over your natural curves in your body. Once the fabric is in place with pins, carefully take a few out at a time, and hot glue that section down.
It takes a lot of patience and careful cutting and gluing, but I thought it was worth it for a more finished look!