- HubPages»
- Arts and Design»
- Crafts & Handiwork»
- Paper Creations
Easy Paper Craft: Make A Hallowe'en Witch!

Hallowe'en Time is Here Again!
October 31st is the date of an ancient Celtic celebration of one year's end and the beginning of a new. Traditionally observed as a time to revere ancestors, this festival was partially absorbed into the early Christian calendar as All Hallow's Eve, or Hallowe'en. The present-day emphasis on trick-of-treating is a relatively recent American invention.
For kids, part of the fun of Hallowe'en is in making your own costumes and props. Why not try your hand at making these very simple paper witch dolls? They cost next to nothing but can provide an hour or so of quiet fun.
Use them to decorate your home, occupy the kids, or to provide an easy-to-do craft project for someone who has little dexterity or a low concentration span.
Alternative Materials!
If you don't have black paper, try other colours. Red, orange and green work well. Improvise with what you already have, eg. old wrapping paper.
If your paper is too thin, glue it to the plain side of an empty cereal box then let it dry before proceeding.
Materials Needed to Make Your Witch
- Black paper
- Pen
- Scissors
- Glue
- Paint.
- Sticky label
First Step of Making Your Hallowe'en Witch!
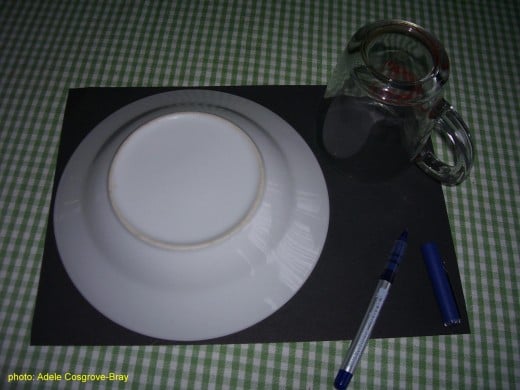
Start With Two Circles!
You will need a sheet of firm black paper, such as sugar paper. If you don't have any, you could cover the plain side of a cereal box with black poster paint then let it dry before proceeding. If you would prefer to use another colour, go ahead - there's no right or wrong way to decorate your witch doll. Maybe you could experiment with patterns by re-using old wrapping paper.
On the paper, draw two circles. Make one bigger than the other. If you don't have a compass to draw your circles with, try using a bowl and a cup just as the photo above shows. The sizes don't need to be exact. If you're planning to make several dolls, they actually look better grouped together if they're different sizes.
Making the Witch's Body

Simple Hallowe'en Craft!
Cut out your two circles. With the biggest circle, cut out a triangular piece. As before, this need not be an exact measurement but it is best to take less than more, as you can always trim a bit more off later.
From the smaller circle, remove a central circle.
The smaller circle will make the hat brim, while the bigger circle will be formed into a cone to make the body of the witch.

Alternative Methods
Instead of using paint to decorate your witch, try stickers, ink stamps, leaves, beads, potato prints, or cut out shapes from colour pages of magazines and make a collage of these.
Decorating A Paper Witch!
Next, it's time to have fun decorating your witch! Do your own thing - there's no right or wrong way to add patterns, stars, moons or whatever takes your fancy.
White or silver paint looks good against black but there are no rules. Experiment and let your imagination carry you along.
I used acrylic paint with a hog's hair paint brush for the doll in the photo. You're free to use whatever is to hand.

Spooky Cute Designs!
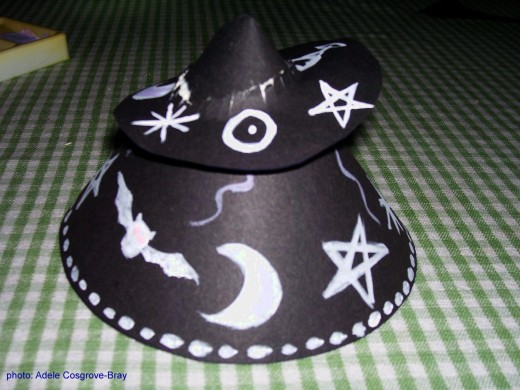
Cone Head!
Fold the largest circle into a cone shale and glue it in place.
Take the smaller circle and use scissors to nip the edges of the central, circular hole. This will help to hold the 'hat brim' in place on the cone, as shown in the photo below.
Witch Made Manifest!
A Witch Among Us!
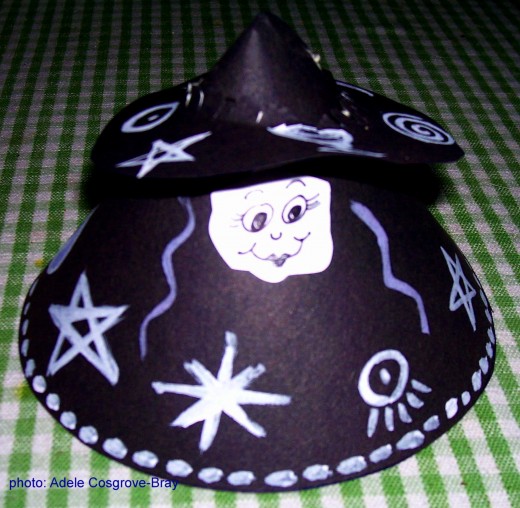
Adding a Witch's Face
Once the cone body and hat brim are assembled, to bring the witch alive you will need to add a face.
Draw a face onto a sticker then stick this in place beneath the hat brim, or paint a face directly onto the paper. Perhaps you could have fun cutting out a famous face from magazines and glue that on instead!
If you want hair, paint it on now. Maybe you could make two small plaits of brightly coloured cool and glue this on instead.
A Witch's Broom!


How to Make a Witch's Broom!
Every witch doll needs its broomstick!
To make one, cut out a thin rectangle of black or brown paper, which will make the broom pole. Then cut out a thicker rectangle of paper and trim it into tassles.
Glue the edge of the tasselated pape to the broom pole, then wrap it around and around then glue the other end in place. Fluff up the tassles a bit, and glue it to the witch doll's body.
Maybe you could experiment and use a painted drinking straw for the pole, or wrap dry grasses around a twig. It depends on how much effort you wish to put into the project.
Did You Enjoy this Simple Craft Idea?
Further Reading...
- Free Fun Hallowe'en Quiz
Fun and educational, this free Hallowe'en quiz offers fifty questions (with answers in italics) about one of Britain's most popular traditional festivals. - Make Paper Dolls Designs
Making paper dolls is easy. economical fun. Read on to learn how to make these traditional toys. - Green Witchcraft or Hedge Witchcraft
Green Witchcraft - some call it hedge witchcraft or herb witchcraft. It's a witchcraft which works with herbs and plant lore, and with elementals...

