ArtsAutosBooksBusinessEducationEntertainmentFamilyFashionFoodGamesGenderHealthHolidaysHomeHubPagesPersonal FinancePetsPoliticsReligionSportsTechnologyTravel

Making a Frog Charm or Pendant From Sculpey.

Updated on May 31, 2014

Making a Frog Pendant or Charm: Example life size frog

Life size frog Pendant for a costume
Life size frog Pendant for a costume | Source
Source

Frog Pendant or Charm

Do you want to make a Pendant or Charm that looks exactly like or resembles a frog? First I am going to start off by writing that I am making a large Pendant for a costume that I am working on for a themed wedding for a relation so I don't normally make them this big. It does help in taking pictures since you get to see a more blown up instructional. You can make the frog any size you want, I will give side notes on some additional or optional directions you can do to help if you are making the piece smaller.

I designed my frog to be as realistic as I can get it and still be able to attach it to a string to highlight a bit of costume I will be wearing later this summer. I find it is important to know the size of the pendant or charm you will be making because you can draw a blueprint or a quick brainstorm of the piece at the size you want and it will help you as you go along to keep to the size.

With the plans you can design your frog to be little and more bead-like, or you can make a more design type frog and go with a more silhouette style. I have made a cartoon-like frog before.

This plan of using a blueprint or brainstorm works well with any clay project. You can post a comment if you have something specific in mind and I can make it.

Polymer Clay

Sculpey is a polymer clay you can bake in the oven. You can also buy Fimo and get the same result, but I use Sculpey primarily because I have not tried Fimo yet. I first learned about it when I worked in the craft store (A.C.Moore). (I also buy a lot of my supplies from Amazon). I was also going to college at the time and someone was using it during sculpture class. Now I still prefer kiln clay to any clay but when you are in a similar situation like I'm in and you just don't have the space or the time for a kiln Sculpey is easy to work with ( a little trickier for those like me who give off a lot of heat) and when you are ready you just bake it at 275 degrees Fahrenheit for 15 minutes per quarter inch of clay. It also comes in a lot of different colors so unlike with Kiln clay where you make your glazes or colored slips you just go out and buy the color you need. The only down side I have with it is that the clay softens as you kneed it and warm it up, so I being a good heat source need to put it in the fridge every once in a while for a few minutes to harden it up again. It also softens in the oven before it hardens, so you need to keep in mind any slumping that will take place when you make something, so in some cases making something in pieces then just gluing it together works best.

Scoring: lightly cutting the surface of two pieces to be joined.

Scoring is something you do when you are going to attach two clay pieces together. This is like a way of bonding the two pieces together and helps interlock them into one piece and keep the pieces from falling off later.
Scoring is something you do when you are going to attach two clay pieces together. This is like a way of bonding the two pieces together and helps interlock them into one piece and keep the pieces from falling off later. | Source

Polymer Frog Pendant material

Source

Ingredients: Polymer Frog pendant or charm

  • 1 Glass ,or Metal, Dish (oven safe), I use a glass dish that I have designated my clay dish
  • Your Choice of clay tools Set bought at the store, toothpick, paperclip, stick, rock..., Anything that you want to use to cut, carve, and or smooth the soft clay
  • 1oz Bar Green Polymer Clay (sculpey or Fimo), I used the whole bar you might just want half if your making smaller than a 5inch long frog
  • 2 Round glass beads (your choice of color), These will be the frogs eyes
  • 1 Tube bead, This is for the mouth where the necklace string will go through
  • 1 Sheet of white paper or gragh paper, I like to make a blueprint of what I'm Doing

Blueprint or Brainstorm of Frog Pendant

I like to design out my project before I start so I have a set of guidelines to help me with.
I like to design out my project before I start so I have a set of guidelines to help me with. | Source

Polymer (Sculpey) Frog Pendant or Charm

Cut 4 pieces off the bar of clay leaving half for the main body.
Cut 4 pieces off the bar of clay leaving half for the main body. | Source
pinch 2 sides of the remaining half and smooth out the edges until you have the shape you designed for the main body.
pinch 2 sides of the remaining half and smooth out the edges until you have the shape you designed for the main body. | Source
cut off a square on each of the pieces of the arm. These squares will eventually be the hands.
cut off a square on each of the pieces of the arm. These squares will eventually be the hands. | Source
smooth out the edges of the pieces you will be using for the legs and arms. elongate as necessary. The leg segments will be longer than the arm segments. Which is why I like to have the Blueprints to remind me.
smooth out the edges of the pieces you will be using for the legs and arms. elongate as necessary. The leg segments will be longer than the arm segments. Which is why I like to have the Blueprints to remind me. | Source
The 2 pieces for the lower part of the arms cut in half. Half of each piece will become the bottom feet of the frog.
The 2 pieces for the lower part of the arms cut in half. Half of each piece will become the bottom feet of the frog. | Source
I like to lay out the pieces on my Blueprint to make sure I am getting my dimensions correct thus far.
I like to lay out the pieces on my Blueprint to make sure I am getting my dimensions correct thus far. | Source
flatten out the pieces you will be using as the hands and feet and pinch the corner of the side that will eventually attach to the leg or arm.
flatten out the pieces you will be using as the hands and feet and pinch the corner of the side that will eventually attach to the leg or arm. | Source
Attach the upper legs after scoring them and smooth if needed. I also push in the sides a little where the ribs would end and the legs would begin.
Attach the upper legs after scoring them and smooth if needed. I also push in the sides a little where the ribs would end and the legs would begin. | Source
I hold the main body over the upper arms on the blueprint and determine where they line up and if I need to trim the arms more.
I hold the main body over the upper arms on the blueprint and determine where they line up and if I need to trim the arms more. | Source
I trim the arms in proportion to the main body then attach them the same way I did with the upper legs
I trim the arms in proportion to the main body then attach them the same way I did with the upper legs | Source
I lay out my pieces on the blueprint to make sure everything is lining up correctly so far.
I lay out my pieces on the blueprint to make sure everything is lining up correctly so far. | Source
I draw a line where the eyes and the necklace bead will end up.
I draw a line where the eyes and the necklace bead will end up. | Source
I place the chosen round beads where they will attached
I place the chosen round beads where they will attached | Source
with some of the remnant clay from trimming I make 2 cylindrical pieces of clay and score and smooth it over the beads to make an eye socket.
with some of the remnant clay from trimming I make 2 cylindrical pieces of clay and score and smooth it over the beads to make an eye socket. | Source
Also with some of the remnant clay so far I make a triangular wedge and score and smooth it under the frog's head to make a more workable area where the necklace bead will go.
Also with some of the remnant clay so far I make a triangular wedge and score and smooth it under the frog's head to make a more workable area where the necklace bead will go. | Source
With my tool I poke a hole where the bead will go that will later be for the string. You don't need a bead I just find that the hole is less likely to slump in in the oven with a glass bead in the way.
With my tool I poke a hole where the bead will go that will later be for the string. You don't need a bead I just find that the hole is less likely to slump in in the oven with a glass bead in the way. | Source
Line the lower legs and lower arms with the main body. Cut the extra clay off so the legs and arms line up proportionally.
Line the lower legs and lower arms with the main body. Cut the extra clay off so the legs and arms line up proportionally. | Source
Attach the rest of the arms and legs using scoring (and smoothing if needed)
Attach the rest of the arms and legs using scoring (and smoothing if needed) | Source
Cut the toes into the feet. I usually do 3 toes a for for a frog. I will also cut them a little uneven for realism.
Cut the toes into the feet. I usually do 3 toes a for for a frog. I will also cut them a little uneven for realism. | Source
With any access clay that I had trimmed off I'll fill in areas that need more proprtion. I will put one triangular segment on the head and score and smooth it onto the eye socket to help strengthen the hold on the bead.
With any access clay that I had trimmed off I'll fill in areas that need more proprtion. I will put one triangular segment on the head and score and smooth it onto the eye socket to help strengthen the hold on the bead. | Source
Score and pinch the feet onto the legs and arms so it looks like joints.
Score and pinch the feet onto the legs and arms so it looks like joints. | Source
Source
Source

Instructions: Polymer Frog Pendant or Charm

  1. I usually make a blueprint or Brainstorm on paper of what my Pendant or Charm is going to look like. I get down dimensions because I like it to be proportionate right side and left side. First thing with the blueprint I like to determine what primary shape I am working with for most of the sculpting (its not set in stone, as you will always need to do minor adjustments). In this case I have decided the main body of the frog is a kind of narrow oval. I figure this by looking at images of the frog in question, or at a frog itself. I then figure out where the appendages and everything else will be placed on this shape and mark that up.
  2. Take out your Clay bar and cut off 4 small sections, leaving half the bar. The 4 sections will become the arms/legs and feet and the half remanding is for the body. (I use a needle tool for most of the things I do)
  3. Take the 4 smaller pieces and cut them in half going the long way. This splits the quantities up into 8 slices.
  4. (4) pieces of the clay slices are for the upper part of the arms and legs. (the 2 pieces for the arms, cut a little square off of each for hands )
  5. (2)pieces of the clay slices are for the lower part of the arm (to be split again so there is 2 pieces for the bottom feet)
  6. (2) pieces of the clay slices are for the lower part of the legs.
  7. I place all the pieces on the blueprint for now while I work on the next step.
  8. With the half of the clay bar reserved for the main body. Shape it into the shape designed in the blueprint. I pinch the sides and then round the edges as I flatten it into the shape. (not completely flatten unless you want to, I like dimension in the project I'm working on, So I am going with more realistic so my frog will have a little more meat on it. If your planning on just having an aerial view of it go ahead and flatten) I then draw a line down the middle for a guideline.
  9. Round the edges on the pieces for the legs and arms, elongating them if needed. (the legs are going to be longer than the arms.) This is when I like having the blueprint because as I'm going along I can match up with my paper.
  10. Attach the upper legs to the main body using a scoring technique (scoring is when you make light slicing marks on the 2 pieces that are going to be connected allowing them to stick better) I then smooth out as needed.
  11. Attach the upper pieces of the arms. (I set the pieces on the blueprint and hold the main body to it to determine if I made the pieces to big. I cut with my tool as needed. Then I attach the same way I did with the legs.
  12. Optional: If doing a small pendant or charm and you want to be doubly sure that the legs and arms don't fall off you can build the legs and arms without attaching them to the body and glue them after everything has fired. Just make a mark where they will attach to the main body.
  13. I pinch in the side of the body a little where the ribs would end and the legs would start, to give a little more realism for later on. (This is optional). I might put this in the fridge for a minute or two as I give off heat and the clay might be getting really soft right now)
  14. I take the pieces for the feet and flatten them into the shape I desire for the feet and hands (using the squares for the hands and the longer pieces for the feet). I then pinch the corner where the foot will eventually attach to the lower leg.
  15. I lay out the pieces on my blueprint to see how its doing, and mark off lightly where I will be putting the eyes and bead for string.
  16. I flatten the head a little more, If it needs it. Then add the beads for eyes. Just set them on top where desired.
  17. Now when you trimmed up the upper arms to fit better you ended up with a couple of pieces of clay. Cut one of the pieces in half, roll the pieces into a little cylindrical shape, and place over the bead creating an eye socket. Smooth with tool so the eye socket and head look like one piece, with an eye in it.
  18. With the other left over piece make a little triangle wedge and place on the bottom of the head, smoothing the piece on after you have scored and attached. This is giving you a better area for the necklace bead to go into.
  19. Poke a hole with a tool and stick the bead in. Don't bury the bead. Make sure you can see the hole on either side after you have smoothed it in. I then smooth the nose a little to make it more frog-like.
  20. Line the frog back up on the blueprint and match the lower legs and lower arms up with the body. I find I usually need to a little more trimming. This is fine as you usually need clay later to fix any mistakes or additions desired. Attach the lower legs and arms like you did with the upper parts, using scoring.
  21. I usually have to put the project in the fridge for a few minutes at this time because I have started to soften the clay too much and the pieces are in danger of falling off. Placing it in the fridge gives it strength again.
  22. The feet: cut out around the toes. I usually only have 3 toes per foot. Then flatten the foot a little more.
  23. With some of the access clay I have accumulated during trimming and adjusting I fill in the top of the head more, to help strengthen where the eye beads are being held down. I make a triangular wedge and score and smooth it down with my tool.
  24. I Score and pinch on the feet and hands. Pinching them on kind of gives it a joint.
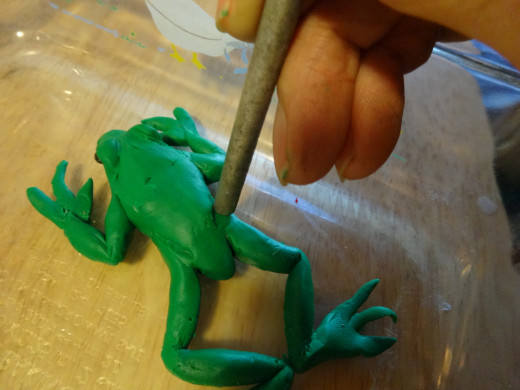
  25. With the backside of my needle tool I go around and fix the dimensions and texture of the frog by lightly taping and smoothing the surface. Don't press down too hard or the clay figure will get stuck to its surface. You can use anything that will give you the texture you want, even a spoon, or the back of a butter knife.
  26. I then, with a little extra clay left over, will make 2 little circle disks and put it on either side of the frog's eye (after scoring it) and then press my tool into it to give it texture. I also will draw in the mouth.
  27. With the frog on an oven-safe glass or metal dish I preheat the oven to 275 degrees Fahrenheit and cook the frog for 15 minutes for every quarter inch of clay thickness. In my case my frog is an inch thick so half an hour.
  28. Take the frog out and I will let it sit over night. It is not completely solid until it cools off. It is still a little soft when you take it out of the oven.
  29. If you have your frog in pieces you can now glue those pieces on. I use goop or E6000. You can also Glaze the frog with Sculpey glaze and this will strengthen your piece even more.

Polymer Frog Pendant or Charm

5 stars from 1 rating of Polymer Frog Pendant or Charm

Polymer Frog Pendant or Charm

Use a tool to smooth out and or add texture to the frog.
Use a tool to smooth out and or add texture to the frog. | Source
Make any last minute cuts or additions. I added circular discs to either side, next to the eye, like you see on bullfrogs.
Make any last minute cuts or additions. I added circular discs to either side, next to the eye, like you see on bullfrogs. | Source
working

This website uses cookies

As a user in the EEA, your approval is needed on a few things. To provide a better website experience, hubpages.com uses cookies (and other similar technologies) and may collect, process, and share personal data. Please choose which areas of our service you consent to our doing so.

For more information on managing or withdrawing consents and how we handle data, visit our Privacy Policy at: https://corp.maven.io/privacy-policy

Show Details
Necessary
HubPages Device IDThis is used to identify particular browsers or devices when the access the service, and is used for security reasons.
LoginThis is necessary to sign in to the HubPages Service.
Google RecaptchaThis is used to prevent bots and spam. (Privacy Policy)
AkismetThis is used to detect comment spam. (Privacy Policy)
HubPages Google AnalyticsThis is used to provide data on traffic to our website, all personally identifyable data is anonymized. (Privacy Policy)
HubPages Traffic PixelThis is used to collect data on traffic to articles and other pages on our site. Unless you are signed in to a HubPages account, all personally identifiable information is anonymized.
Amazon Web ServicesThis is a cloud services platform that we used to host our service. (Privacy Policy)
CloudflareThis is a cloud CDN service that we use to efficiently deliver files required for our service to operate such as javascript, cascading style sheets, images, and videos. (Privacy Policy)
Google Hosted LibrariesJavascript software libraries such as jQuery are loaded at endpoints on the googleapis.com or gstatic.com domains, for performance and efficiency reasons. (Privacy Policy)
Features
Google Custom SearchThis is feature allows you to search the site. (Privacy Policy)
Google MapsSome articles have Google Maps embedded in them. (Privacy Policy)
Google ChartsThis is used to display charts and graphs on articles and the author center. (Privacy Policy)
Google AdSense Host APIThis service allows you to sign up for or associate a Google AdSense account with HubPages, so that you can earn money from ads on your articles. No data is shared unless you engage with this feature. (Privacy Policy)
Google YouTubeSome articles have YouTube videos embedded in them. (Privacy Policy)
VimeoSome articles have Vimeo videos embedded in them. (Privacy Policy)
PaypalThis is used for a registered author who enrolls in the HubPages Earnings program and requests to be paid via PayPal. No data is shared with Paypal unless you engage with this feature. (Privacy Policy)
Facebook LoginYou can use this to streamline signing up for, or signing in to your Hubpages account. No data is shared with Facebook unless you engage with this feature. (Privacy Policy)
MavenThis supports the Maven widget and search functionality. (Privacy Policy)
Marketing
Google AdSenseThis is an ad network. (Privacy Policy)
Google DoubleClickGoogle provides ad serving technology and runs an ad network. (Privacy Policy)
Index ExchangeThis is an ad network. (Privacy Policy)
SovrnThis is an ad network. (Privacy Policy)
Facebook AdsThis is an ad network. (Privacy Policy)
Amazon Unified Ad MarketplaceThis is an ad network. (Privacy Policy)
AppNexusThis is an ad network. (Privacy Policy)
OpenxThis is an ad network. (Privacy Policy)
Rubicon ProjectThis is an ad network. (Privacy Policy)
TripleLiftThis is an ad network. (Privacy Policy)
Say MediaWe partner with Say Media to deliver ad campaigns on our sites. (Privacy Policy)
Remarketing PixelsWe may use remarketing pixels from advertising networks such as Google AdWords, Bing Ads, and Facebook in order to advertise the HubPages Service to people that have visited our sites.
Conversion Tracking PixelsWe may use conversion tracking pixels from advertising networks such as Google AdWords, Bing Ads, and Facebook in order to identify when an advertisement has successfully resulted in the desired action, such as signing up for the HubPages Service or publishing an article on the HubPages Service.
Statistics
Author Google AnalyticsThis is used to provide traffic data and reports to the authors of articles on the HubPages Service. (Privacy Policy)
ComscoreComScore is a media measurement and analytics company providing marketing data and analytics to enterprises, media and advertising agencies, and publishers. Non-consent will result in ComScore only processing obfuscated personal data. (Privacy Policy)
Amazon Tracking PixelSome articles display amazon products as part of the Amazon Affiliate program, this pixel provides traffic statistics for those products (Privacy Policy)
ClickscoThis is a data management platform studying reader behavior (Privacy Policy)