Making a Tiny Treasure Chest


Candy Tins
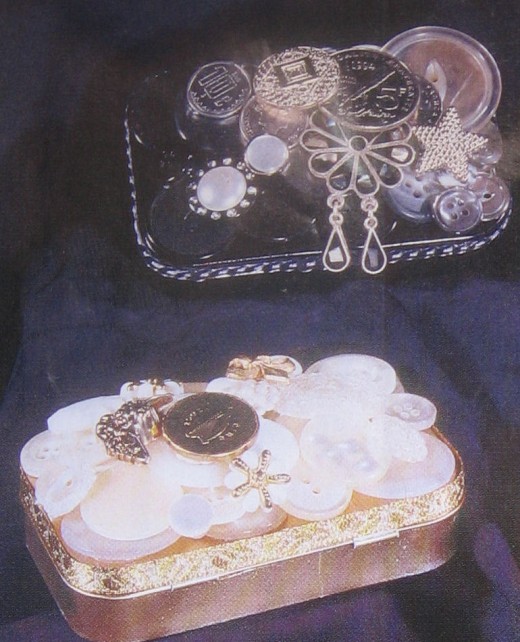
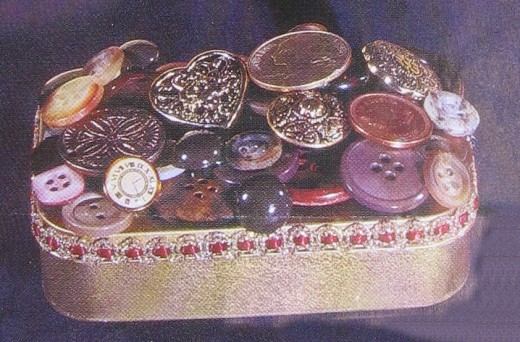
Everywhere you look these days, you see small hinged tins. They can hold candy, mints, gum, cough drops...the list is endless. Once you have finished the contents, instead of tossing out the empties, transform them into tiny Treasure Chests. You don't need much, a handful of buttons, broken jewelry, or coins that you can easily find around the house. These finished boxes let you display tiny treasures that may have been kept/lost in the back of drawers and haven't seen in years. They will be delightful for keeping safe those special things such as baby's first tooth.!
Take a few minutes and look in your sewing box, jewelry box, and don't forget to check your junk drawer! You will be surprised to see just how many bits and bobs you will find that you can use. Plainer or simpler items shouldn't be over looked, as they make for a nice base for your design.
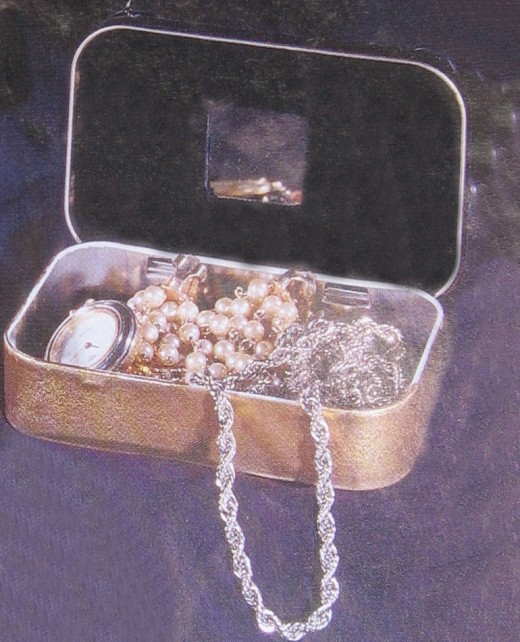
To add a more special touch you may even decide to add a mirror to the inside along with velvet lining.
Supplies
Empty tin with hinged lid
Spray paint
20 - 30 buttons
4 - 5 decorative buttons, jewelry pieces or coins
Decorative 3/8" ribbon, 15" long for a standard size tin
Glue gun and glue
White glue
Optional items:
Scrap velvet, approx. 5"x12" for a standard tin
Double sided tape
8 1/2"x11" card stock
Small mirrors
X Acto knife
Steps
1. Remove any paper inserts and any leftover mint/candy bits. Place tin on newspaper and give a light coat of spray paint.. Allow to dry thoroughly. Repeat several more light coats, being sure to dry completely between each.
2. Optional: in order to make a lining for your box, place the tin bottom side down on the piece of card stock. Trace the outline of the tin. To line the lid, repeat, tracing the top of the lid. Cut out form just inside the edge of your lines, making the liners slightly smaller for easier fitting. Place card forms on the back of your velvet/fabric scrap, glue onto velvet/fabric. Cut the velvet/fabric approximately 1/2" wider than the card stock form. Place double stick tape along the length of one side of the velvet/fabric edge and fold over the bottom of card stock. Repeat until all sides are folded/taped down.
3. Cut a length of ribbon long enough to fit the rim of the lid. Attach the ribbon by using a thin line of the white glue. Using the glue gun start attaching the first layer of large buttons to the top of the lid. Start with the plain ones leaving the more decorative ones for the top layer. Don't worry about placing them perfectly. The charm of the finished tins is the randomness of the buttons and baubles. Small bits of ribbon can also be used on the lid to create an interesting design.
Tips
Select buttons, ribbon, and bit and bobs that have a unified theme. Tortoise shell and brown buttons coordinate well with warm colored metal objects like brass and copper. Ivory and white buttons coordinate with pastel colored focal points. Black and gray buttons coordinate with silver and and stronger colored buttons like red and bright blues.
Too add a little glamour to the inside of your lid, you can add a small mirror to the center of the fabric/velvet lined lid using hot glue gun.
Related

How to Keep Children Amused Without a TV or Computer

Free Jewelry Making Tutorials: Crafting Handmade Pins, Bracelets, Necklaces and More

Crafts for Baubles, Bangles and Beads & How to Make Orange Peel Jewelry & Pasta Jewelry

Lego Indiana Jones 2 Walkthrough 8: Radiers of the Lost Ark, The Treasure Chest Levels

How To Use Plarn For Braided Bracelet Jewelry Recycled Craft Projects


