Make a Ring - Set a Stone in Bead Netting


Bead Netting is a Fun Way to Set a Stone
Use this easy netting technique to form a beaded bezel around any cabochon. For this tutorial, the netting encircles an opal and is extended outward to form a ring. However, beaded bezels make great settings for pendants, bracelets, and earrings, too! The netting technique can be used to make many other beautiful jewelry designs, not just to set stones.
Bead Netting Ring Overview
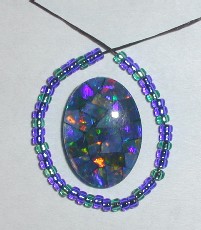
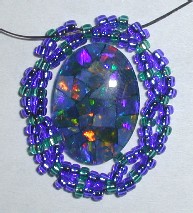
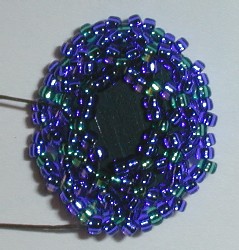
I've been wanting to set this mosaic black opal for some time, but I never found a setting that pleased me. This beaded bezel protects the opal from the scratching and wear it could be exposed to in a ring, plus it accentuates the colors within the stone. I didn't embellish the perimeter of the netting, but this technique lends itself to all sorts of creative expression.
I would rate this as in intermediate level beading project. The netting technique is very simple, but maintaining tension on the thread and working with tiny beads may be a bit frustrating to new beaders. This project takes about an hour to complete.
Materials for this Beading Project
Cabochon
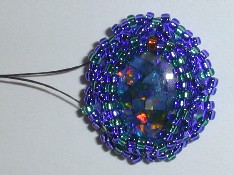
A round or oval cabochon is easiest. My cab is flat-backed, but the technique would have worked with a faceted gem.
Beads
My cab was relatively small, 8x6 mm, so I used size 15 seed beads. However, size 11, 10, 13s are all good choices for larger stones. It's nice to work from a larger bead size toward a smaller size, but it isn't necessary. I used a pair of 3-mm accent beads for either side of the cab. They are optional.
Thread
I recommend Power Pro or something similar if you are using beads with large enough holes. However, I used size D nymo with the size 15 beads. You will need to allow for at least 4 thread passes through the beads.
Needles
I used size 12s. You could use size 10 beading needles with larger seed beads.
Find Beading Materials Online
You should be able to locate the materials for this beading project at any beading or crafts store, but they are also available online. Feel free to contribute ideas to this list.


Bead Netting Ring Step 1:
I cut about a meter of beading thread. It's more than I needed, but the netting requires tension, so it's better to have too much thread rather than not enough. String on beads in groups of 6 (2 main color, 1 accent color) until you have enough beads to very loosely encircle your cab. The netting will pull the beads around the cab, so you do not want to start out with a tight circle.
Bead Netting Ring Step 2:
Allow the beads to slide to the middle of the thread. Complete the beaded circle, exiting through an accent bead. Pick up 2 main color beads, 1 accent bead, and 2 main color beads. Pass the needle through the second accent bead in the circle (in other words, skip an accent bead).
More Bead Netting Projects

Bead Netting Ring Step 3:
Add 2 main, 1 accent, 2 main - go through the second accent bead. Repeat this pattern until you have come back to your starting point.
Bead Netting Ring Step 4:
Now make a third row of beading. You will still be entering/exiting the contrast color beads from the first row. If you find that these beads won't accommodate your thread you will need to start over again using either a thinner thread or else larger size contrast color beads. Complete the pattern until you come back to and through that first contrast bead again.

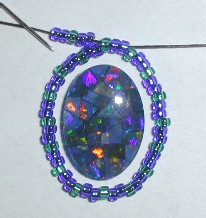
Bead Netting Ring Step 5:
Pass through 2 main color and 1 accent bead of any row. Add 1 main color, 1 contrast color, and 1 main color bead. Pass the needle through the next contrast color bead of the row you are working with. Add 1 main color, 1 contrast, 1 main, and pass through the next contrast color bead of the previous row, continuing until you are back to your starting point. Pull the thread fairly snug. If your cabochon is secure, you can reinforce the stitching of the last netted row. If you like, you can exit a contrast bead and add 1-3 beads of the same of smaller size, enter a contrast bead, etc. to form an additional row of netting. Experiment to get the look you want.

Bead Netting Ring Step 6:
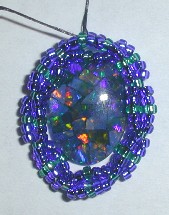
The back of the cabochon is secured in the same manner as the front. Work one end of the thread so that it exits a contrast color bead near the back of the cab. Add 1 main, 1 contrast, 1 main, passing through a contrast bead of the previous row... you probably get the drill by now.
Bead Netting Ring Step 7:
You can add extra rows of netting to completely cover the back of the cab if you like. I added 2 rows of netting. When you are pleased with the coverage on the back of the cabochon run the thread back through the beads to reinforce the final rows. If this the netted cabochon is to be made into a pendant, you can cut the threads once the beadwork has been reinforced.
Bead Netting Ring Step 8:
To make the ring, I worked both threads through the beadwork until they exited contrast color beads on the one row that doesn't have netting (see photo). The thread placement and the type of band that you can make will depend on the size of your cabochon and the number of beads that you have to work with.
Bead Netting Ring Step 9:
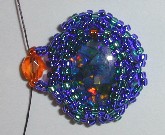
I added three seed beads to each thread and crossed the threads through a Czech firepolish accent bead.
Make a Bead and Wire Ring
Here is another type of beaded ring that you can make.
Bead Netting Ring Step 10:
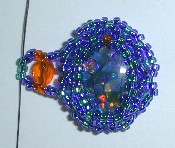
The remainder of the ring band was made by adding 3 main color beads to each thread and crossing the threads through 3 contrast color beads. I repeated the pattern until the ring was just a bit smaller than the size I wanted.

Bead Netting Ring Step 11:
At this point, I crossed the threads through another Czech firepolish bead, added 3 beads to each side, and stitched the end of the band into the netting around the cabochon. Be careful to avoid twisting the band of the ring when you join the ends. If you are using Nymo or another relatively weak thread, be sure to reinforce your stitching around the band before cutting the thread. I didn't tie any knots - the beadwork becomes very stiff and secure after you reinforce it. There isn't any right or wrong way to do the netting. You don't even need main color and accent beads, although I think two colors are easier to work with if you are new to the technique. You can adjust the numbers and sizes of beads to get any number of wonderful effects. Enjoy!
Books about Beaded Rings and Netting
Here are some project books for making more beaded rings or for other bead netting projects. Add your own recommendations. Don't forget to vote up/down.

Questions or comments about bead netting or making a ring? Here's the place for them!


