How to Make Pebble Worry Beads & Paper Weights

Making Simple Pebble Worry Beads
Turning worry beads over and over in your hands, has been proven to help reduce and relieve stress and anxiety.
They can be made with a wide range of materials, for example: seeds, clay, metal and wood, have all been used over the years to make worry beads.
Making pebble worry beads is a fun craft to do with your child, they are easy to decorate, they make some of the most attractive, personalized worry beads.
Having been a pebble and stone collector for many years, I think that half the fun in making these is finding suitable pebbles to use.
Depending on where you live, it make take a little time and effort to find the right kind.
This is a great way to spend an hour or two with your child outside and away from the hustle and bustle of every day life.
Choose pebbles that are flat or rounded and really smooth.
One of the best sources for these are beaches, stream or river beds.
Over time, the continuous flow and movement of the water has worn the pebbles down, grinding them together to create smooth, rounded surfaces.
There are so many possibilities when looking for pebbles on the beach.
You can find pebbles with holes, where a core of soft rock has been washed out.
Sometimes the pebbles have a fault or weak spot, caused by a rubbing away or wearing down by friction. This can be extra effective in your design.
Some pebbles may already have a pattern or design, caused by quartz running through it, or even colored in an attractive way that appeals to you.
When thinking about the pebbles you choose, remember, they should fit nicely in your hand.
They should feel comfortable when moving them around with your fingers, and this action should bring a sense of comfort and ease.
Once you have chosen your pebbles, scrub them well to remove any dirt particles and leave them to dry completely. Once completely dry, your pebbles are ready to decorate.
Most oil-based paints are suitable for decorating the pebbles. Or you can use poster paint, mixed with a diluted gloss instead.
Have a good look at your pebbles before you decorate them. Sometimes the natural colors of the pebbles, such as slay blue, black, ochre or white tinged with pink, will be decorative enough just on their own. These can be left with very little decoration, perhaps just an initial.
A lot of pebbles you find by the water look really pretty when they are wet, but when they dry, they take on a rather uninteresting dusty hue. If you wish to have them keep their wet look, just use a thin coat gloss or varnish.
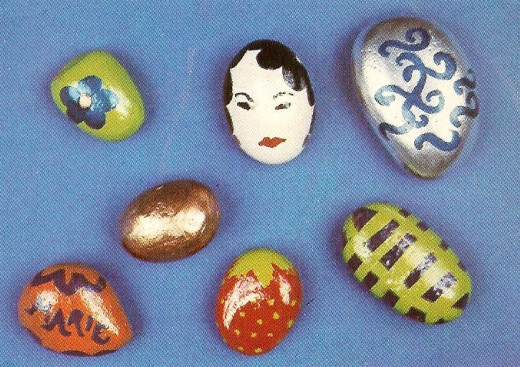
The shape of the pebble too, may well suggest some form of decoration. You may find that some are bean-shaped, or strawberry shaped like the one in the picture above. If you are lucky enough to find one with a hole in it, perhaps you could capitalize on this feature by making it into an eye. Look out for flint stones especially. They are often very interesting knobbly shapes when unbroken and can be made to look like all sorts of things.
When you go out looking for suitable pebbles, do not pass over larger stones. These can make excellent paper weights, and the really big stones make a great door stop.
Finish your worry beads with a coat of gloss or varnish to give them a shiny, wipe-clean surface.

Simple Pebble Paper Weights
Pebble paper weights are fun to make and give great scope for the imagination.
The ideas in the photographs will show you the type of weights you can make, but your own designs will be largely dictated by the shapes of the stones you collect.
You Will Need:
- Selection of smooth stones of varying sizes - beach pebbles would be very suitable
- Selection of paints
- Three paintbrushes of different thicknesses from fine to medium
- Epoxy resin adhesive
- Non-hardening modeling clay like Plasticine
- Brush cleaner
To begin, first wash and dry your pebbles and assemble painting materials. Always clean brushes well after use, and be sure to let one color dry thoroughly before adding the next.
A strong adhesive such as epoxy resin is necessary to stick stones together.
The quick setting type which is firm in ten minutes is a good one to use.
Fat Red-Haired Man in Trunks
- Choose a large pebble with a flat base for body and a small oval one for head.
- Paint both with pink lacquer acrylic paint and allow to dry.
- Stick the smaller pebble on the larger one, holding in place until dry with non-hardening modeling clay.
- Paint in hair and features, trunks and arms, and one arm holding an ice-cream cone or candy.
Smiling Lady
- Choose three pebbles; large, medium and small.
- Paint smallest pebble black for hairpiece, medium one pink and largest one green.
- Leave to dry.
- Stick pebbles together with pink one in center.
- Allow to set.
- Paint in features and hair, clothes and arms detail as shown in the photograph.
Flowery Tortoise
- Choose large flat pebble for the body, four small pebbles for the legs and a flat small pebble for the head.
- Paint all the pebbles purple.
- Allow to dry.
- Stick pebbles together.
- Paint in toenails, features and a simple daisy on the back in white.
Fish in Pond
- Paint a smooth, round pebble in light blue.
- Allow to dry.
- Paint simple outline of fish in orange and give him a green eye.
Ducky Duck
- Paint large oval pebble white and smaller egg-shaped pebble green.
- Allow to dry.
- Glue smaller pebble to one end of larger.
- Paint in wings, tail and beak in red, and the eye in white.
Kitty Cat
- On the oval pebble, add ears, feet and tail in non-hardening modeling clay.
- Make nose, mouth and eyes in same material and stick on, the eyes should be green and the nose red.
- Stick a green sequin on each eye.
These are just some ideas to get those imaginative juices flowing. Additions, like the Kitty Cat, may suggest themselves and may be left uncolored or painted afterwards.
I have been an avid rock collector throughout the years and have found many interesting pebbles along the way.
Sunny afternoons along the river are one of my favorite things.
Thanks for stopping by & Happy Crafting!
© 2013 Dawn


