Photography: A Few Lighting Tricks

Light Bounce Is Not Always a Bad Thing
In my first article on photographic lighting, I explained how light can bounce and ruin a photo. There is a way, however, to use that very same light bounce to enhance your photo. This is a trick most useful outdoors, but it can also be put to use indoors as well for a portrait sitting.
You will need some simple supplies, and possibly an assistant.
- tripod for the camera
- white foam-core board
- artist's easel (or that assistant)
Tripods are among the most basic of tools for anyone interested in taking more than casual snapshots. Besides holding the camera absolutely steady, use of a tripod also frees up one of your hands to hold or manipulate something else if need be (as with the tape measure in the photo above). If you are using your camera on "macro" setting, or zoomed in on telephoto setting, a tripod is not an option, it is a must! That magnification also magnifies any shake or vibration and will result in a fuzzy out-of-focus image.
If you don't have the foam-core board available to you, a large piece of white cardboard will do in a pinch..but it can cause problems because it may not be rigid enough to stand without collapsing. Again, an assistant can help with this. (Alternately, clamps can be used, if there is a near enough surface to which anything can be clamped.)
I list an artist's easel as an alternative to an assistant if no one is available to help, but anything you can rig up that will hold your foam board still and in the position you want will work, for example you could use white-headed thumb tacks or push-pins to fasten it to the side of a saw horse.

Why Not Just Use the Flash?
For one thing, the camera's flash is harsh lighting, and not pleasing for a portrait effect. The pros use expensive cameras with a detachable flash unit they can use to bounce the flash off a nearby wall or the ceiling, giving a softer light. Most of us can't afford the cameras with that capability.
Secondly, you might have an "awwwwww...sooooo cuuuute" moment with a sleeping baby and/or pet, and you don't want to wake them up with a sudden flash of bright light.
Eliminating Shadows Without Using Flash
This is one of the tricks used by the "big boys" for getting that soft portrait lighting using natural light. One caveat: this is only usable on either sleeping subjects, or those old enough (or in the case of pets, well-trained enough) to understand remaining still while you set up.
This can be done either indoors or outdoors, but outdoors, you may have breezes to contend with, and you will need that helper.
Let's set up a possible scenario:
You are at a picnic, and your child has fallen asleep under a tree with a half-eaten apple in her hand. Too cute. However, it is a large tree, and casts a deep shadow. Here is the setup:
- Observe the position of the sun
- Mount your camera on the tripod at the angle you want for the photo
- Have your helper hold the foam board opposite the sun, so the light bounces off toward the shadow cast by the tree
This will cast a very soft added bit of light onto your subject, lessening the darkness of the shadow.
You can also use a silver-coated board, or something shiny such as one of those insulated sun shades made for car windshields; this does give a harsher light, but not as harsh as using the flash on the camera.
Now, don't tell me you didn't bring all your supplies with you! Anyone serious about photography and improving their pictures never travels without all the "might need" items! Don't forget that kitchen sink! ;-)
Portraits
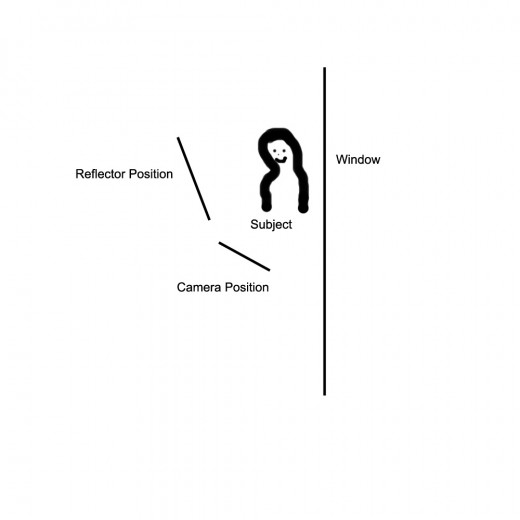
A very nice informal portrait can be taken with the subject posed next to a window. The natural light coming in the window makes a nice soft glow...if the sun is not shining directly into that window. This is why artists favor north-facing windows. If you have no north-facing windows, just use a window opposite the current position of the sun...i.e., west in the morning; east in the afternoon.
For even softer light, leave the curtains closed, assuming they are sheers. If they are not sheer, open them. You will notice the side of your subject away from the window (near side) will be in fairly deep shadow, and the features will be almost a silhouette in the final photo.
To eliminate this shadow, using your artist's easel or assistant, position your foam board reflector fairly close to the subject, but just out of view of the camera, facing the window. The light will bounce off the board, and lessen the shadows. The overall effect is a very soft light, almost a glow.
This technique, on a much larger scale, is also used in Hollywood movie production. You also see it in professional photography studios, with their reflector flash units, where the flash is facing away from the subject into a reflective umbrella gizmo.
Near-Window Portrait
Click thumbnail to view full-size


Videography
You can also use this when shooting video, but you must be very, very careful, or the end result will look very amateurish and be a distraction instead of an asset.
It is best put to use with a stationary subject, such as an interview. Your reflector board must be large enough to light the entire shadow side of the subject, and it is imperative that it be held absolutely still, and the camera should be on a tripod as well.
In this case, that easel, sawhorse or clamp arrangement is essential. The very worst effect you can have is for that reflected light to be moving and bouncing about like a kid playing with reflecting the sun off a pocket mirror.
If you are conducting an interview about anything the least bit serious, a flaw of that nature with your lighting setup will not only be distracting, but it will detract from the credibility of your overal work. Yes, people do make those kinds of leaps in judgement.
Practice Makes Perfect
Or so they say. As I'm fond of saying, "Anyone looking for absolute perfection is on the wrong danged planet!"
Practice will certainly make you a more accomplished photographer whose photos are worthy of admiration instead of avoidance.
Go play, and have fun! For the majority of us, photography is a hobby, not a job, so enjoy the process!
© 2011 Liz Elias


