Photoshop for Beginners: Create Yummy Orange Jelly Text

In this tutorial I will show you how to create Translucent Orange text effect in only twelve steps. I have used only default font and layer styles so all Adobe Photoshop versions are applicable.
The Tutorial is suitable for Beginners Level. In the process of work you will learn how to colorize Layer, How to use Type tool and how to apply Blending Options on Text layer.
Those of you who are Intermediate or Advanced Level Photoshop users will notice that I haven’t rasterized both Text layers. This is in case if you don’t like the Font I have used, to be able to change it only by highlighting the previous Text and typing the new one with the Font you have chosen.
All Photoshop versions are applicable.
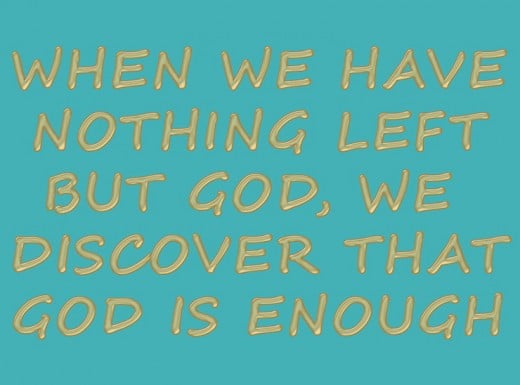
This is what you are going to create:

Open a New Photoshop Document and Colorize Your First Layer
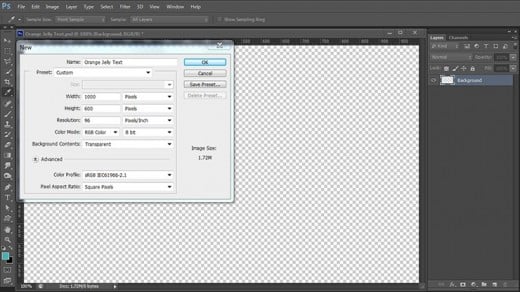
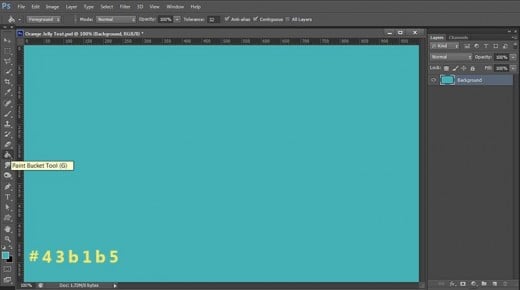
In the coming two steps you task is to create a new .psd file with Transparent Background layer. After that you have to use Paint Bucket tool from the Tools bar to colorize your canvas in blue.
STEP 1
Start by creating a new Photoshop .psd document. In Name field insert Orange Jelly Text, set Width to 1000px, Height to 600px, insert 96 Pixels/Inch for Resolution (or 300-600 Pixels/Inch if you intend to print the text), choose RGB for Color Mode and Transparent for Background Contents. Double click on Layer 1 and change its name to Background.
STEP 2
Set Foreground Color to #43b1b5 and with Paint Bucket Tool colorize your canvas. Just drag once with the tool to fill your first layer with color. You can do the same if you navigate to the Menu bar and choose Edit, Fill, Foreground color.
Type Your Text and Apply Four Blending Options
In the coming four steps you should firstly type the Text using Segoe Script default Font. After that you have to apply four Blending Options on the Text layer- Drop Shadow with Ring Triple Contour, Inner Shadow with Cone Contour, Bevel and Emboss with Shallow Slope-Valleys Contour and Contour Layer Style of Rounded Steps type. As you can see I have stressed on the contours to achieve the cool effect. You also need to reduce Fill Opacity Option of the Text to 0% in order to make it transparent and only the Blending Options to be visible.
As a last step, you need to duplicate the Text layer, clear the previously applied Blending Options and keep the Fill Opacity to 0%.
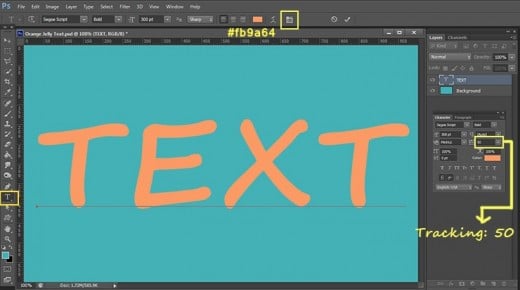
STEP 3
Grab the Horizontal Type Tool, choose Segoe Script (default font), Set Font Style to Bold and Size to 300pt. Choose #fb9a64 for Text Color. Type TEXT using capital letters. Highlight the text then click on Toggle the Character and Paragraph Panels and set Tracking to 50.
STEP 4
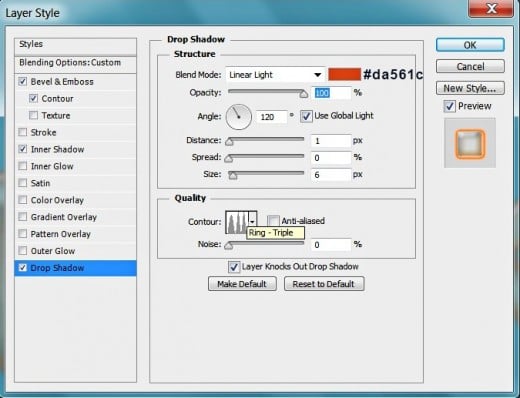
With Text layer selected, reduce Fill option in Layers panel to 0%. Your text will disappear, but no bother. You'll see it again after you start to apply the Blending Options. Right click on Text layer and select Blending Options or go to Layer, Layer Style and tick Drop Shadow. Change its settings as follows:
Blend Mode: Linear Light
Color of Shadow: #da561c
Opacity: 100%
Angle: 120 degrees
Use Global Light: checked
Distance: 1px
Spread: 0%
Size: 6px
Contour: Ring-Triple
Anti-aliased: unchecked
Noise: 0%
Keep Layer Style dialog box open as we are going to apply two more layer styles on our first Text layer.
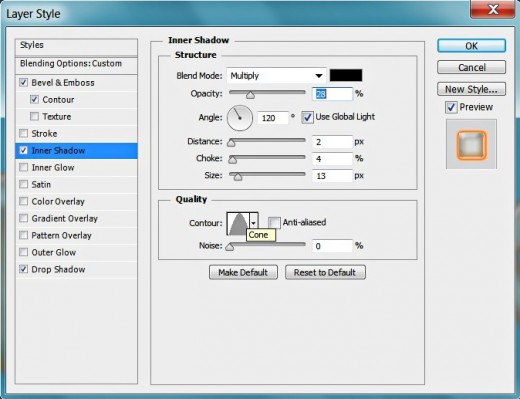
STEP 5
Now check Inner Shadow in Layer Style box and change its settings as follows:
Blend Mode: Multiply
Color of Shadow: #000000 (Black by default)
Opacity: 28%
Angle: 120 degrees
Use Global Light: ticked
Distance: 2px
Choke: 4%
Size: 13px
Contour: Cone
Anti-aliased: unchecked
Noise: 0%.
STEP 6
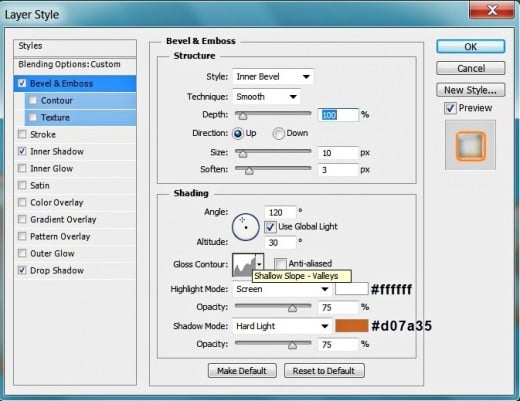
The third Layer Style to apply on this first Text layer is Bevel and Emboss. Change its settings like this:
Style: Inner Bevel
Technique: Smooth
Depth: 100%
Direction: Up
Size: 10px
Soften: 3px
Use Global Light: checked
Altitude: 30 degrees
Gloss Contour: Shallow Slope-Valleys
Anti-aliased: unchecked
Highlight Mode: Screen
Color of Highlight: #ffffff (white)
Opacity: 75%
Shadow Mode: Hard Light
Color of Shadow: #d07a35
Opacity: 75%.
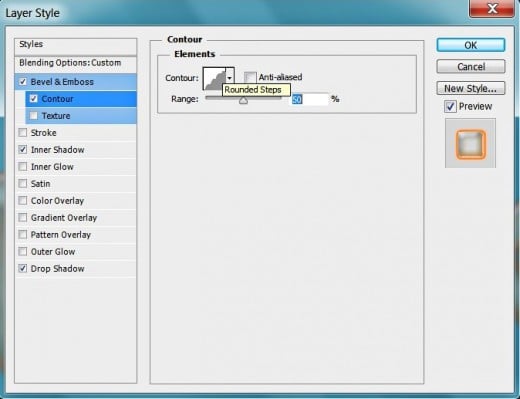
The last Layer Style you have to apply on the original Text layer is Contour. Choose Rounded Steps type from the Contour Picker.
Reduce Fill Opacity Option of the Text layer to the minimum of 0%. Thus you’ll make your Jelly Text transparent.
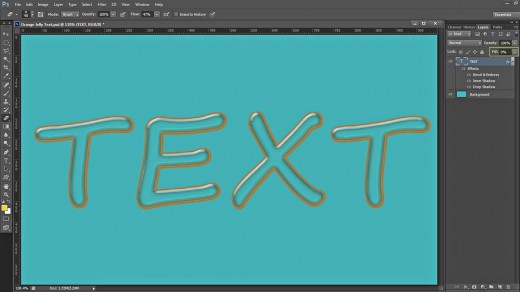
Right click on the Text layer and select Duplicate Layer or simply drag Text layer to Create a New Layer icon at the bottom of Layers pane. Delete the layer styles of the duplicate- right click on the copied layer and select Clear Layer Style or drag fx symbol at the right of the layer to the litter bin icon at the bottom of Layers panel. Keep Fill Opacity option of Text copy layer to 0%!
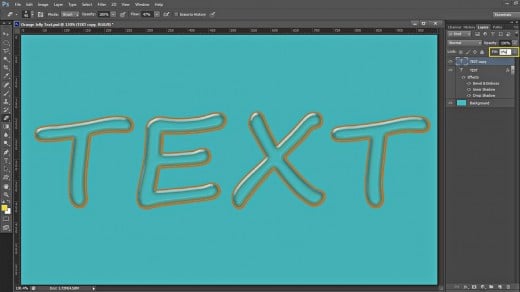
Apply Three Blending Options on the Duplicated Text Layer
Your task till the end of this tutorial is very simple. All you have to do is to apply three Blending Options on the duplicated Text layer. You should add orange Color Overlay, Inner Shadow with Terraced Contour and Bevel and Emboss with orange shaded Highlight and Shadow Color.
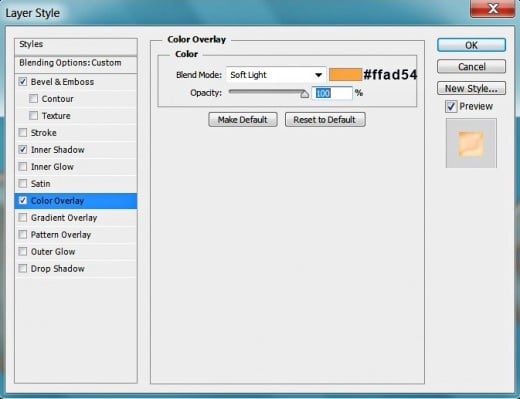
STEP 7
Now while the Text copy layer is selected, go to Layer, Layer Style and tick Color Overlay. Set Blend Mode to Soft Light, set Color of Overlay to #ffad54 and Opacity to 100%.
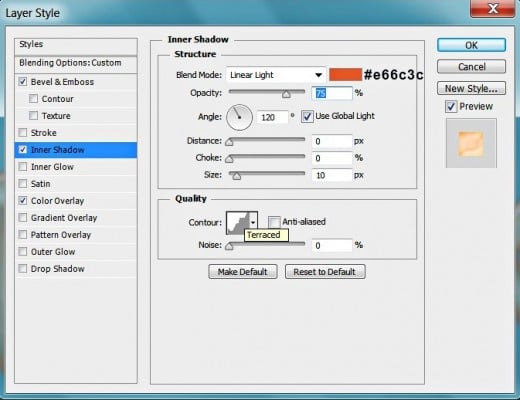
STEP 8
Now check Inner Shadow in Layer Style box and insert these settings:
Blend Mode: Linear Light
Color of Shadow: #e66c3c
Opacity: 75%
Angle: 120 degrees
Use Global Light: checked
Distance: 0px
Choke: 0%
Size: 10px
Contour: Terraced
Anti-aliased: unchecked
Noise: 0%.
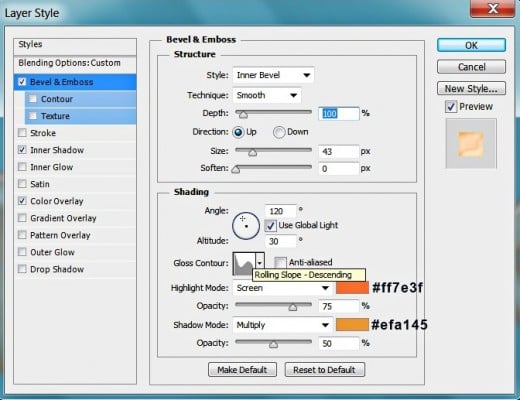
STEP 9
We have one more Blending Option to apply in order to finish our yummy text. Check Bevel and Emboss and insert the following settings:
Style: Inner Bevel
Technique: Smooth
Depth: 100%
Direction: Up
Size: 43px
Soften: 0px
Use Global Light: checked
Altitude: 30 degrees
Gloss Contour: Rolling Slope-Descending
Anti-aliased: unchecked
Highlight Mode: Screen
Color of Highlight: #ff7e3f
Opacity: 75%
Shadow Mode: Multiply
Color of Shadow: #efa145
Opacity: 50%.
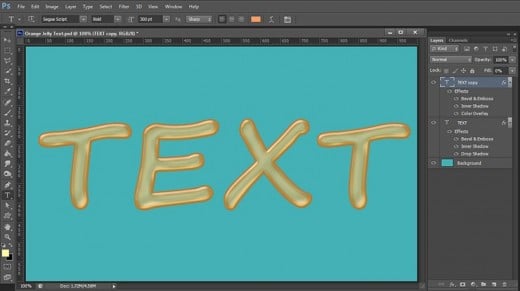
STEP 10
Our yummy orange jelly text is ready. You should have one Background, one Text and one Text copy layer in your Layers pane.
STEP 11
This is the final result. If you have performed all the steps described, your text should resemble the one on my screenshot below. If you have any questions, please don’t hesitate to leave a comment.

Just a simple example to show you how simple, effective and attractive this Orange Jelly Text Effect is: