- HubPages»
- Arts and Design»
- Drawing»
- Drawing Tutorials
Portrait Drawing for the Ultimate Beginner: Hair

Drawing Hair
After drawing the entire face and its features, drawing the hair is the final part. There are many different hair textures: curly, wavy, straight, etc. Other elements or types of hair include eyebrows, eyelashes, scalp hair, facial hair, and body hair. In this lesson we’re going to focus on the eyebrows, eyelashes, & scalp hair (i.e., curly and straight).
Eyebrows
The eyebrow hair is pretty simple to draw. You have thick, thin, bushy, and sparse. By now, you should have pretty good knowledge of how to use your tortillion & kneaded eraser. They both go hand & hand. With this part of this lesson, you will definitely need both.
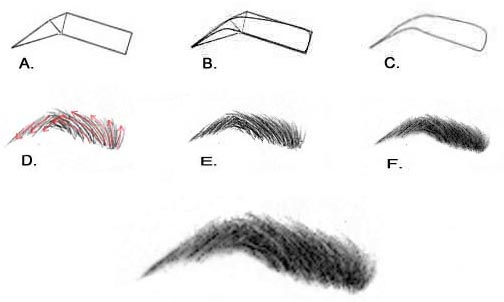
A. Start by connecting a rectangle and a triangles as shown in the example. You make it as wide or narrow as you want.
B. Next, round or smooth the edges.
C. Erase the guidelines.
D. Draw fine lines that resemble hair inside the eyebrow, slightly extending outside the guidelines. Follow the direction of the red arrows.
E. Draw more fine lines, creating fullness.
F. Begin smoothing with your tortillion, but not too much because you still want to be able to see the individual hairs. Molding to a point, use your kneaded eraser to lift some of the darker shades in order to add highlights & dimension.
Eyelashes
In this portion of the lesson we will focus on the eyelashes. Below are some examples of the wrong and right way to draw them:
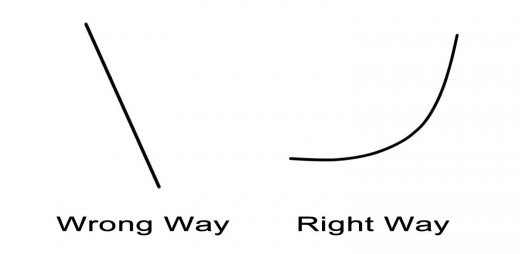
You will notice in the example on the left there is just a straight line drawn at an angle. I’ve noticed some drawings of the eye and the artist, in the beginning stages, will draw the lashes this way. This is incorrect. The eyelashes grow out, not up. The example on the right shows just that. When you examine your lashes, notice they form a slight curve from the root of the eyelids.
Below is a step by step example of how to draw the eyelashes. The same rules apply to all angles of the eye:
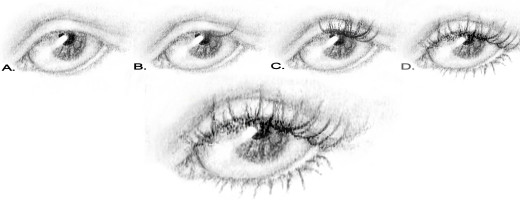
A. Start by drawing the eye. You should be acquainted with drawing the eye with all the practice you’ve had!
B. Start with one lash anywhere on the top lid. We’re going to take small steps. Keep in mind eyelashes should not all be the same length. Some will be short, some will be longer.
C. Begin drawing more & more lashes, overlapping & crossing them as you develop fullness. The lashes should be shorter towards the inner lid and longer in the center.
D. Continue drawing lashes on the top lid until you get the fullness you want. Follow the same steps on the bottom lid, but not as long as the top. The bottom lashes should be thinner and sparse. To give the lashes a more natural look, use your tortillon to blend them, blending only a few lashes at a time.
Hair Textures
Now last, but not least, we will draw two textures of hair. The first example is straight hair and the second is curly, textured hair.
Straight Hair
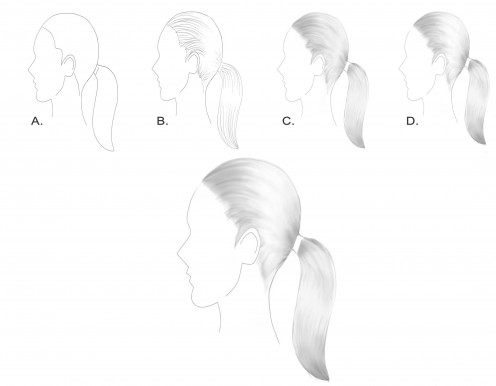
A. Draw the side profile of a head with an outline of a ponytail as shown in the above example. As the shape of the head is not that important in this part of the lesson, you can use the one I’ve drawn as a template.
B. Next, draw what looks like a few strands of hair. You have the choice of drawing the hair as light or dark as you like. I chose to use a lighter tone, which indicates blond hair.
C. Start blending the strands of hair in the direction you drew them.
D. Use your kneaded eraser to lift some of the tones giving the hair shine and dimension. Continue building & blending until you get the definition you want.
Textured Hair
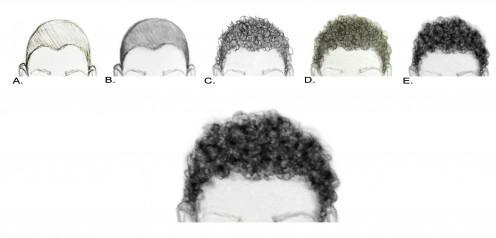
A. Draw the top part of the head. If you’d like, you can just draw a circle or another side profile. The only thing we need to focus on is the hair. Now, draw a hairline & fill in the portion above the hairline (i.e., scalp) with your pencil.
B. Next, smooth the surface with your tortillion. This will lay the foundation for the curly hair.
C. Now is the fun part! Start drawing squiggly lines (i.e., circular motion) like you learned in elementary school on the scalp. Draw enough squiggles to cover the entire scalp.
D. Start smoothing those squiggly lines with your tortillion using the same motion.
E. Continue drawing more squiggly lines, this time darker & smaller, building more texture. Repeat the process of smoothing, blending, & building tones. Mold your kneaded eraser into a point. Use this to dab and lift some of the tones to create highlights.
♦ Key Points to Remember
-Keep in mind the various textures of hair: curly, wavy, and straight.
-The shade of hair you choose to draw will determine hair color (ex: light-blond, dark-brunette, etc.).
-Eyelashes are drawn in a curve and not a straight line.
-Curly/textured hair is all about building volume. Draw squiggly, circular shapes when drawing this hair type.
-Have patience.
-Don’t be hard on yourself & have fun!
-Keep practicing! It will make you a better artist.


