Create Glossy Text with Stroked Work Path in Photoshop
In this short tutorial I am going to show you in detail all the steps I have taken to create lovely glossy text with layer styles and work path.
In the process of work you will learn from me how to turn a selection into a path and then stroke it with a brush of your choice.
I have created the Text Effect in Photoshop CS6 but all other versions are applicable as I haven't used brushes or instruments exclusive for the higher versions.
The Frost Texture I have used to make the Background more prominent is my own photo and unrestricted stock.
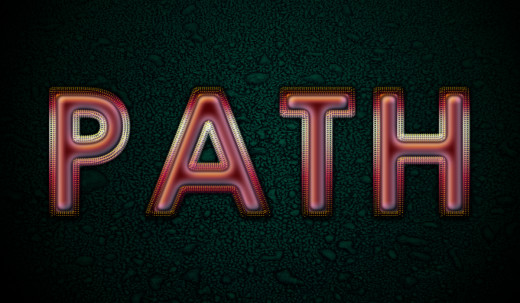
This is a preview of the final result:

STEP 1
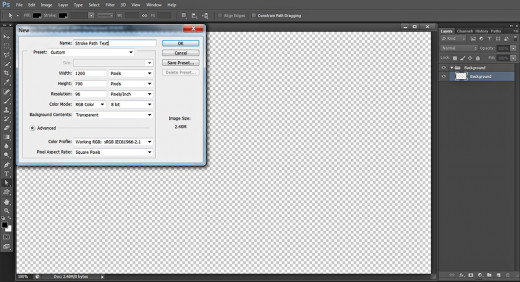
Open your Adobe Photoshop program, navigate to the Menu bar and choose File, New. As you see on the screenshot below, I have called my .psd document Stroke Path Text but if you like, you can insert another Name.
Set the Width of the document to 1200 Pixels and type 700 Pixels for Height.
I don't intend to print the Text, that's why I prefer 96 Pixels/Inch for Resolution and RGB for Color Mode. If you like to print, set the Resolution to 300 Pixels/Inch and choose CMYK for Color Mode.
The last setting which is to be changed is Background Contents. I have chosen Transparent option as I'll get automatically an editable layer.
Now double click on the Layer 1 name and type Background in the white rectangle to rename the layer. Press also Ctrl+G to place it in a group. Change the name of Group 1 to Background.
Don't forget to place your Stroke Path Text .psd file in a folder, as later you are going to download Texture and it is better to keep your files in one and the same place.
Create Background with Frost Texture and Sepia Antique Gradient
In Steps 2-7 we have three tasks to implement. Firstly we are going to colorize our first layer with navy blue, then we'll add Frost Texture and will change its Blend Mode to create awesome relief. As a final touch we'll create third Background layer filled with Radial Sepia Antique Gradient.
STEP 2
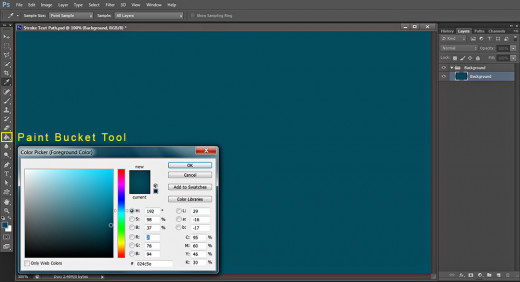
With the Background layer selected, navigate to the Tools bar and Set the Foreground Color to #024c5e then grab Paint Bucket Tool and drag once on the canvas to colorize it.
STEP 3
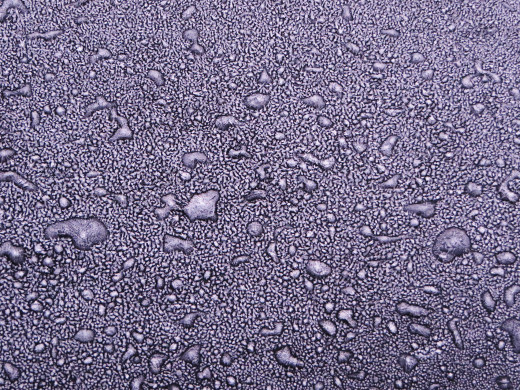
Now download this Frost Texture- click on it to open it in High Resolution then right click and choose Save As to place it in your folder. We are going to work with this Texture in the next two steps.
STEP 4
Create a New Layer named Frost Texture on top of Background group.
Now open in Photoshop the Texture you downloaded in Step 3, press Ctrl+A to Select it as a whole then press Ctrl+C to Copy it.
Go back to the Stroke Path Text .psd file, select Frost Texture layer and press Ctrl+V to place the Texture there.
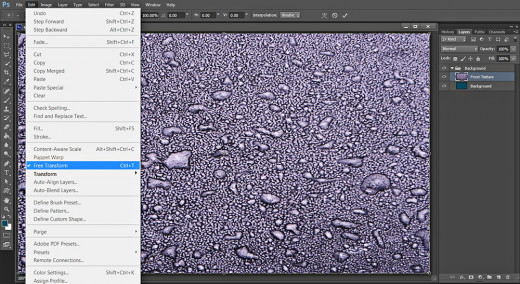
Keep Frost Texture layer highlighted, then navigate to the Menu bar and select Edit, Free Transform. Move a chosen node in inner direction to resize the Texture- it should cover your canvas, then press Enter to apply the Transformation.
STEP 5
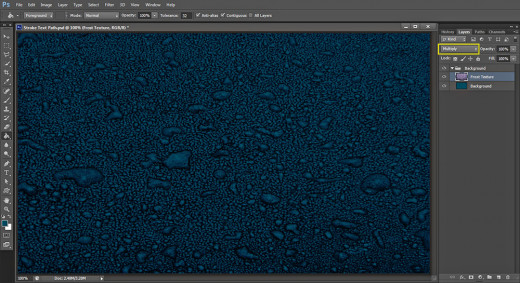
Change the Blend Mode of Frost Texture layer to Multiply.
STEP 6
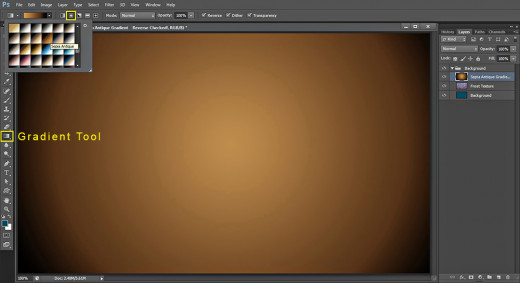
Create a New Layer above all layers in Background group and call it Sepia Antique Gradient, after the Gradient we are going to use. No bother if your Photoshop version does not offer this type of Gradient. I'll give you its Color Stops in this step so that you can prepare it yourselves.
While the newly created layer is selected, take Gradient Tool, find Sepia Antique Gradient in the Gradient Picker (it is in Photographic Toning Pack) and click on the Radial type of Gradient icon in the Options bar. After you are ready with these settings, drag with the instrument from the middle to any corner of the canvas.
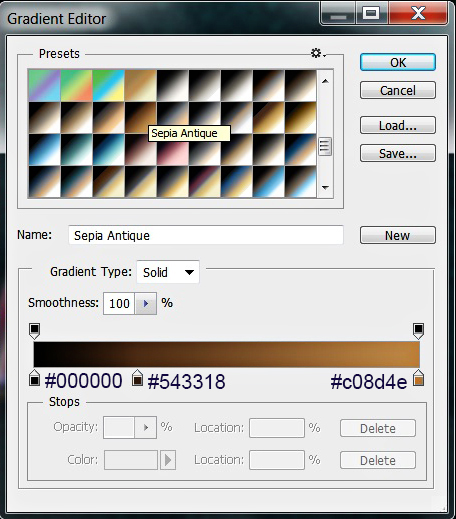
For those of you who need to prepare this Sepia Antique Gradient, its three color stops are as follows:
First Color Stop (Location 0%): #000000 (black)
Second Color Stop (Location 27%): #543318
Second Color Stop (Location 100%): #c08d4e.
STEP 7
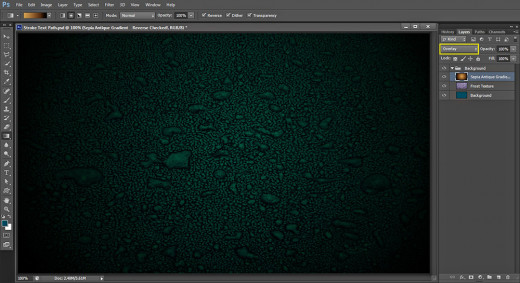
Change the Blend Mode of Sepia Antique Gradient to Overlay and you'll get the following outcome:
Type Your Text and Apply Two Blending Options
In Steps 8-10 you need to type the Text using defaul Font, then you are going to apply Inner Shadow and Bevel and Emboss on its layer to make the text glossy and more prominent.
STEP 8
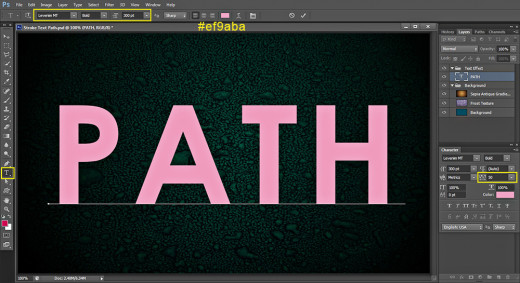
Let us now start to create the Text which we are going to stroke later. Grab Horizontal Type Tool then navigate to the Options bar. Firstly find Levenim MT from the Font Family drop down menu. Of course you can use another thick font looking similar to the one I have chosen. Set the Font Style to Bold and the Font Size to 300pt then choose #ef9aba for Text Color. Type Path or any other four-lettered word on your canvas. As you can see I have left the Tracking to the default 50 as our stroke won't be too thick and there is no possibility for the letters to overlap.
Place the Text layer on top of Layers panel and put it in a group called Text Effect.
STEP 9
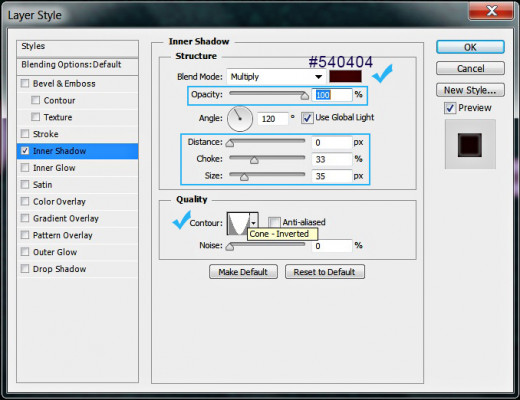
Now right click on your Text layer and select Blending Options (Layer, Layer Style, Blending Options). Check Inner Shadow Layer Style and modify the following six settings: change the Color of Shadow to #540404, increase the Opacity to 100%, set Distance to 0px, Choke to 33% and Size to 35px. Choose also Cone Inverted Contour from the Contour Picker.
Keep the Layer Style box opened because we have to add 3D effect in the coming step.
STEP 10
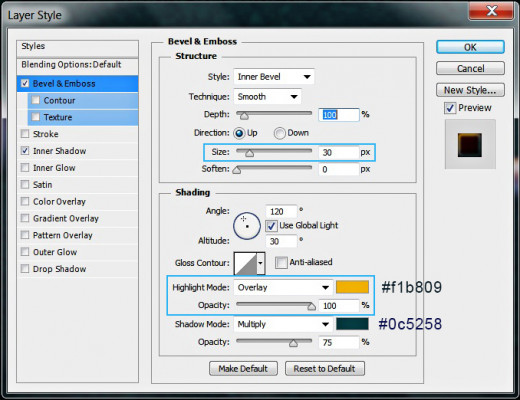
This time tick Bevel and Emboss in Layer style dialog box. Heighten the value of its Size to 30px. Change the Highlight Mode to Overlay, then set the Color for Highlight to #f1b809 and increase its Opacity to 100%. Set also the Color of Shadow to #0c5258.
Click OK button to close the dialog box. We finished with applying Blending Options on our Text layer.
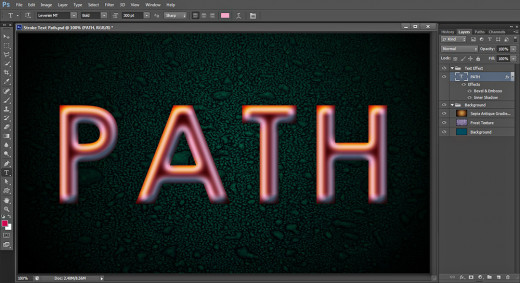
This is the outcome you should get after adding Inner Shadow and 3D effect to the Path Text layer:
Create Work Path and Stroke it with Snowflake Brush
In Steps 11-17 we are going to Make Work Path from Selection in Paths panel then we'll stroke it with Snowflake Brush. To improve the look of the path, later we are going to apply Drop Shadow, Gradient Overlay and 3D Effect.
STEP 11
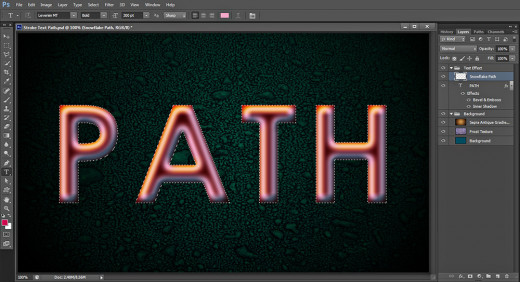
Now create a New Layer on top of Text Effect group and name it Snowflake Path, after the snowflake default brush we are going to use later. Keep this new layer highlighted, then hold down Ctrl key and click on Path Text layer's thumbnail to Load Selection. You should achieve this result:
STEP 12
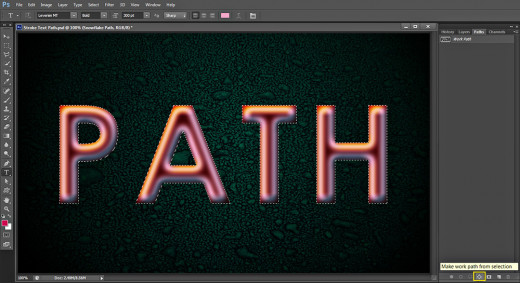
Click on Paths panel or if it is still not activated, go to Window, Paths. Click on the icon Make Work Path from Selection which is at the bottom of the panel:
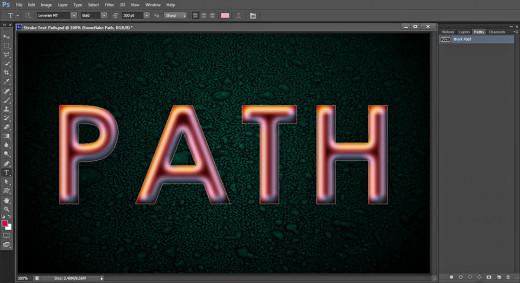
This is how the created Work Path will look on your canvas:
STEP 13
Set the Foreground Color to #c90b53 then grab Brush Tool and find Snowflake Brush of 20px Size by default.
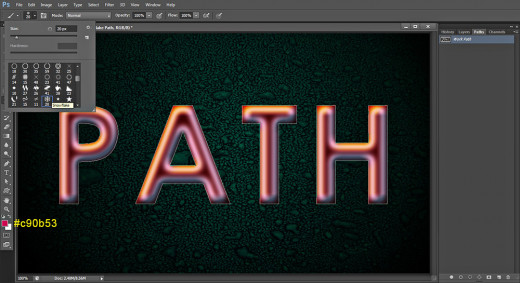
STEP 14
Now click on Stroke Path with Brush icon at the bottom of Paths panel:
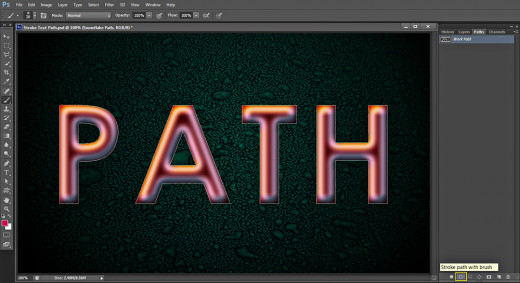
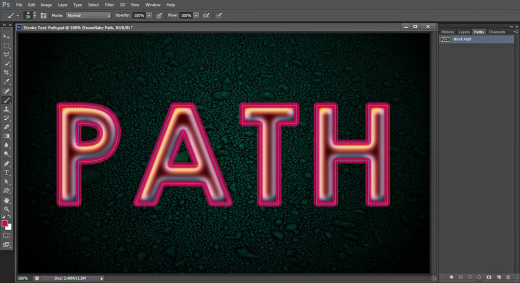
Below is shown a preview of how your stroked Work Path will look. You don't need the Path anymore. Certainly you can keep it if you like but if you prefer to get rid of it, just press Delete key or drag the Work Path to the Recycle Bin icon at the bottom of Paths panel.
STEP 15
The dark pink stroke around the letters looks flat and dull so we need to add Blending Options if we want to make it more appealing.
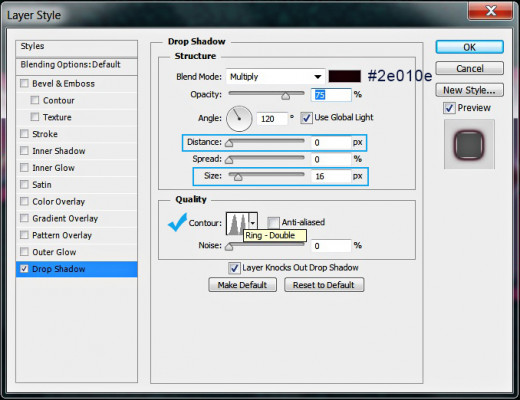
Double click on Snowflake Path layer's thumbnail to call Layer Style dialog box. The first Blending Option to be selected is Drop Shadow. Change the Color of Shadow to #2e010e, reduce Distance to 0px and highten the value of Size to 16px then select Ring-Double from the Contour Picker.
Keep Layer Style box active as we have another two Blending Options to add.
STEP 16
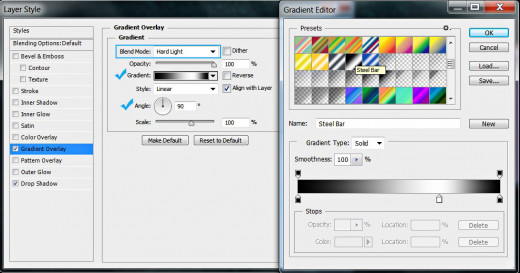
Now check Gradient Overlay, change its Blend Mode to Hard Light and set the Angle to 90 degrees, then click on the Gradient thumbnail to activate the Gradient Picker. Select Steel Bar Gradient.
STEP 17
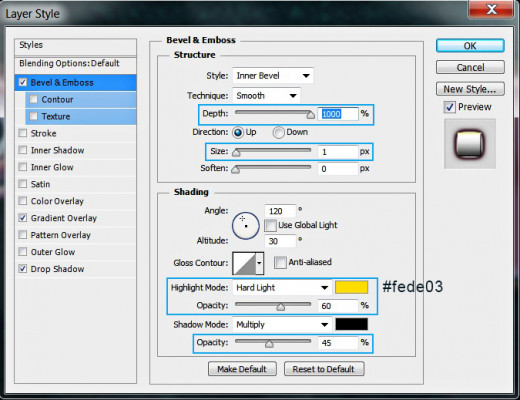
The last Layer style to be added on the Snowflake Path layer is Bevel and Emboss. Increase its Depth to 1000% and reduce the Size to only 1px. Change the Highlight Mode to Hard Light, select #fede03 for Color for Highlight and reduce the Highlight Opacity to 60%. Lower also the Color of Shadow Opacity to 45%.
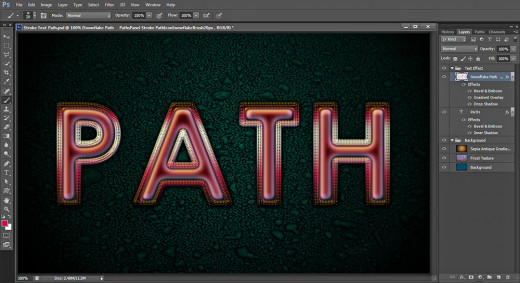
Below is shown the result of adding Blending Options to the stroked layer. We already completed our work on the Text. If you have followed all my steps you should have these three groups of layers in the Layers pane:
-
Background group with three layers in it: Background, Frost Texture and Sepia Antique Gradient and
-
Text Effect group which includes the following two layers: Path Text layer and Snowflake Path.
STEP 18
This is a preview of my result saved in .jpg format. Hope you learned something new from this short tutorial and found working in Paths panel easy and funny. Please, leave a comment below if you don't understand something and need further explanation. Thanks a lot for reading and God bless! :)
