Create Splendid Background with Texture, Shapes and Distort Transformation

This tutorial will show you fast and easy way to create beautiful Background with the ordinary Adobe Photoshop tools. To get the final result, you will need to use gradients, Soft Brush, Inner Shadow Layer Style, Custom Shape and Rectangular Marquee Tool.
The Stone Texture applied to improve and add relief to the Radial Gradient is my own photo and unrestricted stock.
I did my best to explain everything in detail so the tutorial is suitable for Beginners level and all Photoshop versions are applicable.
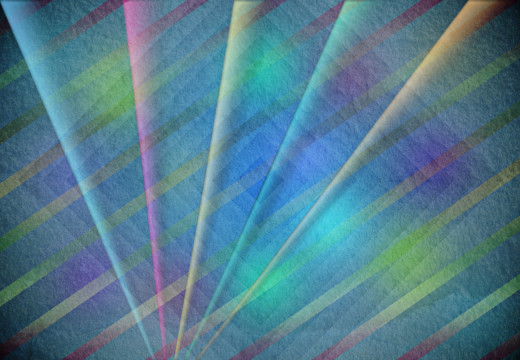
This is the result you should achieve:

![Adobe Photoshop Elements 2018 [Old Version]](https://m.media-amazon.com/images/I/51AQ4wl7eOL._SL160_.jpg)
STEP 1
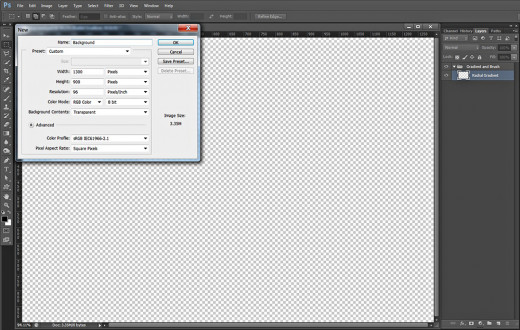
To start your work open your Photoshop, go to File, New and create a new .psd document of 1300 Pixels Width and 900 Pixels Height. Set the Resolution to 96 Pixels/Inch, choose RGB Color for Color Mode and Transparent for Background Contents. Call the file Background for example.
Rename Layer 1 to Radial Gradient and press Ctrl+G to put it in a group. Rename Group 1 to Gradient and Brush.
Prepare the Background Base with Radial Gradient and Soft Round Brush
In the coming two steps you have to colorize the canvas with blue shaded Radial Gradient. After that you should cover your canvas on a New Layer with default Soft Round Brush dabs to improve the color combo. You need to change the Blend Mode and reduce Opacity of the Brush layer to make the colorful circles transparent.
STEP 2
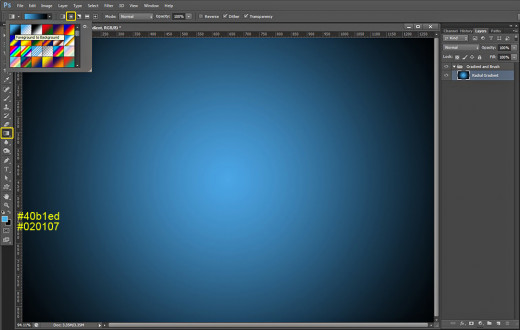
We have to colorize our first layer in this step. Change the Foreground Color to #40b1ed and Background Color to #020107. Take Gradient Tool then navigate to the Options bar to change its settings. Firstly select Foreground to Background type of Gradient, then click on Radial Gradient icon. Drag with the tool from the middle to any chosen corner of the canvas and you'll get the following outcome:
STEP 3
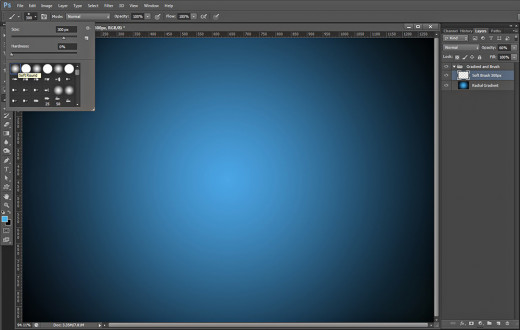
Create a New Layer on top of Gradient and Brush Group and name it Soft Brush. I have called it Soft Brush 300px to recollect the Brush size and type I have used when I open the file after a long time but it is not necessary for you to do the same like me.
Well, now select Brush Tool and grab Soft Round Brush from the Brush Preset Picker. Increase its Size to 300 pixels.
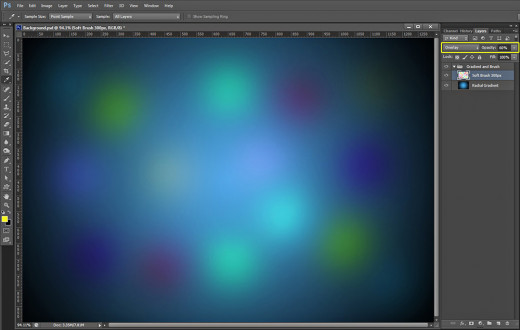
While the Soft Brush layer is highlighted, start making dabs with the Brush on your canvas, using different colors. I have chosen the following six colors: #87f9f1, #f4f31f, #f492f5, #ffa654, #9d16a0 and #f93251.
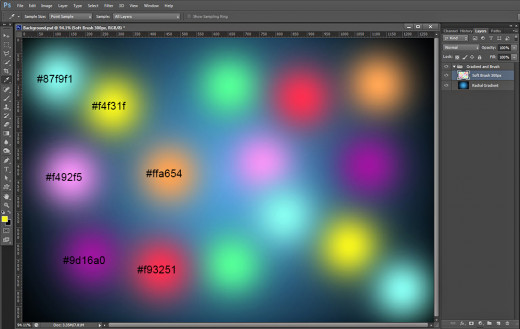
Change the Blend Mode of Soft Brush layer to Overlay and lower its Opacity to 60%.
Add Stone Texture to Create Rough Surface
In the next three steps you should download Stone Texture photo and Paste it in a New Layer in your .psd document. You also have to create a New Group for the purpose. You need to Resize the Stone Texture with Free Transform so that it covers your canvas then change its Blend Mode and Opacity to make it translucent.
STEP 4
Now you have to download this cool Stone Texture which is going to add a nice touch to our Background image. Click on the Texture and when it opens in High Resolution, select Save As and put it in the folder where you keep your Background .psd file.

STEP 5
Create a New Layer on top of Layers panel and name it Stone Texture. Put it in a Group called Texture and Custom Shape.
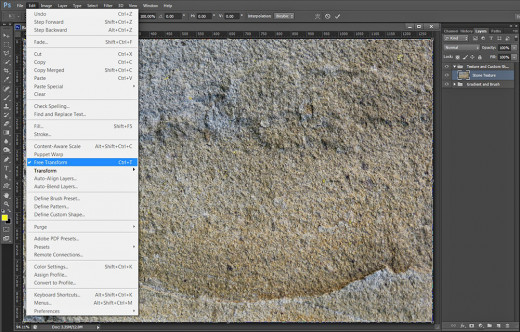
Now open in Adobe Photoshop the Stone Texture you downloaded, press Ctrl+A then Ctrl+C to Select and Copy it, then go back to the Background .psd file, check if Stone Texture layer is selected and press Ctrl+V to Paste the Texture there.
You'll see that the Stone Texture is bigger than your canvas so apply Edit, Free Transform to resize it- to make it cover the canvas. Press Enter to tell your Photoshop to accept the Transformation.
STEP 6
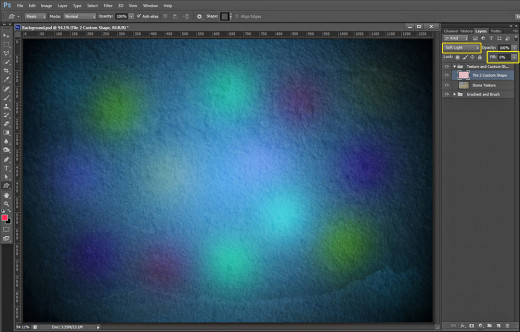
Change the Blend Mode of Stone Texture Layer to Soft Light and lower its Opacity to 45%.

Add Stripes with Custom Shape Tool and Colorize them with Gradient
In Steps 7-9 you have to cover your canvas with default Tile Custom Shape. You should draw the Shape in a New Layer on top of Texture and Custom Shape group and reduce Fill Opacity Option to 0%. In order to colorize the stripes, you should apply default pastel colored Gradient.
STEP 7
Create a New Layer on top of Texture and Custom Shape group. Name it Tile 2 or Tile 2 Custom Shape after the figure we are going to use in this step.
Change your Foreground Color to #fd3156, after that take Custom Shape tool and set its Mode to Pixels in the Options bar. Find Tile 2 in the Custom Shape Picker and drag from the upper left to bottom right angle of your canvas to cover it with the shape.

STEP 8
Now reduce Fill Opacity of Tyle 2 Custom Shape layer to 0% and change its Blend Mode to Soft Light. The shape will disappear from your screen but in the next step you'll be able to see it again after applying Layer Style.
STEP 9
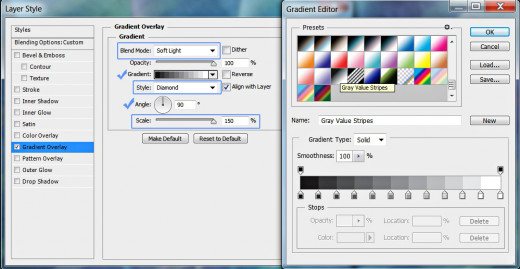
Double click on Tyle 2 Custom Shape layer's thumbnail or go to Layer, Layer Style, Blending Options. Select Gradient Overlay Layer Style, change its Blend Mode to Soft Light and select Rust, Green, Gold Gradient from the Gradient Picker. Set the Gradient Angle to 90 degrees.
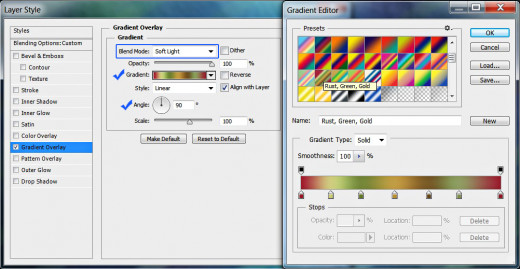
This is how the Tyle 2 shape will look after adding the Gradient to it. Our Background is getting better. :)

Draw Rectangles Filled with Gradients and Apply Distort Transformation
In Steps 10-16 you are going to draw a few rectangles using Rectangular Marquee Tool, then you should fill them with Linear Gradient and apply Distort Transformation to turn them into awesome colorful rays.
You have to apply Inner Shadow Layer Style to give the rays more volume.
STEP 10
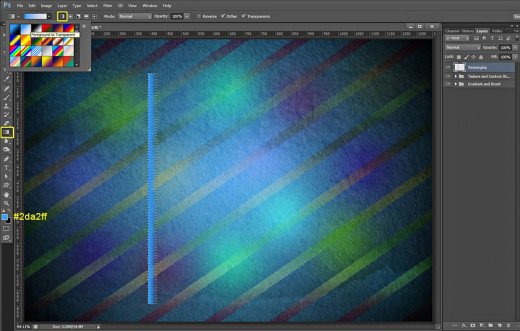
Create a New Layer on top of Layers panel and name it Rectangles.
Change the Foreground Color to #2da2ff. Grab Rectangular Marquee Tool (the second instrument from top to bottom, below the Move tool in the Tools bar). Draw a thin rectangle as you see on the following screenshot.
In order to colorize the rectangle, select Gradient Tool, choose Foreground to Transparent Type of Gradient and click on the Linear Gradient icon. Hold down Shift key and drag with the Gradient from the left to right side of the rectangle.
Keep the rectangular selection active.
STEP 11
While Rectangles layer is highlighted and the selection active, go to Select, Transform Selection.
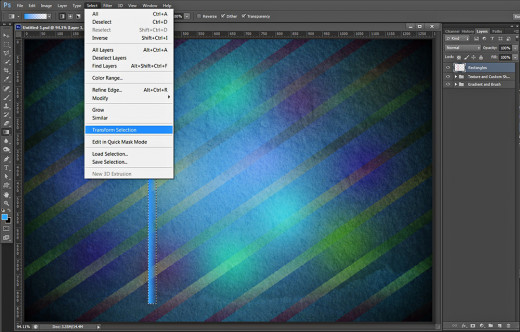
When the Transformation Rectangle with the nodes appear around your selection, hold down Shift key and simultaneously press Right Arrow key 4-5 times to nudge the selection. Press Enter to apply the Transformation.
Don't deselect. We'll repeat this step a few more times.
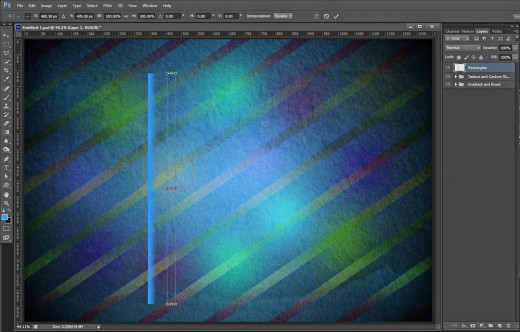
STEP 12
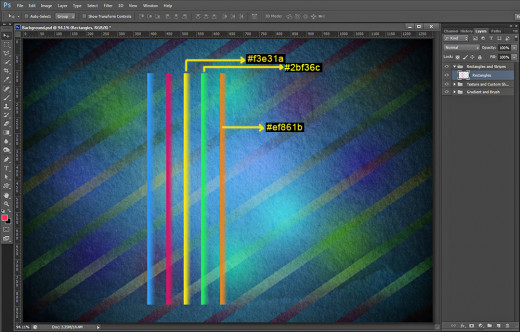
Change the Foreground Color to #f2096c then select again Foreground to Transparent Linear Gradient and while holding down Shift, drag from the left to right side of the selection.
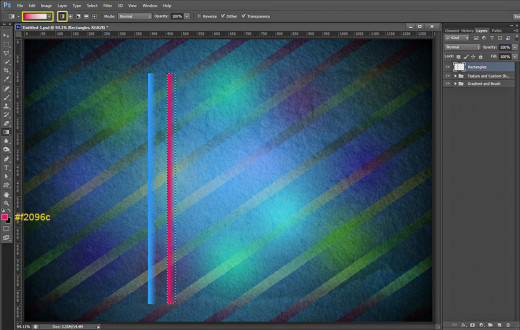
STEP 13
Repeat Step 11 concerning the Selection Transformation three more times. Use different colored Foreground to Transparent Linear gradients to fill the respective rectangular selection. I have used these foreground colors: #f3e31a, #2bf36c and #ef861b.
Press Ctrl+D (Select, Deselect) to remove the rectangular selection when you are ready.
Press also Ctrl+G to place Rectangles layer in a group named Rectangles and Stripes.
STEP 14
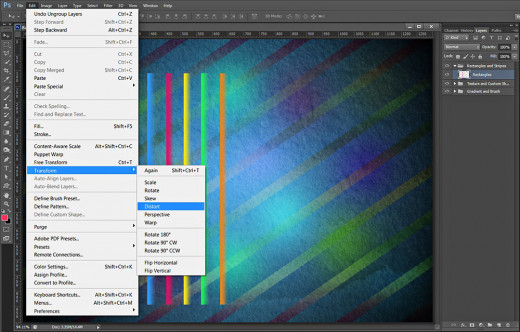
With Rectangles layer highlighted, go to Edit, Transform, Distort.
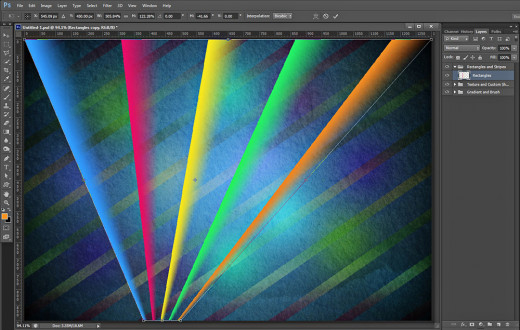
Drag the upper left node of the Transformation Rectangle to the upper left corner of the canvas. Drag also the upper right node to the upper right corner of your canvas and move both bottom nodes to touch the bottom side of the canvas. Use the following screenshot for a referrence.
Press Enter to apply the Distort Transformation when you are ready.
STEP 15
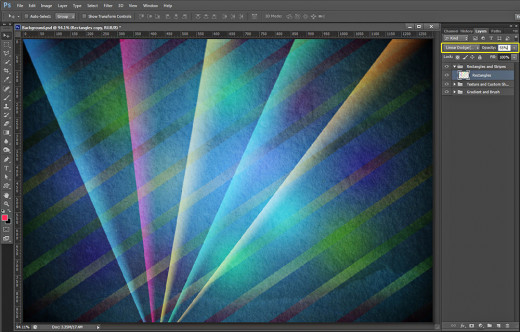
Change Blend Mode of Rectangles layer to Linear Dodge and reduce its Opacity to 55%.
STEP 16
In this step we are going to add shadow and more volume to our distorted rectangles. Double click on Rectangles layer's thumbnail to call Layer Style dialog box. Check Inner Shadow then reduce Distance to 0px, increase Choke to 1% and Size to 10px.
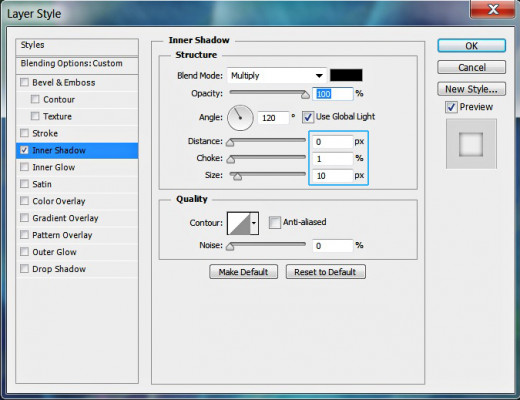
This is how your distorted gradient rectangles will look after applying the Inner Shadow Layer Style.

Improve the Texture with Gray Value Stripes Gradient
In the last steps of this tutorial, you have to Create a New Layer and fill it with Black then lower its Fill Opacity Option to 0%. Your next task is to apply default Gray Value Stripes Gradient of Diamond Style and Soft Light Blend Mode. This will add awesome geometric pattern to your work.
STEP 17
Press D key to set Foreground/Background Color to Black/White.
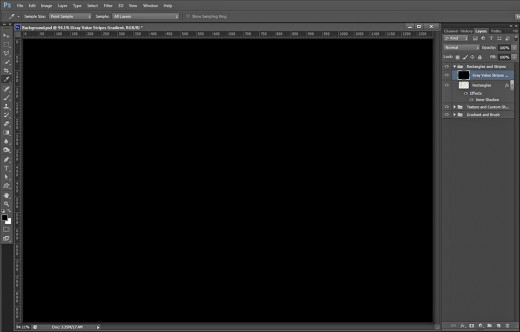
Create a New Layer on top of Rectangles and Stripes group and name it Gray Value Stripes after the Gradient we are going to use. Fill the layer with Black (Edit, Fill, Foreground Color or use Paint Bucket Tool).
STEP 18
Reduce Fill Opacity of Gray Value Stripes layer to 0%. The black color will disappear which is good. We need to fill the layer with any color (not necessary to be black) in order to be able to apply Layer Style. The layer styles applied on empty layer are not visible.
STEP 19
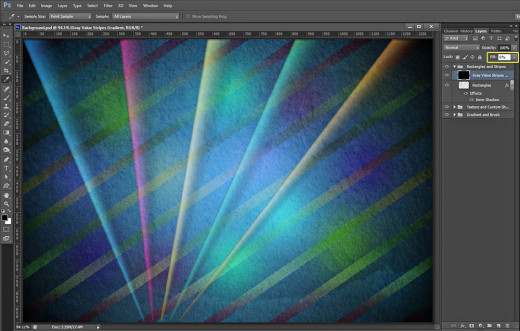
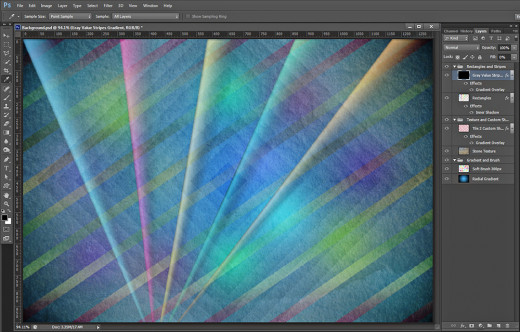
Double click on Gray Value Stripes layer's thumbnail and check Gradient Overlay in Layer Style box. Change the Blend Mode to Soft Light, find Gray Value Stripes Gradient from the Gradient Picker, choose Diamond from Style drop down menu, Angle should be 90 degrees and Scale 150%.
This should be your outcome after applying the Gray Value Stripes Gradient of Diamond style. As you can see, it created really awesome and unique effect without much effort.
If you have followed all my previous steps, you should have the following three groups with the respective layers in them:
-
Gradient and Brush group with two layers in it: Radial Gradient and Soft Brush;
-
Texture and Custom Shape group which includes these two layers: Stone Texture and Tyle 2 Custom Shape and
-
Rectangles and Stripes group which consists of Rectangles and Gray Value Stripes layer.
STEP 20
This is our Splendid Background saved in .jpg format. Hope you like the outcome and find this tutorial funny and useful.
If you have any questions, don't hesitate to contact me or to leave a comment below.
Thank you very much for reading and God Bless! :)


")


