Repurposing Shelves to Display Cabinet for WWII Artefacts

Safety Criteria
My wife’s brother-in-law recently gave our son WWII gasmasks and other artefacts found in his loft during a clear-out prior to moving. As our son is as keen on history as I am he wanted them on display in his bedroom, but was concerned because they contain trace amounts of lead, arsenic, asbestos and mercury.
Therefore, he asked me if I would convert part of a built-in corner shelf unit into an air-tight display cabinet. The toxins in the masks filters and in the other WWII artefacts are only in trace amounts, and quite stable (undisturbed), so handling them briefly, provided you wash your hand afterwards is quite safe, although it would be unwise to actually try one on.
However, he was most concerned in that although there’s a low risk to health from airborne particles (there’s more risks from car fumes in a busy street), the fact that they would be on display in his bedroom where he sleeps might slightly raise the risks, if they weren’t displayed safely behind glass in an airtight cabinet.
Design Requirements
Following discussions with my son we concluded that the cabinet would not have to be watertight, it would only need to be airtight to the extent of trapping any stray airborne particles. Also, he wasn’t concerned whether the front glass panel was presently screwed in place or not as, once they are on display safely behind glass, he has no intention of getting the gasmasks out.
Another requirement my son had was that the inside of the display cabinet should be all white; to reflect maximum light, and to give maximum contrast to the artefacts.
Therefore, after putting some thought into it, I decided the best solution would be to make the glass panel removable, and to seal the edges with door and window frame draught excluders.

Factors Dictating Design
The first step to designing the display cabinet was to try the gasmasks on the shelves to see how they fit, get an idea of what needs changing, and draw a rough sketch with measurements.
Factors governing the design included:-
- The gasmask with built-in filter was deeper than the depth of shelves, and
- The right side panel extended further than the shelf depth.
For the gasmask with the built-in filter to fit within the space:-
- It would need to be placed at a 45 degree angle.
- The left side panel would need to be extended to same depth as the right panel, and
- The glass front would need to be fitted in front of the two side panels, rather than fitting between them.
To make a sealed display cabinet with shelves to fit the gasmasks:-
- The top and bottom shelves would need to be replaced with new shelves that would be the full depth of the display cabinet,
- The two middle shelves would need to be altered, one made deeper and the other less deep, and
- Both middle shelves would need repositioning.


Step-by-step Guide to Making the Display Cabinet
Below is a step-by-step guide on how I recycled salvaged wood to convert the shelving unit to a display cabinet.
#1: Making Both Sides the Same Depth
The side panel on the right jutted out 55mm (just over 2 inches), but as the glass panel needs to fit over the front of both sides (to maximise depth), the left side needed to be brought forward by 55mm.
The simple solution would be to fit a piece of timber of the correct dimension into the space available; the space available being 90mm x 55mm with a minimum length of 1m.
In rummaging through my wood store in my workshop I found part of our old front porch doorframe that just so happened to be 90mm x 55, and almost double the minimum length.
All I had to do to prepare the wood, before gluing and screwing it in place, was to remove the door stop, de-nail it, sand it back to the bare wood, and trim the ends; as follows:-
- Use old chisels, crowbar and hammer to prise off the door stop.
- Use a claw hammer to de-nail it.
- Sand it back to the bare wood with a belt sander, and
- Trim the two ends with a mitre saw.
Once that was done, before gluing and screwing in place I also had to use an old chisel to gently prise off the decorative corner moulding in the space where the timber was to be fitted.
Although the piece of timber is longer than the display cabinet I was making, it was just a few inches shorter than the full length of the corner shelving unit. However, those few inches is just the right height to create a convenient nook to display and store my sons silver plated money box; therefore we decided to keep that as a design feature.


#2: Making the Front Glass Frame
The spare piece if pine plank I had in my workshop, measuring about 5 inches by 1 inch planed, would be more than enough wood to make the from provided I cut it in half lengthways.
However, it was badly warped and twisted, and would be challenging to work with as the front glass panel would need to be perfectly flat and square for an airtight fit and to accommodate the glass. Nevertheless, I was confident that I would be able to encourage the wood back into shape, and square it up, and make it flat, as I progressed with its build and fit.
The steps for making the frame for the glass:-
- Measure the width of the plank and set the guide for bench saw so that the middle of blade would be in line with the middle of the width of the plank, then use the bench saw to cut the plank in half along its length.
- Cut all the required pieces to length with a mitre saw.
- Lay the pieces out and square them up using a square, double checking for squareness by measuring the opposite corners diagonally e.g. if the frame is square the two sets of diagonally opposite corners will be identical.
- Number or letter each pair of butt joint, for identification when re-fitting.
- Mark across each pair the butt joints, with a pencil, where each pair of dowels is to be fitted, and transfer those markings to the edges with a square.
- Ensure the front of each piece of wood is facing in the same direction e.g. towards you, use a marking gauge to mark the exact position for each dowel; so that all the dowels in each butt join lines up properly. Alternatively you can use a suitable dowelling jig to achieve the same thing.
- Choose a drill bit just a fraction of an inch wider than the thickness of the dowels to allow for the glue; ideally by just 0.5mm, and fit a drill stop collar to drill bit to just over half the length of the dowels.
- Drill all the holes, put a generous blob of glue in each hole, tap the dowels in place with a hammer, and fit all the joints together.
- Clamp up the frame on a flat surface, ensuring it stays square and flat, and leave overnight for the glue to set.


Untwisting the Frame
With the wood badly warped and twisted, after the frame had been glued together, and left overnight for the glue to dry, the frame was still badly warped by a good couple of centimetres (more than an inch).
It was essential for a good airtight seal for the frame to be flat when fitted in place.
So as a first stage of encouraging the wood back into shape, each night for the period of the project (three nights) I would re-clamp the frame to my workbench and drench it in with water from a spray bottle.
This exercise reduced the warping from over 2cm to less than 1cm; which was sufficient given that by the time the frame was finished the wood would be much thinner and more pliable, so that once the plate glass was fitted and the frame locked into place it would be perfectly flat.

#3: Making and Fitting the Top and Bottom Shelves
The top and bottom shelves would form the top and bottom of the sealed display cabinet.
For making these shelves I found a teak wood side panel in my wood store, which I’d previously salvaged from an old office cupboard.
Using this wood, the steps I took to make and fit these shelves were:-
Cutting the Shelves to Size
- Using a tape measure, square and pencil, measure and mark out the size of the shelves to be cut.
- Carefully cut the shelves to size with a jig saw.


Facing the Shelves in White
To make the inside of the display cabinet white, in accordance with one of the criteria of the design, I had a couple of sheets of white faced hardboard sheets in my wood store; salvaged from the back panel of a scrapped modern wardrobe that I’d be given.
Optionally I could have painted the inside white with gloss or emulsion paint, but as I had just enough white faced hardboard for this project I felt using the hardboard would give a much better and maintenance free finish. White gloss would have been easy to apply, but it tends to go magnolia within a few years and therefore needs regular repainting to keep it white. White emulsion does stay whiter for longer, but it tends to be a sheen finish (silk) rather than a shine (gloss finish).
- Using the shelves as templates, I marked up and using a jig saw cut the required pieces for facing to size from the salvaged sheets of white faced hardboard.
- I then glued and tacked the white facing hardboard onto the underneath of the top shelf, and the top side of the bottom shelf.


Bottom Shelf Head Support
One of the props my son uses in his profession, as a professional photographer, are polystyrene heads; and it was two of these heads that he would be using to showcase the two WWII gasmasks.
However, with the heads being polystyrene the masks made them top heavy, so some means of holding the heads in place upright was required.
My solution was to fix rods to the shelves and push the heads down onto the rods. To achieve this for the bottom shelf, in rummaging around the spare bits and pieces in my workshop, I found a piece of plastic coated metal rod, a rubber foot for stools and a spare rubber stopper from pond water feature.
So the steps in making the head support were:-
- Place the polystyrene head in one corner of the shelf to mark and measure the spot for drilling a hole to fit the metal rod.
- Cut the rod to the appropriate length with a pipe cutter.
- Trim the rubber stopper with a Stanley knife to create a rubber washer.
- Use a flat wood drill bit to drill the hole in the shelf, and
- Test fit the rod.


Locking Design for Tight Fit of Glass Panel to Bottom Shelf
In designing the airtight display cabinet one option would be to just simply screw the front panel to the modified shelving unit. However, ideally I wanted the front glass panel to be easily removable if required.
Therefore, after a few cups of coffee and some thought, the design I devised was as follows:-
- The white faced hardboard would butt against the bottom edge of the front panel.
- A wooden batten would be fixed to the edge of the white faced hardboard as an extra butt.
- I would fit a couple of dowels to the bottom of the front panel as lugs, which would fit into corresponding holes in the bottom shelf, to butt against the white faced hardboard and batten tightly, and
- On final assembly, the seal would be completed with the use of a strip of foam rubber window and door draught excluder.


Fitting Top and Bottom Shelves and Test Fitting Front Panel
After completing the bottom shelf and adding a similar butt batten to the underside of the top shelf, I then fitted both shelves in place and test fitted the front panel.
The only adjustment necessary was to use an electric plane to just trim off a couple of millimetres from the top of the front panel for a tight fit.


#4: Making the Two Middle Shelves
The two middle shelves are specifically to house and display the top mask; the upper middle shelf needed to be half depth, while the lower middle shelf would be full depth.
For the upper middle I decided to use thicker wood as this would support the heavier of the two masks, and I wanted the extra depth as extra support for the metal rod. The rod itself would be made from some spare copper pipe I had, and a spare plastic fitting in my plumbing tool kit.
The wood I chose for this shelf was an off-cut of meranti wood leftover from when I made my wide a sewing cabinet; and the wood I used for the lower middle shelf was from a sheet of pine wood salvaged from an old wardrobe.
As with the top and bottom shelves, the top sides of these shelves would also be faced with white faced hardboard; and the front edge of the top shelf would be faced with uPVC window and door trim leftover from when I built our conservatory.


#5: Facing Sides and Back in White
Using the spare white faced hardboard to face the back and sides of the display cabinet in white:-
- I cut the hardboard to size for the two sides and back.
- Marked and measured for the shelf supports for the two the middle shelving on the left-hand panel; recycling salvaged beading as the shelf supports. No shelf supports required on the other side panel as I would be screwing through the side panel to secure the shelves in place on that side.
- I then glued and tacked the three white faced hardboard in place, and
- To make the unit airtight I sealed around all the edges with white bath silicone sealant.


#6: Test Fitting the Middle Shelves
Having faced the inside of the display cabinet in white, it was time to test fit the middle shelving with the polystyrene heads for gasmasks, and the front panel, to make any final adjustments before turning my attention to completing the front panel.
The result of the test fit was to raise the lower middle shelf by 25mm (1 inch) so as the give a better view of the lower head and gasmask, and thus the need to raise the middle rail in the front panel to align with the that shelf.


#7: Repositioning Middle Rail on Front Panel Frame
Having done a test fit of the middle shelves, and raised the lower middle shelf by 25mm (1 inch) to give a better view of the lower gasmask, I then needed to raise the middle rail on the front panel by 25mm to keep it in line with the corresponding shelf.
Repositioning the middle rail is a bit of a pain, but it’s not a difficult or lengthy job.
The only restrictions were:-
- I couldn’t do a dowel joint internally without dismantling the whole frame, and
- I couldn’t screw from the outside as I would be narrowing the styles (side frame) and routing decorative mouldings into them; and in doing so I wouldn’t want the bench saw and router bits cutting into the screws.
Therefore I decided to reposition the middle rail, use dowel joints from the outside, as follows:-
- Use a piece of offcut from the same wood I used to make the frame.
- Find a suitable piece of dowel from my wood store and check its diameter.
- Carefully cut the existing middle rail out with a Japanese saw: Unlike conventional saws that cut on the push, Japanese saws cut on the pull and therefore are easier for making a fine cut when precision sawing is required.
- Using a drill bit slightly larger than the dowel thickness e.g. to allow for dowel and glue, drill two holes on either side of the frame that’s deep enough to go through the style and at least a couple of cementers into the rail.
- Place a generous blob of wood glue into each hole and push the dowel into place. Make a pencil mark on the dowel each time, to the depth of the drill bit, to double check that the dowel has gone deep enough.
- Use the Japanese saw to cut the end of the dowel flush with the wood.


#8: Routing Glass Recess and Decorative Mouldings on Front Panel
I did all the required routing around the inner edge of the front panel before trimming the styles so as to give the clamps more grip while routing:-
- I first routed the recess for the glass on the inside of the front panel; by clamping the frame to the worktop and using a clamp guide to give a straight edge.
- Then routed the decorative moulding on the reverse side; this routing didn’t need the clamp guide as these router bits butt against the edge of the wood anyway, and
- Finally, gave both front and back of the front panel a quick sanding, first with a belt sander and finishing off with an orbital sander.

 was used as a straight edge for the router.")


 was used as a straight edge for the router.")


Trimming and Routing the Styles
Having routed the inner edges of the frame, I then:-
- Trimmed both styles to the same width with my bench saw; to give a flush finish with the right hand side of the shelving unit, and then
- Routed decorative mouldings into the outer edges of the styles.


#9: Staining, Varnishing and Waxing Front Panel Frame
To complement the décor of the room I wanted a light coloured wood finish, and the finish doesn’t have to be durable as the display cabinet is something that will be viewed rather than handled.
Therefore, the steps I took to achieve this effect were:-
- To give the whole frame a quick sanding with hand sandpaper, to ensure it was all nice and smooth.
- Give it a quick wipe over with white spirit to get rid of the loose sawdust, and leave it for half an hour for the white spirit to dry.
- Generously rub the whole frame down with teak oil, just to give it some colour depth; and leave that for 30 minutes to dry.
- Quickly brush in one coat of light oak coloured floor varnish; and leave that for an hour to dry.
- One final quick and light rub down with hand sandpaper to give the varnish a smooth finish; and clean it with quick wipe down of white spirit.
- Finally, rub in light-coloured beeswax, with a fine grade wire wool, rubbing the wax into the grain; and leave for 15 minutes before buffing to a shine with a yellow duster.


#10: Fitting Draught Excluder and Final Test Fit
Before fitting the glass I wanted to be sure the draught would make the unit airtight, as intended, and that the front panel still fitted perfectly without having to make further adjustments.
The steps I took for this were:-
- Apply the self-adhesive draught excluder around the front of the display unit, and
- Also stick the self-adhesive draught excluder around the inner edges of the front panel; to create a double seal.
- Then test fitted the front panel, to ensure it still closed with all the draught excluder, and then,
- Fitted the bolt at the top, to fasten it tightly in place.


 the nook created, during the conversion from shelving to display cabinet, and left as a design feature for storing and displaying my son’s silver plated money box.")


 the nook created, during the conversion from shelving to display cabinet, and left as a design feature for storing and displaying my son’s silver plated money box.")
#11: Fitting Plate Glass in Frame
I purchased two sheets of 6mm (¼ inch) plate glass from a local glazier, allowing for a 2mm gap all round, and fitted it to the frame as follows:-
- I used a sealant gun to apply a bead of glazing silicone into the recess routed for the glass on the front panel.
- Gently pushed the glass into place.
- Secured it with a few panel pins around the edge.
- Applied more silicone into the 2mm gap between the glass edge and the edge of the recess.
- Quickly polished and cleaned the glass with glass cleaner (warm soapy water), followed by a final clean with white vinegar.


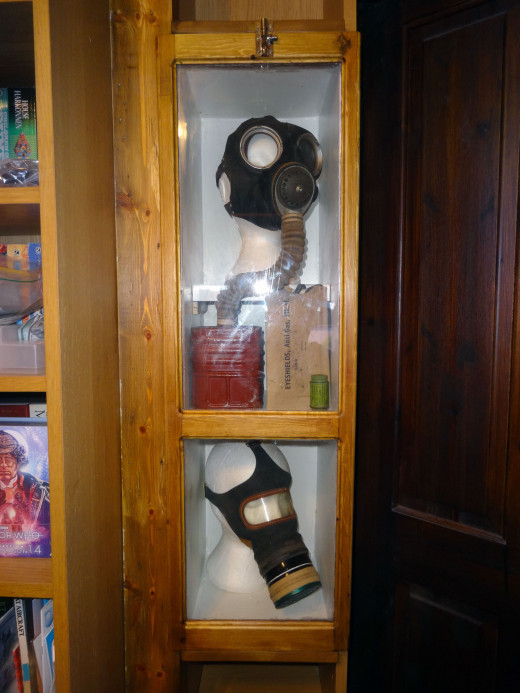
#12: Putting WWII Gasmasks and Artefacts on Display in Sealed Cabinet
With all else done, it was just a case of my son getting the gasmask, and other artefacts, down from the loft and putting them safely on display in the airtight sealed display cabinet.


Who Has WWI or WWII Artefacts
Do you have any WWI or WWII artefacts you would like to put on display?
This content is accurate and true to the best of the author’s knowledge and is not meant to substitute for formal and individualized advice from a qualified professional.
© 2020 Arthur Russ


")


