Turn an Old Book Into Your Secret Stash

A little hide-away

A fun way to give
As much as it hurts me to cut up an old book, the idea of transforming it into something fun with a new purpose makes me happy. I loved Trixie Belden books when I was about 10. After I'd read all the Nancy Drew series, my mom suggested I try Trixie Belden. She read them when she was little.
Trixie Belden, like Nancy Drew, was a girl detective. The books were first published in 1948, when my mom was just a little girl herself. She told me stories about checking them out of her school library on Fridays, then hiding from chores on Saturday so she could read them.
I, too, loved the books, but my daughter did not. So when I loaded up on Trixie Belden books at my library's annual book sale, I ended up with extras on hand. I've always loved the old book safes and thought I'd use my extra books to make a neat way to give money as a gift -- tucked away inside of an old book.
What you need
- An old book
- 2 or 3 binder clips
- School glue
- Paper towel
- Ruler
- Craft knife
- Scapbook paper or cardstock
- Scissors


Step 1
Use two binder clips to secure all but the first four pages of your book. Clip the long ends of the pages, leaving the short ends ready to glue.

Step 2
Squeeze a liberal amount of glue along both short edges. Use your finger to smooth out the glue, making sure it covers all the pages that are clipped together. If it gets between the pages, that's okay. If it gets on the front or back page, simply wipe off the excess with the paper towel before it starts to dry. Allow the ends to dry thoroughly.
Step 3
After both ends are completely dry, remove the clips from the side. Spread glue on the inside of the back cover and push the glued stack of pages to it. Add clips to both ends of the book to clamp the glued pages to the book's backing.

Where's your secret stash
Where do you hide your rainy day money?
Step 4
Apply glue liberally to the long edge of the book's pages. If excess gets on the top page, wipe it off with a paper towel before it dries. You can use the binder clip's prongs to help keep the unglued pages from sticking to the glued ones.Allow to dry thoroughly.

Step 5
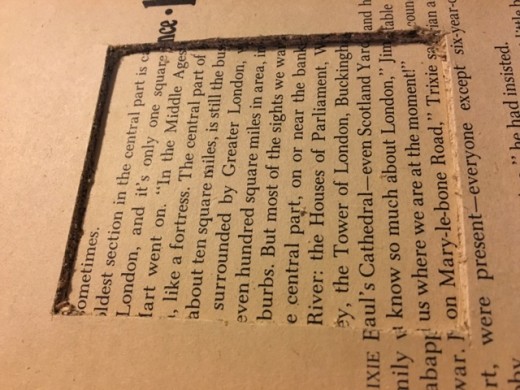
Once the long edge is dry, you are ready to cut your secret compartment. Determine the size you want your compartment. Mine is 3x3.5-inches. Use the ruler and craft knife to cut the size you want, making sure to cut through just a few pages at a time.
Step 6
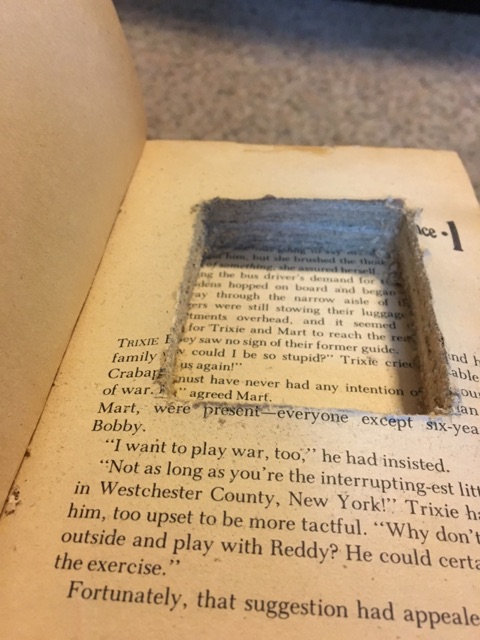
Continue carving out your hiding spot a few pages at a time. You may cut all the way through to the back page if you'd like. I chose to stop mine with some pages still visible.
Step 7
Once you've carved away a hiding spot, use the craft knife to clean up any jagged edges and wipe out any stray pieces of paper from the hole. Hold the book so you can easily access the inner edges of the hole and squirt a line of glue on each edge. Use your finger to smooth it around all edges, like you did on the sides of the pages. Allow the glue to dry thoroughly.

Step 8
Cut a strip of card stock to be a little narrower than the width of your hole but 1 inch longer.
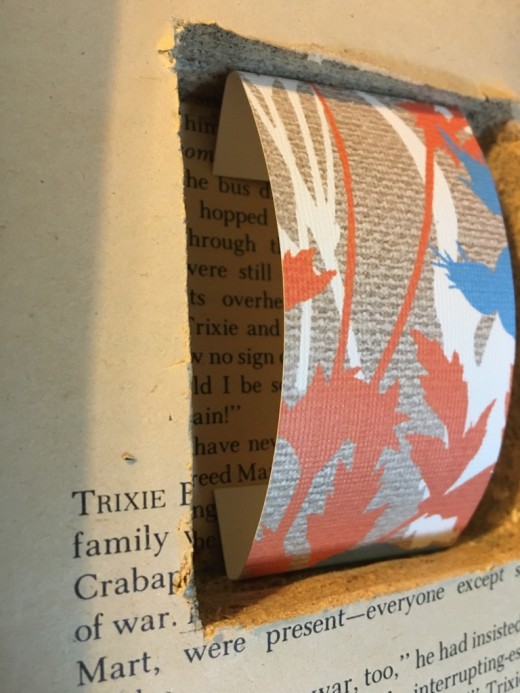
Step 9
Fold the ends of the card stock/scrapbook paper under one-half inch on both the top and the bottom. Slip the strip inside the hole. This strip keeps your money inside the hole.
Step 10
Add some cash, a gift card, or a small trinket. Wrap the book and it's ready for gifting!
Tips
- Be careful when using a craft knife and always cut away from you.
- When adding glue to the inside of the back cover, be careful not to get too close to the edge. The glue will run over the edges when it is clamped down.
- Some tutorials advice to water down the glue, but I found it to work better at 100 percent. It's handy, less messy than watered-down glue, and requires fewer tools.
- You may choose to leave more than 4 pages unglued at the beginning of the book. I actually had 8 unglued because I wanted my opening to start on Chapter 1.
This content is accurate and true to the best of the author’s knowledge and is not meant to substitute for formal and individualized advice from a qualified professional.
© 2017 Ronna Pennington


