Woodburning Simple Works Of Art

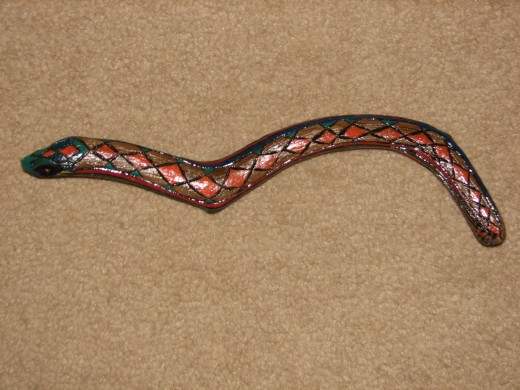
Finished Snake

Simple Woodburning Projects For Starters
The most fun can be had from creating something out of nothing. Here I would like to show how I take a stick of wood and turn it into a snake. All you need to start is your woodburning pen and a good solid stick of wood. I like to put a little paint on my finished piece to add color. These make great gifts for almost anyone but are always a big hit with the children. First I like to burnish the stick with a piece of deer antler that I have had for umpteen years. You might know of an avid hunter who would be willing to share an antler with you. I got mine that way. I rub the wood until I have created a lustred finish on the entire stick. When I am satisfied with the way it feels I start burning the design.
The most important thing to remember is to be very careful not to burn yourself or catch anything on fire. Work on a fireproof surface. There is a little trick to keeping a snake pattern centered on the back of the snake as you work. I suggest that you work slow and think about each time you put the hot pen to the wood. You will not be able to recover a mark made where you do not want it to be.When you have completed your design always find a place on it to burn your signature. I like to put the date made next to mine. I do a lot of these snakes and have sold more of them than I can remember. I like to add a little color and sometimes a finish over the top of the color.
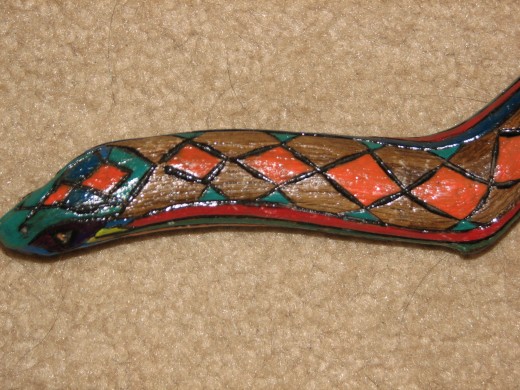
Acrylic paint works very good to add the color. You have to be careful as the wood has a tendency to bleed the color much like a piece of cloth would. You can remedy this by applying a coat of sealer to the piece before you paint it. Here I suggest that you do not try to coat or paint the entire surface at the same time. Do half of the piece and allow it to dry and then do the other half. There are a few reasons for this suggestion.
First you will have a part of the object to hold onto as you turn it over to apply the wet finish or paint. You are not working on a flat surface so the coating may have a tendency to run. This way you can manoeuvre the work around to catch any drips and control your application. It will also be easier to set up for drying. The dry area can be rested so as to allow the wet part to cure. I often hang, mount,or tip the piece so the wet part is not touching anything. You will have to think ahead and prepare a drying/curing situation that will work for you.

")


