How You Can Make an Easy Raggedy Quilt With Flannel

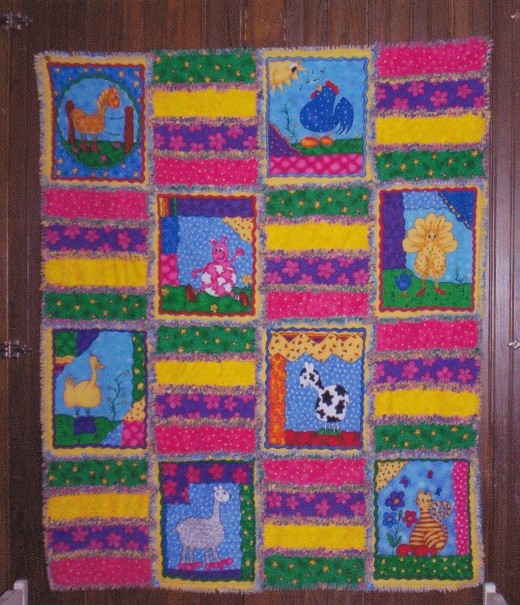
Quilt for my Granddaughter

Raggedy Quilt with Panel Blocks
How to Make a Raggedy Flannel Quilt
Raggedy flannel quilts are quite easy and fun to make. Young children especially like them, as they are colorful, warm, and soft to the touch. This type of quilt does not need to be hand or machine quilted after you sew the blocks together because each block is its own little quilt. You are sewing the front and back of each block together and there is no need for batting between the two pieces because the flannel is quite heavy on its own. If batting were added to the blocks, it would be much too dense.
You can make these quilts in different sizes, but the most popular are 36"x44" or 54"x77." This Hub will explain the process for making the larger size, and will detail how much fabric is needed, what size pieces to cut the fabric into, how to sew them together, etc.
Panel prints of flannel are not always easy to find, but they look very nice when cut and distributed throughout this quilt. You don't want the panel to be the whole width of the fabric, but you want material that has smaller panel rectangles, measuring approximately 10"x12" as shown in the quilt in the picture on the right. When I made my raggedy quilt, I was not able to find any panel flannel that worked so I just bought two figured materials in my color scheme. These are the red flowered blocks and the zigzag blocks shown in the quilt in the top picture.
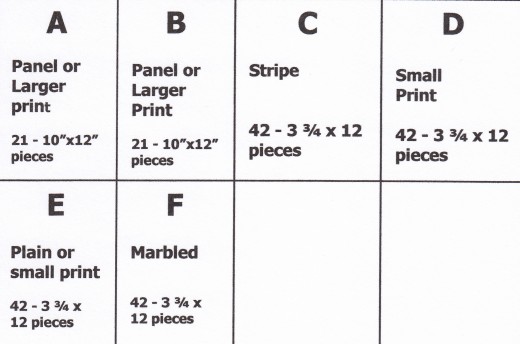
The quilt is made from six different flannel pieces: the flannel that has the panels or two larger print fabrics, a coordinating fabric for the back of the panels or larger blocks, and four other coordinating fabrics. All of these fabrics should be 42" wide. Usually the saleslady at the fabric shop will help you pick out fabric colors that blend well together. That is their business and they have always been very helpful--as it is not always easy to pick good coordinating fabrics. When you are ready to go look at fabrics, you should have an idea of what you want--baby designs, nature designs, teenager designs, etc. and also your color scheme.
The following is a list of materials you will need: 2 yds. of larger print 42" fabric or fabric with the correct panels; 2 yds. of larger print 42" fabric; 1 3/8 yds. of four different coordinating 42" fabric, small print, stripes, marbled, or plain. Actually picking out the material is fun if you go to a good quilt fabric shop, but it may take quite a while to decide on what you like and what coordinates well.
When you are ready to cut out your pieces, use the table in the photo below as a guide. Cut 21 pieces,10"x12", from fabric A and 21 pieces, 10"x12", from fabric B. Cut forty-two (42) pieces,
3 3/4"x10," from each of C, D, E and F. The types of design in the materials suggested in the table are just that (suggestions)--just use whatever you like, or the saleslady suggests.
Now comes the fun part - sewing the pieces together. Always use a 1/2" seam. If your pieces aren't quite the same size, it really isn't a problem as the seams will be "ragged" out. With wrong sides together, sew two 10" x 12" coordinates together - one from A and one from B, until you have 21 blocks sewn. When you place the pieces together, it is a good idea to press them to hold in place for sewing. Or you can pin them together, whichever you prefer. Next sew four 3 3/4"x12" rectangles together, one rectangle from each C, D, E and F. Piece them together all in the same sequence. You should have 42 of these 4-piece blocks when you are finished. Then put wrong sides together of two of these blocks, reversing the order of the sequence of the rectangles on the back of the block. Lay your sewn blocks out on a table, the floor or some place where you can decide the pattern you want them. Once you have your blocks of A and B, and blocks of C,D,E & F sewn, you should sew seven blocks together, alternating the A and B blocks and the C,D,E, & F blocks to make a row. Be sure to keep the seams toward the front of the quilt. There should be six rows of seven blocks when you get finished. Then you sew those rows together. After all of the blocks are sewn together, sew around the outside edge of the quilt, using a 1/2" seam.
Now comes the tiresome part. You need to clip all of the seam allowances about every 1/8" being careful not to clip through the seam. This is what gives your quilt the raggedy look. After you are finished clipping the seams, you should wet the quilt and throw it into your dryer with a tennis ball to "chenille" the seam. Some people like to use a commercial laundromat for this process, as there will be many small frayed pieces of fabric come loose.
©joaniebaby - 3-13-12
Use fabrics as shown in table below