Zentangles - Part 3


ZENTANGLES – PART 3
Now that you have all your supplies you’re ready to start your first Zentangle.
Step 1: With your pencil, put four dots on your paper—one at each corner of your future design.
Step 2: With your pencil, draw a line to make a frame from one dot to another.
Step 3: With your pencil, draw a string inside your frame.
Turn on a soothing CD and take in a few deep breaths before you go any further. (Optional, but a really good idea.)
Step 4: Fill in the spaces you have created with a different tangle using your Micron 01 Pen.
So, what do I draw and how do I draw it? There are hundreds of tangles that can be used. Tangles that have already been used by others are usually named so they are recognizable, but it’s not necessary to memorize the names of all the tangles.
Go to this link for an interactive chart of many of the most common tangles. http://tanglepatterns.com/. Most of these tangle examples give you detailed instructions as to how to draw them. I suggest you print out some of these tangle patterns for future reference. Print out tangles you have seen on other artist’s Zentangle designs. Use them for inspiration while you are working on your Zentangle pattern. Most Zentangle artists are willing to share their ideas and they don’t mind if you use some of their tangle designs. You could get a 3-ring binder and keep all your tangle information in it. I have a canvas pouch that has a 3-ring holed side to it. I keep my pens, eraser and pencil in this pouch in front of my binder.
There are also books you can order from Amazon.com that might be helpful: http://www.amazon.com/s/ref=nb_sb_ss_i_0_17?url=search-alias%3Dstripbooks&field-keywords=zentangles+basics&sprefix=zentangles+basics
For a free emailed Zentangle Newsletter and to view back issues go to: http://www.zentangle.com/whats-new.php This newsletter has several tangle ideas and useful information every month.
There are patterns all around you. You’ll be surprised at how many patterns you will find in nature and around your home or office that can be used as tangle patterns. You might want to take photos of these patterns and then use them to create your own tangle pattern. One place that is exceptionally inspirational would be a fabric store or fabric department at a craft store. There are plenty of repetitive patterns in fabrics.
Be daring and don’t worry if you are doing any tangle correctly. Do your own thing – don’t worry if you go out of your sting or frame lines. The idea is to eliminate stress, not make more for you. If your pattern doesn’t turn out exactly like the sample, no one will know but you.
If your city or area has a Zentangle, Club, I highly recommend that you join it. These clubs usually meet once a month. Member Zentangle Artists share projects and new tangles they have been working on. They also have group projects that all members can work. It’s fun to Zentangle with others, even if you don’t talk while you’re drawing.
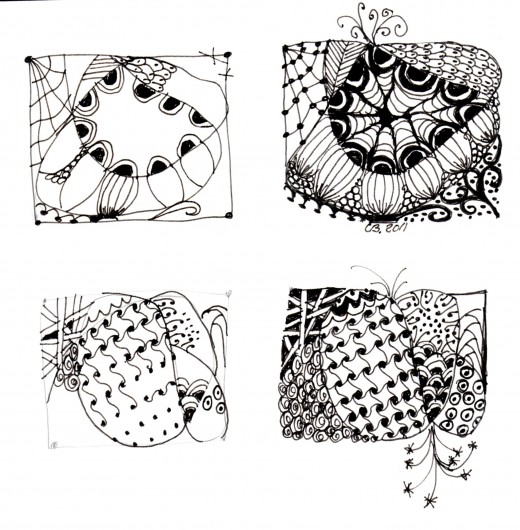
In the samples above, I gave you two ideas of what you could do in your first Zentangles. The illustration on the left shows you how I started the pattern and you can see how the completed tangle turned out on the right side.
It’s a good idea to start in the middle of your Zentangle design and then work outward to the edges. Don’t feel that you have to stay in the lines—a sting is merely a guide. You also don’t have to fill in to every corner. Let your imagination be your guide.
Step 5: Don’t forget to sign your design at the bottom so people will know which end is up.
Step 6: After you have totally completed your Zentangle, use your kneaded eraser to get rid of all the pencil lines. Pull and knead the eraser to clean it and to have a clean eraser the next time you want to use it.