Crochet An Easter Egg Ornament Or Egg Holder With Bunny Border! A Free Pattern

It's An Ornament! It's An Easter Egg Holder! It's A Coaster! It's...Versatile!
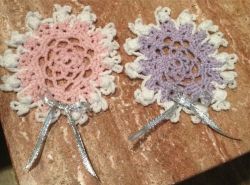
I was so tickled when I figured out a way to crochet little bunnies prancing around the border of this little crochet easter egg! I think they turned out kinda cute, if I do say so myself!
Here is the free crochet pattern, just for you, all my crochet friends! I really hope you will have as much fun crocheting it as I did!
If you do not know how to crochet with thread, I recommend that you check out this article at It will teach you how to transition from yarn to thread.
You might also want to try crocheting this pattern in yarn for a larger centerpiece or placemat decoration! Happy Easter, and happy Crocheting!
Get The Hooks I Use! - You Will LOVE Them!

What You Will Need
Crochet hook size C (I used Clover Soft Touch) for a slightly larger egg.
The ones pictured used a size 0 Clover Soft Touch. So... choose the size you feel most comfortable with using #3 thread, as gauge is not important with this project.
10" ribbon for optional bow
Aunt Lydia's Iced Bamboo #3 Crochet Thread in pink (or color of your choice) and white
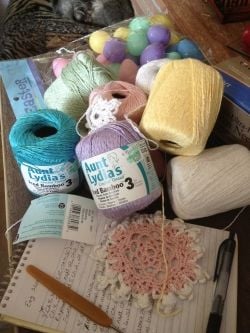
I thought you might get a kick out of seeing how I work! I usually write up my patterns by hand and then type them later. I'm always surrounded by whatever materials I'm working with. Sometimes I have to lay out everything and look at it for awhile before inspiration strikes!
What a lovely mess I live in!
Ideas For This Easter Egg...
- Attach it to a barrette for a pretty hair accessory
- Starch it and add a ribbon hanger for a pretty ornament
- Make two, lace the border together with ribbon, and use as an Easter Egg holder
-Attach a ribbon and hang from an Easter basket handle as a decoration and pretty gift!
- Crochet it in yarn and use as a placemat!
You could easily make a doily with these motifs! - Just make four eggs in your choice of colors...
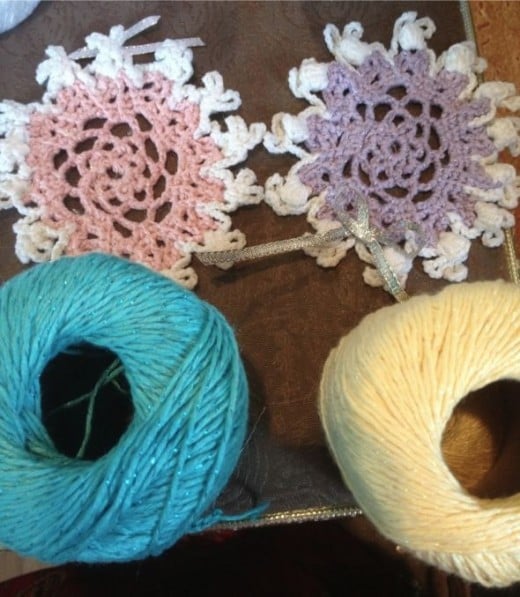
As shown in the photo, when you lay these motifs next to each other, there are two places where the bunnies' ears would be a perfect joining place. For that matter, you could even tie them together in a square pattern with little ribbons, a crocheted chain, whatever you like! I think I just may have to do this! Here is the photo with the colors I'll be using to do that.
About the thread I used...
For this project I chose the new line of Bamboo Ice #3 thread from Aunt Lydia. The feel is amazing, very silky. It has a fine glisteny fiber running all through it for subtle sparkle. I chose blue, green, pink, yellow, white and lilac.
How To Make The Magic!

With desired center color, chain 9, join with sl st to form ring.
1/ *Ch 5, SC in ring 7 times. Join with sl st to base of first ch-5.
2/ Sl st to center of Ch 5 space. *Ch 5, SC in CH 5 loop. Repeat from * around, ending with ch 5, sl st in first SC.
3/ Sl st to center of ch-5 space. *Ch 7, SC in ch 5 loop. Repeat from * around ending with ch 7, sl st in first SC.
4/ Sl st to center of ch-7 space. Ch 1, SC in loop. CH 2, SC in same space. *CH 7, work (SC-ch 2-SC) in next ch-7 space. Repeat from * around ending with ch 7, sl st in first SC.
5/ CH 1, SC in same place. CH 2, SC in next SC. *Ch 3, work (SC-CH 2-SC) in next ch 7 space. Ch 3, SC in next SC. CH 2, SC in next SC. Repeat from * around ending with ch 3, sl st in first stitch.
6/ *CH 6, SC in 4th chain from hook. CH 2, SC in next SC. Repeat from * around, ending with CH 2, sl st in first stitch.
7/ *CH 4, work (SC-ch 4-SC) in ch-3 point loop. CH 4, SC in next SC. CH 2, SC in next SC. Repeat from * around ending with ch 2, sl st in first stitch. Fasten off.
8/ Attach White in any ch-4 loop. *CH 2, work 7DCP in loop (ch 1 to close). CH 9, sl st in base of ch 9 justmade. SL st in center of popcorn. CH 9, sl st in base of ch 9 just made. CH 5, SC in next SC. CH 5, sl st in next ch 4 loop. Repeat from * around ending with ch 5, sl st in first popcorn. Fasten off.
Starching Makes All The Difference!
Although this looks ok as-is, it would look even better if you did go ahead with the starching and blocking process. It would make the bunnies' ears really stand out. If you need to know that, there is a video how-to on this lens! And as soon as I get a minute, I'm going to starch and block mine!
What Do You Think Of This Pattern? - Come On, You Can Tell Me!
How do you like this pattern?
How To Block Crochet Work on YouTube!
Proud To Be An Associate Professional Member of The Crochet Guild of America!

A Message From Sheila...
Hi, I'm SheilaSchnauzies, also published as SheilaSparkles, and my life's passion is designing in Crochet! I also love to share gifts with friends, and this pattern is my gift to you! I give away about 95% of my pattern designs free. The other 5% are sold on my SheilaSparkles Crochet pattern store at Craftsy.com to benefit the vet expenses of my Miniature Schnauzer Rescue, Sheila's Schnauzies.
Just one little favor, please... I would appreciate it if you do not post this pattern anywhere on the Internet or in the 'real world.' Instead, you are most welcome to provide a link to this webpage.
I use a system I call the "Official Schnauzer Difficulty Rating" just for fun, to rate the difficulty of my patterns. If it's a 3/5 or more, I'll explain why I consider it more difficult. A few of my designs use techniques that are a bit unconventional! If it's one of those patterns, I'll warn you ahead of time. I do a lot of custom-fit patterns, for example. They are made to fit YOU, the dog, or the object in question - not a measurement from a chart. They're surprisingly easy to do and actually end up fitting. That's a good thing, yes?
So glad you found my patterns! I hope you really enjoy making whatever it is you're making! Crochet hugs, -Sheila


")
 Pattern With Step-by-Step Videos")
