Buttons for Sewing

Sewing Buttons -- Little Works of Art
Buttons for sewing are not only useful, but often sewing buttons are decorative as well. Many people collect sewing buttons, whether they ever sew anything or not.
One reason I collect buttons is for the sheer pleasure of running my fingers through a pile of cool buttons, feeling their smooth texture. And when I'm done playing with them, I love looking at the intricate beauty of buttons.
Many sewing buttons are little works of art. Take a creamy white button for instance, that's been carved from shiny shell to reveal the white and blue and black layers. Pressed glass buttons can be plain or intricate but almost always are pretty.
A rhinestone sewing button may be too flashy for every day but when used sparingly and on the right outfit, is just the right touch.
Photo Credit: Peggy Hazelwood

How to Sew on a Button
It's not hard!
If you are needle and thread challenged, you may not know how to sew on a button. Have no fear! This simple task is easy as pie.
You'll need:
- sewing needle
- thread
- sewing button
- thimble, optional
- scissors
- that shirt or blouse that's missing a button
- glasses, if needed
1. First remove any thread from the shirt or pants or whatever it is that needs a button sewn on.
2. Thread the needle. This can be tricky if you've never done it. Trim the thread and pull out a goodly amount, about 2 feet so you have plenty of thread to work with. Hold the needle between your thumb and pointer finger. Gently push the needle onto the thread so the thread lines up with the hole in the needle. It seems to work better to push the needle onto the thread rather than the other way around. But do what works for you. If the thread starts to come apart, trim the thread again. And don't forget to lick that thread as needed.
3. Okay, once your needle is threaded, pull both ends of the thread so they meet at the ends. Tie a knot by bending the doubled thread over itself and pushing it thorough to knot it. Double knot if the knot seems very small.
4. Now you're ready to sew on a button. Get the button, using either the button that fell off or match one from your stash, if possible.
5. To sew on a 2 or 4-hole button, start at the back of the piece of clothing. Line up the button on the front with where the button goes. Push your needle from the back through the fabric and through one of the holes on the button. If your needle hits the button, simply move the needle so it goes through one of the buttonholes.
6. Pull the needle up to the front of the clothing so it is on the front side of the clothing where the button is. Take the needle and push it through a different button hole moving the needle to the back of the fabric. Pull the needle through and continue moving the needle from back to front, front to back, at least three times until you feel the button is securely sewn on. Note: Use a thimble if desired. Use the thimble on your index finger to push the needle through the fabric. A thimble is great if the fabric is heavy, like denim.
7. Tie a knot. Use the needle to tie a knot. Make sure your needle is at the back of the fabric or piece of clothing (on the opposite side as the button). Push the needle through the fabric without going through to the front of the blouse or shirt or pants. Leave a small loop of thread and push your needle through the loop. Repeat this a couple of times and your thread is knotted. Trim the thread close (but not too close). You're done!
8. To sew on a shank button, the process is very similar to sewing on a button with buttonholes. Start at the back of the fabric (on the opposite side as the button). Push the needle through to the front making sure to line up the shank (hole) of the button with the correct spot. Move the needle through the shank/hole and push the needle through the fabric to the back of the piece of clothing. Repeat this process three or four times or more until you feel like the button is secure. Use the same technique to knot the thread.
Photo Credit: Peggy Hazelwood
Do you know how to sew on a button?
Scarlett O'Hairy -- Seamstress Cat - Click a small image below to enlarge it and see a big Scarlett.
Click thumbnail to view full-size


Sewing Tools
Needle Threader
If your eyesight is bad or your hands are shaky making it difficult to thread a needle, consider using a needle threader. These flimsy little wonders are great for getting the thread through that tiny eye of the needle. I've broken more than one of these so buy a four pack or six or whatever count they come in. You'll be glad to have an extra one or two around.
I can usually thread a needle just fine but some days it's "purt near" impossible. There is no shame in using a great sewing tool like a needle threader.
Photo Credit: Peggy Hazelwood
Sewing Kits and Sewing Boxes - make lovely gifts for a beginning or seasoned seamstress

Sewing Buttons on Amazon - And how to use buttons in fun, new ways
Don't have a button jar of your own? Get started with a few of these fun buttons.


Photos of More Buttons for Sewing - Click on each photo to enlarge it and find out more about those sewing buttons.
Click thumbnail to view full-size


I'm So Happy I Could Pop
(a button)
My dad loved to tell this joke. And why not, it's clever and it features buttons.
The teacher asked the class to use the word 'fascinate' in a sentence. Little Johnny raised his hand, saying "Me! Pick me!"
The teacher knew Little Johnny was a naughty boy but she decided it would be safe to let him do this assignment.
The teacher said, "All right, Little Johnny. Give us an example of how to use the word 'fascinate' in a sentence."
Little Johnny said, "My sister's blouse had ten buttons but her basookas were so big she could only fasten eight."
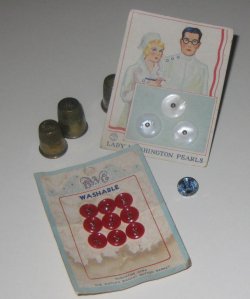
Vintage Buttons on Button Cards - Courtesy of Gathering Dust (click one of the small images to enlarge it please!)
Click thumbnail to view full-size


Vintage Shell Buttons
I love shell buttons. The shades of shell buttons can range from creamy white to a mellow yellow that can come from age to dark blue or almost black.
Shell buttons are durable and great for sewing onto clothes. Be careful though if the shell buttons are thin, because I have seen them split in half after many washings.
Photo Credit: Peggy Hazelwood
Button Magazines


Ideas for Using Buttons
- Flower Pillows - DIY
Pam shows us how to make Flower Pillows....Felt Flower Add-Ons, Flower Pillow, Chrysanthemum Flower Pillow, More DIY Flower Pillows to Make Applique Flower Pillows Felt Flowers, and more
Affiliate Disclosure
This author, Peggy Hazelwood, participates in Amazon, eBay, All Posters, and other affiliate advertising programs. When you click an advertising link on this page and make a purchase, I receive a small percent of the sale. Thank you for reading this far!


 Pattern With Step-by-Step Videos")