- HubPages»
- Arts and Design»
- Crafts & Handiwork»
- Crafts for Kids
Recycle Broken Crayons Into New Crayon Shapes!

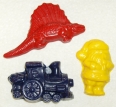
Melting the old bits into new, fun shapes!
We've all had broken crayons before...they usually just go in the garbage. Now you can turn them into new, exciting crayons in lots of different shapes.
I worked in Childcare for 15 years. After one year of throwing away broken crayons (LOTS of broken crayons) I figured out a way to make them fun again!
Preschool teachers I worked with would grate the crayons and melt them in muffin papers in the oven. When done you would have a large blob of multi-colored crayon bits. It was fun for a little while, but it was not really easy to color a picture.
I started to make these crayons for the childcare. Then it became a fundraiser for us...we would sell them for stocking stuffers at Christmas time, or to hand out for treats at Halloween.
Now, you can make exciting, new crayons using a double boiler method and candy molds! Read on, and I tell you how...

Tools Of The Trade
You will need some basic things to get started:
-
Electric fry pan
-
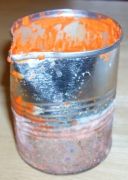
Empty soup or vegi cans (1 for each color of crayon you're making)
-
Stir sticks (bamboo skewers, chopsticks, etc.)
-
Candy Molds
-
Paper towels
-
Broken(or unwanted) crayons
Prep Your "Tools"...Now That You Have Them!
There are only 2 major preparations you need to make:
1. Squeeze the top edge of your melting cans into a pour spout.
2. Peel the paper off of the crayons, and separate them by color.
The cans bend pretty easy just with your hands (use pliers if you want a better spout).
Peeling the paper off of the crayons has got to be the worst part of this whole project! Picking at the paper just gets wax and paper stuck under your fingernails, and it's not fun when you're doing a lot of crayons.
I discovered if you soak the crayons in ice water for a few seconds (20 - 45 seconds), then tap them, vertically, on a hard surface the wrapper will slide off! Also, if you work at a Childcare Center, you'll find that the kids LOVE to tear the paper off the crayons for you! Then you can make a color game to separate them.
Let's Make Crayons!
1. Set your Electric Fry Pan to a little above the warm setting, and fill with a little water. How much water depends on how many crayons are in your melt cans...I usually only fill them 1/4 to 1/3 full. You want the water at the same level as the crayons in the cans, or lower. Don't let it start to bubble.
2. Put your melt cans in the water and mix with stir sticks frequently.
3. When all the crayons have melted you're ready to pour. Have your molds on a flat surface. Pick up the melt can with 3 or 4 layers of paper towels (to protect you from the heat), and pour slowly into the molds.
4. Allow the filled molds to sit until completely cooled. This can take from 20 minutes to an hour depending on the size of the pieces.
5. When cooled completely...turn the mold over and gently bend and push on the mold to release the new crayons. Deep mold designs will sometimes take a little work to release. Set a folded towel down, hold onto the bottom corners of the mold and hit the top corners of the mold on the towel. The force and the angle will convince stubborn crayons to let go!
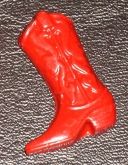
Congratulations! You made your first crayons! Go on....color with them. You know you want to!
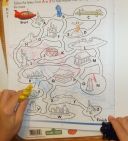
Got Crayons! Let's Color...
- Coloring Pages | crayola.com
- Free Coloring Pages
Free printable coloring pages for a variety of themes that you can print out and color.
What's Your Favorite Crayon Color?
I've heard it said that blue is the most popular color. When it comes to making crayons red is the most difficult color to find, so that means it must be the most popular right? Let's find out for ourselves. I've listed some crayon colors below...
Which of these crayon colors is your favorite?
Little Helpful Learning Moments
Things I wish I would have known when I started.
I never realized how many green and brown crayon shades there are until I started making crayons! Green and brown colors can get ugly if you use too many "Olive Green" or "Burnt Sienna". Try to use enough bright colors to offset the dull ones. If you want a bright red color, then make sure you have true red crayons and not reddish colors (like red-orange).
I used a piece of paper to check the "real" color of the crayon. It may look blue, but it colors a whole different color! Different companies make slightly different colors.
If you find some specialty crayons (scented or sparkly) use just one or two pieces to make the whole batch scented or sparkly!
There are some crayons that don't melt...or melt at a much higher temperature. If you find all your crayons in the melt can have melted except for one, then just remove it with your stir stick.
When I started getting serious about fundraising with these crayons, I needed a lot of crayons. I asked local stores if I could put up little bins for people to donate their broken crayons. I soon had more than I could use! Yard sales are another good place to find old crayons.
Good luck, have fun, and happy coloring!
With your help and comments I hope to streamline this lense and make the process of recycling crayons less confusing. Let me know what you think, and how your crayons turn out.


