Creative Halloween Paper Lanterns

Halloween Lanterns
Crafty, Creative Halloween Lanterns
Need something cool and creative for that Halloween party? This is perfect for teens and preteens. Just add some LED tea lights and you have the perfect walkway lanterns or window dressings. These lanterns also make great décor for outdoor birthday parties. Some cutting with a box-cutter or Exacto knife is required, so not suited for younger children unless supervised by an adult.
Cut Designs For Holes

Get Crafty For Halloween
Create your own Halloween Lanterns for your walkway.
These lanterns are easy to construct with a few folds and a little glue, so why not? It's practical and thoughtful. For girls and boys alike. The materials you will need are: Pencil and box pattern
White watercolor paper (12x18 or larger)
Large 1" paint brush
White glue, scissors, and sharp box-cutter knife/Exacto blade
Black and orange acrylic paint
1 tea candle or LCD light and an inch of sand each
Paint Both Sides of the Paper

Step 1: Painting the Paper
Paint one side of the piece of watercolor paper completely black. When it is dry, turn over and paint the other side your optional color. Orange is perfect because it looks like fire. Allow the paper to dry thoroughly.
Lawn Lantern Patterns

To create the lawn lanterns you need to create a box pattern as in the photo to the right. This is a square 4 inches by 4 inches with flaps for gluing, and a "chimney" piece at the top. You could copy this four times or create a linked chain of squares and leave only one flap at the first side square for the gluing, plus one-floor square. You have the think about how boxes are made. Typically a box has six sides: four around, one bottom and one top. In the case of our lantern, there is not a top but instead, a chimney is added. The little slit and oval-shaped flap at the chimney are for easy access to the center of the box for the candle or tea light. If you glued all sides and left no flap for opening, there would be no way to place a candle or light it or a tea light. I have found that it works well if you don't glue down the bottom also. In that way, the boxes can be folded flat for easy storage for next year.
Step 2: Trace and Cut

Step 2. Trace and Cut
On the orange side, on a clean dry space, trace the box pattern and cut out the "holes" for light to shine through. An adult should do this, as it will take a sharp knife or Exacto blade to work. Draw Halloween faces, cats, spiderwebs, skulls, etc. Only cut out a few holes and leave the paper where "lines" would be in the drawing. Crease the flaps and the sides. Apply glue to the flaps and hold them until the glue has bonded well. Glue down the bottom flap.
Sample Patterns for the Lawn Lantern Windows

Use My Designs or Make Your Own
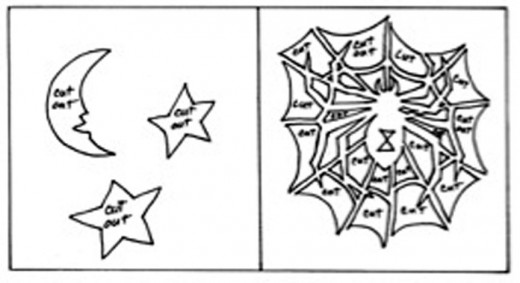
These are just sample drawings that can be used for the lawn lanterns windows. You can create your own designs and cut them out as it pleases you. I have tried all these and found them to be useable. Some are harder than others. The spiderweb is more difficult than the skull and the cat. Try them all and have fun. Another tip is to leave one side of the lantern solid so that the light can reflect better. I tried cutting windows in all four sides and noticed that you cannot see the light as well as those where I only cut windows/shapes in three of the sides. Good to know.
More Lawn Lantern Window Patterns

Tips
Just like the first four shown in the module above, these four designs are samples of the windows you can cut in the Lawn Lanterns. Cut only three of the sides and leave the fourth side of the lantern solid for optimum reflection. Enjoy.
2 More Patterns

Use Them Anywhere
Place them around the pool for a great summer pool party, using palm trees and beach balls for the window designs. Place them around the yard for an outside birthday party, using the birthday person's age (such as 9 or 10) for the window designs. You could use birthday cakes, candles, presents, bows, etc. My grandson was born near Halloween so every year we try to come up with some fun interesting decorations for his birthday. These lanterns worked wonderfully around his home. Also, they look good in the windows for the neighbors to see.
2 More Patterns
A Teaching Tool For Homeschoolers
I have created a series of coloring books for teaching classical art to children. The Classical Renaissance Art Coloring Book is the first published and Volume 3 in the series, including Classical Modern Art, Classical Impressionist Art, Classical Romantic Era Art, Classical Medieval Art and Classical Early Art. Children can color a masterpiece as if they were the master and then read about how the artist created and worked. Helpful links are included to get more information and see the color version of the original art.
Step 3: Ready for a Party

Step 3. Ready for a Party
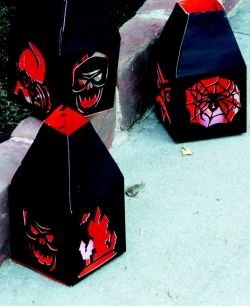
Add sand and a tea candle before folding down the top. The lantern is so special, you can use it as a gift box. Beware. People may like lanterns better than gifts! Create a bunch for special occasions. These in the photo were created for my grandson's ninth birthday party, which always lands near Halloween.
Note: To create your own box pattern, cut out a square of 4 inches x 4 inches and trace four of them in a row, plus one below for the bottom. Each of the sides not connected to a square much has a flap (for gluing), of about 1 inch or less, with tapered sides, as in the photo. For the chimney top, I created a cone shape 4 inches at the base, tapering to 2 inches at the top. These cone shapes also needed flaps for gluing but only on two sides, not all four.
Book of Boxes
I wrote a book on boxes with over 40 different box patterns similar to this lantern pattern. I've used many of them for lanterns, gift boxes, storage for business cards, etc. I think you will like it. The title is Boxes, Boxes, Boxes by Denise McGill. The color version is more expensive than the non-color version.
Let me know what you think and how your lanterns turned out. I would love to hear how you used this project.


")


