Enhance Your Crochet Or Fabrics With "CroBroidery!"

What In The World Is "CroBroidery?" I'm Glad You Asked!
CroBroidery is simply the best term I could imagine for the technique of decorating my crocheted pieces that I have come up with! It's a little crochet... a little embroidery... but with no needles involved! Just your crochet hook, your crochet thread or embroidery floss, and a piece of crocheting or fabric that you want to embellish!
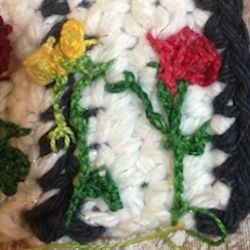
It all started with this potholder. I had this picture in my mind of a picket fence potholder. I had it all finished but the border, but all I could say was, "BLAH!" It was boring! What's a picket fence without some flowers growing alongside it? I had my big container of balls of crochet thread sitting here, picked out a color for a flower, and started playing around. It was a bit awkward at first but once I got the hang of doing something completely different, it was FUN!
The potholder I was working on ended up becoming a miniature work of art and I promise you it will never get used for cooking! Once I was done decorating it, I added a solid crocheted back (which conceals all the cut threads on the back side) and a border which makes the fence pickets stand out more, along with a hanging loop. You can find the pattern for my Picket Fence Potholder here on Squidoo.
Start with a brand new project - any object you have chosen to crochet, and decorate. Or do my CroBroidery technique on a cloth item, such as a cloth napkin, placemat, etc.
Choose virtually any kind of washable threads you like from sewing thread to crochet thread, embroidery floss, Kreinik threads, etc. (potholders are the exception, they should always be 100% cotton). You can mix thread types within a project in whatever way appeals to you!
I'm already envisioning a multitude of things I would like to do with this technique. It is quickly becoming addictive! A new way to work with our crochet hooks and pretty threads - what's not to love about that!

My Picket Fence Potholder In Progress

The Schnauzer Difficulty Rating!


The Perfect Holder For Threads For Doing CroBroidery!
I just discovered this bowl and have just ordered one for myself! It is absolutely perfect, it would hold all my multiple Kreinik spools or several balls of Perle cotton then run them all through the holder. This thing is amazing!

What You Will Need...
- Any crocheted, knit, or fabric object you wish to embellish
- Your choice of threads - sewing threads, crochet thread, embroidery floss, Kreinik threads, etc.
- Crochet hook in appropriate size for strand you're working with. Example – some of the flowers shown on my potholder were done with one strand of Perle #8 cotton. Other flowers were done with 5 strands of plain sewing thread. I used a size 8 crochet hook to crochet both types.

A Word About Thread Selection...
You may use different threads with good results! Just make sure to keep them similar in weight and thickness so as not to throw off your design.
Beautiful Threads To Try From Amazon! - I Personally Use & Love All Of These!
These little Kreinik spools may look small, but they actually can go a long way. I like to buy the collections because I love having a wide variety of colors to choose from. I also like having gold, silver and opal metallics on hand to accent other threads, which they do beautifully.

Here's How To Make The Magic! Let's CroBroider!
I'm going to show you how to create the Crobroidery shown on this project, as it is currently the only one I have in existence!
I started by doing each tulip plant (the green parts) separately, breaking off thread in between. I quickly figured out it was easier to work continuously across, doing them all in one continuous motion. How you do that is of course up to you.
Please keep in mind that you are being a bit of a freeform artist here. If you're not comfortable "drawing" the plants freeform, just follow my illustration as closely as you can and you'll come up with something very similar.
Create a starting loop/knot as if you are getting ready to make starting chain. Insert hook through the loop, insert hook through the edge of your piece and slip stitch. Since you will want to vary the height of each plant, the next instructions will vary on each one - chain 6. Going straight up vertically, slip stitch in the piece to anchor thread (AT). Now let's create the right-hand leaf. Ch 3, AT. CH 1, AT just below and slightly to right. Ch 3, AT over the stem center. Ch 5, lay chain just to right of straight vertical and AT. Ch 4, lay chain back down over chain you just did and AT. Ch 7, lay chain just left of straight vertical and AT. Ch 1, AT straight left. Ch 1, AT over leaf you just completed. Chain back down to leaf division point, AT. CH 6, lay chain at about 10 o'clock position and AT. Ch 1, go straight left, AT. Fasten off, pull end threads to back of work.
Tulip Stems & Leaves
I used plain variegated #8 Perle Cotton and a size 8 hook for these. I'm going to give you instructions for the right-hand red tulip.
Tulip Flower
Attach Red in the base of the "V" between the two right hand upper leaves.
Ch 5, work a 5-DC Popcorn in 5th chain from hook. Ch 3, SC in top of popcorn just made. Ch 4, sl st in chain you worked the popcorn in. Ch 3, work 5 DC in 3rd ch from hook. Position flower exactly as desired and AT. Do (Ch 2, AT) working around the flower. Fasten off, pull end threads to back and slip stitch securely.
Additional Flower & Leaf Notes
On some of the tulips (like the yellow one next in line) I did two sets of popcorns with a ch 3 in between. I liked that look. On some of the flowers, I did a (ch 3, SC in top of popcorn) over the completed popcorn.
Remember you can add as many tulips and extra leaves as you want - there are no rulesl!
What Do You Think Of "CroBroidery?" - Come On, You Can Tell Me!
What Are Your Thoughts On CroBroidery?
A Few More Pretty Kreinik Threads...

Learn Crochet On YouTube - Right Or Left Handed!
A Note From Sheila...

Hi, I'm SheilaSchnauzies, also published as SheilaSparkles, and my life's passion is designing in Crochet! I also love to share gifts with friends, and this pattern is my gift to you! I give away about 95% of my pattern designs free. The other 5% are sold on my pattern store at Craftsy.com to benefit the vet expenses of my Miniature Schnauzer Rescue, Sheila's Schnauzies.
Just one little favor, please... I would appreciate it if you do not post this pattern anywhere on the Internet or in the 'real world.' Instead, you are most welcome to provide a link to this webpage.
I use a system I call the "Official Schnauzer Difficulty Rating" just for fun, to rate the difficulty of my patterns. If it's a 3/5 or more, I'll explain why I consider it more difficult. A few of my designs use techniques that are a bit unconventional! If it's one of those patterns, I'll warn you ahead of time. I do a lot of custom-fit patterns, for example. They are made to fit YOU, not a measurement from a chart. They're surprisingly easy to do and actually end up fitting. That's a good thing, yes?
So glad you found my patterns! I hope you really enjoy making whatever it is you're making! Crochet hugs, -Sheila
"Crochet thread is the ink with which I will sign my life." –SheilaSchnauzies
My Picket Fence Potholder Pattern
With Blue worsted weight cotton yarn, chain 33.
Row 1
SC in 2nd chain and in each ch across. Fasten off or carry yarn to back.
Row 2
Attach White yarn. Ch 1. Work 4 rows of SC in even pattern. Fasten off or carry yarn to back.
Row 3
Attach Blue yarn. Ch 1. Work 1 row of SC in pattern. Fasten off or carry yarn to back.
Repeat Rows 2 and 3 until you have six White sections. End with a blue row. Do not fasten off, carry work to back.
Picket Fence Border
At end of blue row attach White. Ch 1, turn work to right, SC in left side of work immediately adjacent the corner - corner made.
*With White, working over the White section, work SC-TRC-DC-SC, one stitch over each white row. When completing the last SC, yarn over and catch the blue yarn, pull it through the white SC. Now slip stitch in the blue row with the blue... BUT again do only half the stitch - yarn over and catch the white yarn and pull through to complete the slip stitch. Doing this will perfectly place your colors. Repeat from * for each section across. Fasten off.
Border
Attach Blue in top left corner. Working down left side, Work SC in each stitch. Ch 1, SC in corner and SC evenly across lower edge. Ch 1, SC in corner. SC in each stitch working up right side. Ch 1, SC in corner. Pickets: *Work SC in each stitch up side. Work 2 SC in point stitch. SC in stitches down other side. Slip stitch in blue row between pickets. Repeat * across.
Honored To Be An Associate Professional Member of Crochet Guild of America!


Thanks, Squidoo!
For The Shiny Purple Star!
This lens was awarded Squidoo's highest honor, the Purple Star, on March 30, 2013. Thanks very much, Squidoo!
The term, "CroBroidery," all photos and content in this article ©SheilaSchnauzies


