- HubPages»
- Arts and Design»
- Crafts & Handiwork»
- Textiles
Crochet Disney Descendants doll jumpsuit pattern

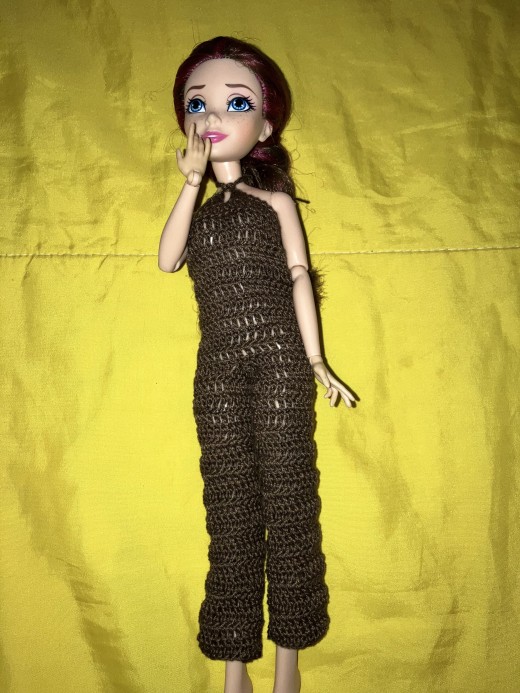
It’s getting to be that time again. The season’s changing. The cute swimsuits and tiny shorts are about to be replaced with cute coats and stylish skirts. So, how about we help get our dolls ready for it, too? Kind people of the public, I present to you this fashion doll jumpsuit pattern!
It’s made to be largely slip-on, with a tie at the neck to hold it up. The idea was to have something cute, easily adjusted for just about whatever doll you have, and nice to layer with jackets, skirts, purses - whatever you see fit!
This particular design has been made for a Disney Descendants Jane doll, but the adjustments are simple. Whatever your doll’s size/model, make a chain long enough to fit nicely around the hips (or the widest part of your doll, in case you’re working with an older Barbie doll).
Your results may vary for more pear-shaped dolls - this pattern works best if the bust and hips are about the same size, depending on your taste in how the clothes fit. The torso segment of this pattern is made to fit around the widest part of the doll, and fit around the bust with just enough slack to allow it to be pulled up by the string that keeps it on the doll, making it look a bit more fitted than it is. A lazy kind of stylish, if you will!
Also, shout-out to dezalyx for sharing her pattern for doll pants - I use her technique for pant legs here, because it’s the smoothest, most effective technique I’ve ever used to make pants/pant legs for my dolls. I would be remiss if I didn’t mention the hand she’s played in my ability to crochet and design crochet patterns!
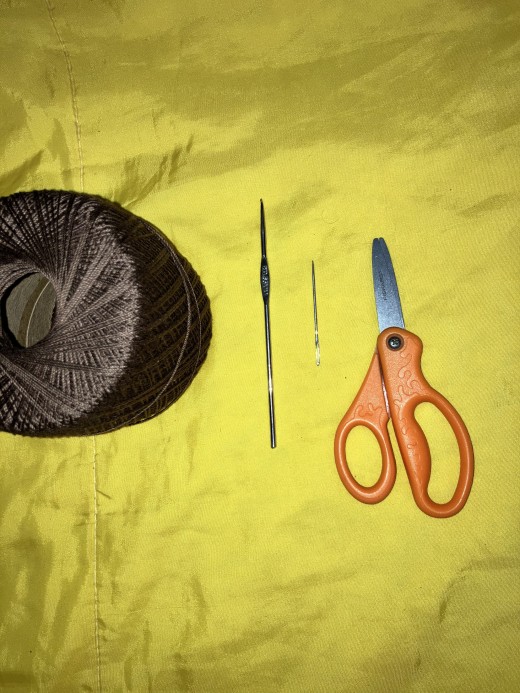
You Will Need:
Size 10 crochet thread
A size 7(1.65mm) crochet hook
A small yarn needle (for weaving in ends)
Scissors
Terms Used:
Ch(s) - chain stitch(es)
Dc(s) - double crochet stitch(es)
Sl st - Slip stitch.
Sk - skip a stitch
This piece is worked from the top downwards, using American crochet terminology. I’ll maintain the instruction to turn after the initial chain to start another round - this is optional, I just like the smoothness of the fabric afterwards. If you want to make this for a different doll size, you just have to make sure the beginning chain has an even number of stitches and slides easily up and down the widest part of the doll (36-40 chains works for kind of a baseline petite-to-average-sized fashion doll). As long as you’re keeping count of your stitches, the few small instruction changes in the pattern shouldn’t give you too much trouble.
R1: Ch 36, join into a ring. Ch 2, dc in the next 17 chs, ch 1, sk 2 chs (this is the hole for the tie to go through), dc in the next 17 chs, join to the first dc with sl st. Ch 2, turn. (35 sts)

Note: I emphasize using an even-number starting chain heavily so that you can get a decent chain space for the tie. The shift to an odd number of stitches is required for when you get down to the pant legs.
R2 - R10: Dc around, join to the first dc with sl st. Ch 2, turn. (35 sts)
R11: Dc around, join to the first dc with sl st. Ch 7, turn. (35 dcs & 7 chs)

R12: Sk 17 dcs, join to the next dc with sl st. Ch 2, turn. Dc in each ch, and in every dc around (this is the start of your pantleg). Join to the first dc with sl st. Ch 2, turn. (24 sts)


R13 - R29: Dc around, join to the first dc with sl st. Ch 2, turn. (24 sts)
R30: Dc around, join to the first dc with sl st. Fasten off. (24 sts)
Head back to R11, rejoin the thread and work R12 - R30 for the second pantleg (I recommend working in the unworked side of the chain from the first pant leg first, just to have the more fiddly part out of the way). Obviously, you can fasten off at a shorter length if you like. Here are some comparative pictures I took while working the second leg:


Once you’re done, make a chain of 70-ish chs. About 8-10 inches (20-25cm) should do the trick, if you don’t want to bother counting, or if you want to use ribbon instead. It should be about as long as the doll is tall, like this:

And I loop it through like this:


And you’re done! Thank you so much for checking out my pattern, and I hope you got something great out of it! As always, if anything in particular is unclear, drop me a comment and I’ll be happy to help any way I can! Have fun!


")
")
")

