Custom-Fit Sun Hat With Optional Cooling Pocket Free Crochet Pattern!

A Crocheted Hat You Make To Fit YOU! And With An Optional Cooling Pocket Too!
I love floppy hats, there's nothing more fun to wear with a little sundress and sandals in the summertime! Now that I have been going through treatment for malignant Melanoma, sun protection has suddenly become extremely important to me! If I'm going to rock the hat look, I'm going to have one in every color to match everything! So this is my first hat design. I hope to come up with many more for myself to share with you!
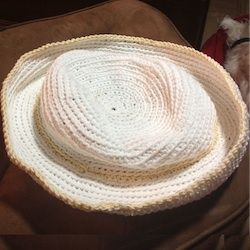
I've done this hat in 100% white cotton for myself for coolness. i designed the extra optional cooling pocket which I can to use to tuck in a few ice cubes or a cold pack when I go out to garden!
The hat is made to custom-fit you. So there's no guessing what size to make. Happy crocheting!
Awesome Crochet Helpers On Amazon! - My Hand Picks!

The Schnauzer Difficulty Rating! 2 Fairly Easy

What You Will Need
Sugar n' Cream Cotton Yarn in White or choice of color OR
Any other worsted weight cotton yarn
Small amount scrap cotton yarn for trim
Crochet hook size G or preferred

A Word About Yarn & Thread Selection...
You may use different yarns such as scrap yarns or threads with good results! Just make sure to keep them similar in weight and thickness so as not to throw off the pattern.

Let's Make The Magic!
NOTES
I wanted my hat to have a ribbed design, so I worked all SC in the back loop only. You may do your SC either in BLO or plain SC.
As you work, a line will develop where you do the slip stitch to the first SC of each round. I am opting to cover this line with a flower and stem applique. If you do not want the flower/stem, to avoid this line just SC into the first SC of the round and keep crocheting, like one giant spiral. It will be helpful, if you use this method, to place a stitch marker where the original beginning of the round is so you can keep your place more easily.
Directions
CENTER
Ch 4, join with sl st to form ring.
Round 1
Work 9 SC in ring. Sl st to first SC.
Round 2
Ch 1, work 2 SC in each SC around. Sl st to first SC.
Round 3
Ch 1, *SC in next 2 stitches, work 2 SC in next stitch. Repeat from * around, sl st to first SC.
Round 4
Ch 1, work 1 SC in each SC around. Sl st to first SC.
Round 5
Ch 1, *SC in next 3 stitches, work 2 SC in next stitch. Repeat from * around, sl st to first SC.
Rounds 6 & 7
Ch 1, work 1 SC in each SC around. Sl st to first SC.
Round 8
Ch 1, *SC in next 4 stitches, work 2 SC in next stitch. Repeat from * around, sl st to first SC.
Rounds 9 & 10
Ch 1, work 1 SC in each SC around. Sl st to first SC.
Round 11
Ch 1, *SC in next 5 stitches, work 2 SC in next stitch. Repeat from * around, sl st to first SC.
Rounds 12 & 13
Ch 1, work 1 SC in each SC around. Sl st to first SC.
Round 14
Ch 1, *SC in next 6 stitches, work 2 SC in next stitch. Repeat from * around, sl st to first SC.
Round 15
Ch 1, work 1 SC in each SC around. Sl st to first SC.
Round 16
Repeat Round 14
Round 17
Repeat Round 15
Round 18
Repeat Round 14
Round 19
Repeat Round 15
Now it's time to measure your hat. Find another hat that fits you and measure the distance from the center top to the side top (before it changes shape on the edge). You want your circle to be the same size as this fitting hat. If needed, repeat Round 14 and 15 until circle is desired size. Do not fasten off.
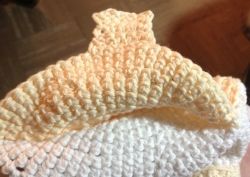
FOR OPTIONAL COOLING POCKET
Make an identical round piece 1 round smaller than the top hat piece. Fasten off, set aside.
Side Rounds
Ch 1, work 1 SC in each SC around. Sl st to first SC.
Continue repeating this round until hat is desired height. Do not fasten off. (If desired, at end of any round fasten off, attach contrast color, and work desired number of rounds. Then change back to main color and continue.
Hat Brim Rounds
Ch 1, *SC in next SC. Work 2 SC in next SC. Repeat from * around, join.
Remaining Rounds
Ch 1, SC in each SC around, join. Repeat until brim is of desired size. Use contrast color for final round, if desired. NOTE: This design will give you a slight curve to the brim which you can flip up or down. If you want a perfectly straight brim with no curve, work the first "Hat Brim Round," followed by two rounds of the "Remaining Round." Repeat that pattern for whole brim.
Inner Pocket & Button
Tie a piece of yarn through center holes of hat and inner circle (keeps it in place as you slip stitch it on). Attach same color as hat to inner circle. Slip stitch to hat all around edge, leaving about a 4” opening unworked.
Create the Buttonhole fastener: Slip stitch only on inner circle to two stitches short of center of open space. Ch 1, SC in next 4 SC. Ch 1, turn. Work across in SC, ch 1, turn.
Ch 4, SC in last SC of row. Ch 1, turn.
SC in first SC. Work 4 SC in ch 4 space. SC in last SC. Fasten off, weave in end.
Button
Work the first 3 rounds of circle pattern. Fasten off, weave in end. Tack down with a couple of slip stitches in position on the hat coordinating to where the center of the buttonhole falls.
Enjoy your spiffy new hat!
What Do You Think Of This Pattern? - Come On, You Can Tell Me!
What Are Your Thoughts On This Pattern?

Flipped Up...

The Ice Pack I'll Use... Tucks Right In!


My New Hat!

Learn Crochet On YouTube - Right Or Left Handed!
A Note From Your Designer...

Hi, I'm SheilaSchnauzies, also published as SheilaSparkles, and my life's passion is designing in Crochet! I also love to share gifts with friends, and this pattern is my gift to you! I give away about 95% of my pattern designs free. The other 5% are sold on my pattern store at Craftsy.com to benefit the vet expenses of my Miniature Schnauzer Rescue, Sheila's Schnauzies.
Just one little favor, please... I would appreciate it if you do not post this pattern anywhere on the Internet or in the 'real world.' Instead, you are most welcome to provide a link to this webpage.
I use a system I call the "Official Schnauzer Difficulty Rating" just for fun, to rate the difficulty of my patterns. If it's a 3/5 or more, I'll explain why I consider it more difficult. A few of my designs use techniques that are a bit unconventional! If it's one of those patterns, I'll warn you ahead of time. I do a lot of custom-fit patterns, for example. They are made to fit YOU, not a measurement from a chart. They're surprisingly easy to do and actually end up fitting. That's a good thing, yes?
So glad you found my patterns! I hope you really enjoy making whatever it is you're making! Crochet hugs, -Sheila
Honored To Be An Associate Professional Member of Crochet Guild of America!

"Crochet thread is the ink with which I will sign my life." –SheilaSchnauzies


")

")

")