Drawing Technique

Eraser Drawing Techniques - Using The Eraser As A Drawing Tool
Most of us tend to think of an eraser as a way of removing our mistakes to make way for a more perfect drawing. But this page was created to demonstrate a drawing technique in which the eraser is used as a tool of creation. I have included two finished pencil drawings of my own in which I applied this drawing technique.
The first example demonstrates it's use in a limited capacity in which depth is added. The second pencil drawing showcases how the eraser can be used to create the main structure of the drawing through the elimination process. Indeed it was through the erasing that the pencil drawing is created.
I usually keep an assortment of erasers on hand. Different types (such as gum or rubber) as well as shapes. Depending on the look you'd like to create an assortment of erasers can be used in new and exciting ways for creating interesting effects with your pencil drawings.
If you're ready to try something new. Let's experiment with using erasers to add dimension and drama to your pencil drawings.
So let's get drawing! Or rather ... erasing!
The Two Drawing Technique Examples Of Using An Eraser As A Drawing Tool Are:
* Using An Eraser In A Limited Way To Add Depth & Contrast.
* Using An Eraser To Create The Bulk Of A Pencil Drawing

All copyrights are retained by the artist,
Mona Majorowicz of Wild Faces Gallery.
The artwork or content in this lens may not be used or reproduced, either
in part or in whole, without the express written consent from the artist.
Have You Used An Eraser To Create A Drawing? - A Quick Drawing Technique Poll.
Have You Used An Eraser To Create A Drawing?

Enter The Humble Eraser
Pencil Drawing Technique In A Slightly Unconventional Way
A good pencil is arguably the artist's most important tool. Good drawing skills form the foundation for an artist to grasp form and line. Sketching is a great way to expresss creativity and connect with one's inner muse.
Enter the humble eraser. Since most drawing at one stage or another requires one it is usually thought as not much more than a means to removing unwanted marks. But I propose that you can expand your drawing skills by thinking of an eraser in perhaps a new light. As a tool of creation.
On this page are two of my pencil dr awings. One uses the eraser just a little. The other uses the eraser a lot.
I hope this page inspires you to play a little with erasers as a drawing technique.
A Drawing Technique Eraser Tip:
You can achieve different looks when erasing by using pencils of differing lead hardness as well as papers of differing rough and smooth surfaces.
A Variety Of Pencils Are A Great Way To Experiment With Drawing Technique - Pencil Sets Are An Easy Way To Ensure You Have A Pencil Type For Every Drawing

Using An Eraser In A Limited Fashion With Your Pencil Drawing - Adding Depth To Your Pencil Drawing With The Use Of An Eraser

Leviathon - Elephant Pencil Drawing on 100% cotton rag
32x40
The majority of this pencil drawing was done as usual. Drawing, shading and burnishing in to get varying degrees of depth of color.
However I did use an eraser as a creationary tool on this piece in 2 places.
* Creating the highlights on the veins in the ears
* The Tusk
The basics of the idea of using an eraser to create as a drawing technique is quite simple. You simply sketch in you base color. Much like a painter would lay down a base color or underlayer. The concept is the same despite it being a monochromatic piece. Then you simply use the eraser to lift up areas of pencil that you wish to look like a highlight.
The point of this drawing technique, as opposed to simply drawing around the areas you wish to show as white?
* You can achieve a more subtle color shift with far less effort.
* You avoid any cut and paste look.
* There is usually some of the original pencil underlayer remaining creating a softer more believible white space.

Areas On This Drawing I Employed This Drawing Technique
In this pencil drawing used an eraser primarily to achieve two things.
1. First I used it to highlight the veins in the elephants ear. By erasing instead of working around an area I have far less of a cut and paste quality to it. It makes for a much softer line and looks considerably more realistic.
2.The second area that I used an eraser to create rather than remove was the tusk. I simply lay in a base coating of pencil and then took my sharpened eraser tip and stoked downward creating the soft modulating shades of the ivory.
A Drawing Technique Eraser Tip:
I would advise only getting white erasers. I had bought some pink, purple and red shaped erasers when I was an in art supply shop. They work fine but on rare occasion they smear a bit of their color onto the underlying paper.Now I only buy white or gum erasers.
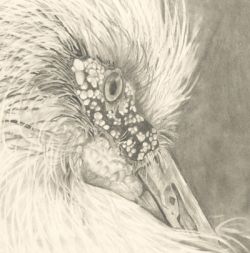
Creating Soft And Hard Edges Using An Eraser As A Drawing Tool - Drawing Technique Using An Eraser

Maguari Stork - Pencil Drawing On Bristol
18x24 inches
NOTE: I used a very smooth almost vellum like paper for this pencil drawing. I used soft lead pencils for the soft background and shadow feathers look. And a hard lead for the darker areas of the eye and face.
Creating Hard & Soft Edges With Your Eraser - Steps For Creating A Drawing Through Erasing

Note: By varying the edges on your eraser you can create both harder and softer erase lines for adding depth and detail.
In the face area of this stork drawing I used both hard edged erase marks as well as soft edged. I wanted the feathers edgeing the bird to appear softer against the background in order to create some depth as well as avoiding the cut and paste look.
The feathers around the eye have a harder edge which is strengthened with more pencil work. This is my focal point so I wanted to be sure to create a variety of textures to add visual interest. I drew in my shadowy areas first and then erased out the smaller pin feathers
Paper Texture As It Applies To This Eraser Drawing Technique - The More Texture The Softer The Eraser Edge

Note: For this pencil drawing I used a super smooth paper with very little tooth. The allows for a crisp looking eraser line.
The more tooth or texture your work surface has, the softer the edge your eraser mark will have.
I wanted to maintain a softness with the outer edge feathers ut had I done it with all of the I think my bird would simply look slightly out of focus. So for some of the feathers I added a little more definition by outling or adding shadow to the underside of the erase lines.
It's a small thing but it dramatically adds believablility.
A Drawing Technique Eraser Tip:
Shaped erasers are a great way to acheive detailed erase areas. If your eraser become too blunt with use simply trim a new point with a blade or knife. Or simply rub (erase) it down to an edge.
Some Great Books To Build Your Drawing Technique - Pencl Drawing Books


About The Author Of This Page
Mona MAjorowicz of Wild Faces Gallery
My name is Mona Majorowicz I am a professional artist who has been making my living selling my work for some time now. I am an animal artist, (meaning I paint critters) who works primarily in Oil Pastel or Water Soluble Pencil.
I own and operate Wild Faces Gallery with my husband Mike in a small rural town in Iowa. There we sell my original artwork and prints, as well as do quality custom framing and offer Giclee printing for other artists as well as for ourselves. I have over 20 years in ate art and framing industry both as a business owner and as a working artist.
I maintain a blog called Fur In The Paint, as well as write a regular column for the equestrian magazine Apples 'N Oats about painting horses.
Animals are my passion and art is how I chose to express it.


