Fabric Dyeing

Fabric Dyeing - Easier than it sounds...
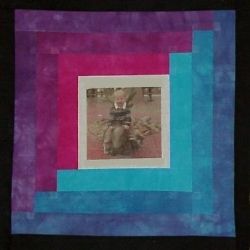
Have you ever drooled over those beautiful hand dyed fabrics at your local quilt shop and then dropped your jaw at the price? I know that I have. I also hate to pay a high price for things that I feel that I can do myself and a few years back, I found a basic fabric dyeing kit that you can purchase from Dharma Trading and decided to try it out for myself. In this lens, I will share the results of the experiment. Perhaps you will be motivated to try it out yourself! It was a lot of fun and I ended up with some beautiful fabrics some of which you can see in the photo here.
Table of Contents

If you have not dyed fabric before, start with a kit...
The kit that I used was similar to this Hand Dyed Fabric Starter Set. This is a great kit that includes a book and all of the supplies that you need to try out the dyeing process and really decide if you enjoy it before investing a bunch of money into supplies because they add up pretty quickly in the larger quantities.
The dyes in this kit are fiber reactive and work on natural fibers such as cotton (which is what most quilting fabrics are made of) or silk, among others. They can also be used to dye wood.
We Dyed Twice...(sorry, couldn't resist)
My mom and I did these dyeing experiments together and had great fun making these beautiful fabrics. Our first dyeing attempt was a success, a bit messy, but a unqualified success. We did a six color progression from fuchsia to turquoise and ended up with some beautiful vibrant colors that I used in the log cabin block shown above. You can see how bright the colors are and how well they coordinate together. How the progression works is that you start with the main colors fuchsia and turquoise (those are the colors closest to the center of the block above) and then add the other color in designated proportions to create a new color. For example, the second color on the fuchsia side has a small amount of turquoise added, the third color has a larger amount of turquoise added; the same process was followed with the turquoise, adding proportions of the fuchsia to the turquoise. I found it interesting that adding the turquoise to the fuchsia resulted in a much more dramatic change than the other way around.
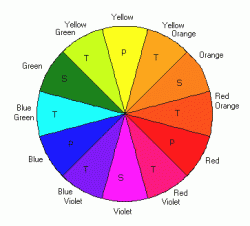
The second time, we decided to do the entire color wheel using all three primary colors (fuschia, turquoise and yellow). We ended up with sixteen colors which is a lot to handle on a smaller scale, but it worked out fine. The second time, we also used a white-on-white print (where a white pattern is printed on top of a white muslin) rather than a plain muslin like in the first round. I will talk more about the larger dye process below.
Color Wheel Fabric Dyeing
Our ambitious endeavor to dye a color wheel arose out of the need to make a baby quilt (the completed quilt is shown further down). My mom and I had decided to make small pinwheel blocks and we wanted to use bright, vibrant solid colors so we decided to dye them ourselves. What follows is a very brief explanation of the process. This lens is not intended to teach you how to actually dye fabric but rather pique your curiosity and perhaps inspire you to enter the wonderful, imaginative, messy world of those who dye fabric.
The Dyeing Process
In a nutshell, cotton fabric is washed to remove additives and impurities and is then placed in a container with the dye/fixing solution and allowed to sit for a specified amount of time and then rinsed many times to remove the unbonded dye from the fabric. The dye that we used was Procion Fiber Reactive Dye from Dharma Trading. The description "fiber reactive" indicates that the dye bonds with the fiber and becomes colorfast. Also, the method we used was the "baggie" method which is used for very small pieces of fabric and differs substantially from those that use larger containers to dye with. We dyed a half yard of each color.
The Dyeing Process: Step-By-Step
1) We covered the work space with newspapers and prepared the first set of zipper bags. This entailed opening the bags and filling them with two cups of soda ash solution (this is what "bonds" the dye to the fabric) and setting them carefully in a plastic basin. The fabric was being washed during this step and is used while still wet.
2) We mixed the dye solutions and added them to each bag in various proportions according to our color chart. The dyes are powdered and are slightly toxic so you want to make sure that you wear a face mask while handling the dry powders. Once they have been mixed with water, you can remove your mask. Mixing the powders is one of the more time consuming parts of the process because you add a small amount of water to the powder and mix into a paste before adding more water to prevent the development of lumps. If there are any lumps floating around in the solution, they will create blobs of color when they come into contact with the fabric.
3) We added the pieces of fabric, sealed the bags and mushed them around to distribute the colors evenly. After a few minutes we moved them outside to sit in the sun while we prepared the next sequence of colors. The temperature needs to be between 75 and 100 degrees to activate the dye and it was warmer outside that day so...
4) After all of the bags were prepared and put outside, we waited and waited...they need to sit for at least an hour and the longer they sit, the deeper the colors become. We timed it so we could go to lunch while the fabric was soaking.
5) We looked at the bags and oohed and aahed over the colors and then began the laborious process of rinsing them. Some of them, especially the ones with fuchsia, seem like they will NEVER rinse clear, but they will. After thorough rinsing by hand, we put the fabrics, grouped by color family, into the washing machine and washed them with Synthrapol which helps remove any additional residue. After being thoroughly rinsed and washed, they can be dried and pressed and enjoyed!
We used fuchsia, turquoise and yellow as the primaries and what we ended up with was each of these colors with a four step progression in between each for a total of fifteen colors. The sixteenth color came about because we had an extra piece of fabric and mom said "Let's dump what's left of the yellow and the turquoise solutions together and see what we end up with" so we did and ended up with an absolutely gorgeous kelly green. It was great fun and definitely worth trying!
Ready to Learn More about Fabric Dyeing?


The Completed Baby Quilt

This is the quilt that we made from the hand-dyed fabrics. We were both very happy with how this turned out. The pinwheel blocks were four inches square and we used a total of 99 blocks. The blocks were made using half-square triangle sets, four per block which translates into 396 half-square triangle sets. Fortunately, we used a quick piecing method that I will share with you in another lens.
The hardest part was determining the layout of the colors. I wanted a color progression, but without defined diagonal stripes so I offset the colors by two which resulted in a more subtle progression.
What We Learned Along the Way
1) If you are dyeing white-on-white fabrics, make sure that you squish the bags around frequently. The mottling that you get from the folding and arranging of the wet fabric before putting in the dye solution is beautiful on solid muslin, much less so when a print is involved. This was our personal opinion.
2) WEAR THE RUBBER GLOVES LIKE THEY SUGGEST. I dislike the feeling of rubber gloves and being the stubborn person that I am, did not wear them during the first few stages of the process and ended up with severely stained hands. Surgical gloves work great and are much more comfortable than the heavier rubber ones.
3) This is a messy project, without a doubt, so be careful with the solutions and put newspapers down and keep paper towels close at hand. One of the books I read suggested making a mixing box out of a cardboard box to keep the powders from flying around and landing on other surfaces.
4) If you are going to be dyeing a large number of colors, create a mixing chart that indicates the proportions of the different color solutions to mix together beforehand (for example green #1 = 5 tablespoons blue, 2 teaspoons yellow). I had the foresight to do this and it was a great time saver and alleviated some of the confusion around the mixing process.
5) Fabric dyeing is not an exact science. Your results will rarely be the same twice. We used the same exact mixing formula for the fuchsia-turquoise progression as we did the first time and ended up with completely different shades of colors. Keep a log of what you do with each project and keep swatches. Make notes of where the bags cured, for how long, what the approximate temperature was (we put ours outside to cure), and how you arranged the fabrics (folded, crinkled, rolled, etc.) in the containers.
Other Suggestions:
1) Go to your local dollar store for the kitchen utensils - funnels, measuring cups/spoons, and basins. They are much, much cheaper at the dollar store than at the grocery store.
2) Before you decide to dye fabric, go to your local library and pick up a few books on fabric dyeing and skim through them to get a general idea of the process and the different ways that you can create patterning in the fabric. You can use plastic bags, small olive jars, PVC tubes, basting stitches as well as many others to create unique patterns and striations of color on your fabric. It is truly amazing the different options that are out there.
Books and Supplies for Fabric Dyeing

Fabric Dyeing Inspiration
Fabric Dyeing Resources on the Web
- Fabric Dyeing 101
Free step-by-step instructions and recipes for creating your own hand-dyed cotton fabrics using Procion MX dyes. - Colorquilts | Fabrics
I have a sinful amount of fun dyeing fabric, and in these pages I show you just some of the hundreds of yards I've produced over the years. Each thumbnail image below links to a page with several related examples. - Paula Burch's All About Hand Dyeing
A site for sharing inspirations,instructions,and ideas with other dye artists. Gallery of examples,instructions,book reviews,and links to related resources. - Natural Dyes From Plants - Pioneer Thinking
Did you know that a great source for natural dyes can be found right in your own back yard! Roots, nuts and flowers are just a few common natural ways to get many colours. Yellow, orange, blue, red, green, brown and grey are available. Go ahead, expe


