Easy Designs - Step by Step Instructions From Start to Sale


Easy Designs to Make With Your Scanner - Unique Gift Ideas
The following lens will take you step by step as you create your own unique designs using an ordinary scanner. But first, I will show you several of the designs that I have already created. You are welcome to purchase any of them as well. To create your own customized design, continue reading past the example design section of the lens.
This easy design idea will show you how to make a customized tote bag for hobbies, books, shopping, and more. A unique way to organize all of your passions, make gifts, diaper totes, lunch for the office, and a list of ideas that will spark your imagination.
Please share your ideas and your creations on this page. We would love to see how you are using this tutorial to creation your designs.
What You Need
Supplies, equipment, and software you will need to create the designs.
You will need the following tools and supplies to create this design.
1. Fabric (decorative trim, yarn, buttons, etc. and any other elements you would like to add),
2. Scanner, (I am using a flat deck with removable cover - if your cover isn't removable you can keep light out of the design by covering the design elements with a dark cloth before you scan them.
3. PC (with internet access if you are going to upload to Zazzle or Photo Sharing account),
4. Imaging editor software[If you are not using GIMP, see footnote-1], and
5. A Zazzle account [if you do not have a Zazzle account,see footnote-2].
[1]footnote: The imaging editor software will need to have the ability to import your scanner image, crop image, and allow you to resize it if needed. Most software will allow you to perform these functions. If you are unsure about your software, consult your software documentation for details. I am primarily familiar with GIMP (GNU imaging manipulator program). The instructions will be step by step for GIMP, however you may easily adapt them to use with your preferred photo/image editing software.
[2]footnote: The Zazzle account is easy to create and there will be more information about that part later. You can create the designs without a zazzle account if you wish. Your designs can be used on your blog, forums you belong to, and other photo shareing methods (such as flicker for example).
Let's Get Started - Step by Step Design Process
The following instructions will guide you through the step by step process of creating a personalized tote bag. I am using GIMP, so you may need to adjust the steps a bit to work with an alternative photo/image editor.
This step by step guide will include every resource you need to prepare your design and prepare it for your gallery. I have included two great lenses I found to show you how to create a gallery on Zazzle and then a showcase on Squidoo, so you can create a lens to show or to sell your creations.
Easy Design Step by Step,
1.First drape your fabric onto your scanner. Adjust it so that you have the elements that want arranged the way you want your image to look.
2.Open the GIMP program.
3.On the upper left section of the GIMP control panel you will see 'file'. When you click on 'file', a drop down menu will be revealed.
4.Move your mouse arrow down to "aquire". Another menu will show up on the side.
5.Move your mouse arrow over to the menu and click on "scanner/camera". The scanner selection menu will appear (if you have more than one printer, you will need to click on the one you are asking GIMP to aquire the image from). Then click on "select" to select the scanner/printer you are using.
6.The scanner window will open. Be sure to click on "Preview" before you scan, so that you can adjust the fabrics to look the way you want them.
If you find the image is too dark, you can remove shadows by bulking up the area where the shadows are. To do this, I have placed additional fabric on top of the space that is too dark (you can use a folded pair of jeans for example). This results in the fabric section to sit closer to the scanner window so that it will receive more light.
(Tip: avoid too many shadows-unless you are using them as a design element).
Continue to 'Preview' your image until it is what you are happy with. If bulking up the space where your darkest shadows are isn't working, you might consider moving elements a little bit apart from each other. For example; On my 'sewing notions' design I needed to move the thread spools a bit apart so that light from the scanner could get in between them.
SELECT THE SCAN AREA BEFORE you go to step 7. The average scanner prepares an image 8.5 x 11.6 , you want an image that meets the measurments of the tote you are making. If you already know the tote you prefer, the measurements are below in step nine. I have usually made the all 10.6" x 9", and then can fit/fill or resize to work for the bag I want to use.
7.Scan. Click on 'scan'. Your image will open in your photo editing window.
8. Turn Off The Scanner. It may be just mine, but, it will get hot if I leave it on while I am going on to the next steps. It is ok to leave the design elements on the deck (in case you want to repeat the first 7 steps with a slight variation or want to add elements (photos, keepsakes, memoribilia).
9. Edit your image. You will want to size the image for totes as follows:
*Classic Bag, Beach Bag (10.6" x 9") = 1590 x 1350 pixels
Accent Bag (8.5" x 7.2") = 1275 x 1080 pixels
Impulse, Floral, Blue Striped (6.5" x 5.5") = 975 x 825 pixels
Save your image in .jpg format and then go to Zazzle to upload it into your account.
Remember that you can customize your design by adding text (personalize it).
Scan - Design - Publish - Buy - or Sell Your Creation
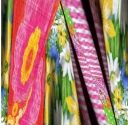
This is one example of how you can use this design idea to create a craft supply tote bag. This design was inspired by a crochet project I am working on. I have placed the fabric and the yarn in the design. This will let me see what is inside easily and save more time for working on the project.
* A Closer Look *
This is the design that is on the tote. I am showing you this so that you can see the elements that are in the design. The yarn and fabric were used to make the design. The text was added after I uploaded the design to the product designer dashboard on Zazzle.
This lens will show you how to create a unique design to use on your personalized tote bag. The applications can be used for many other items as well. After you complete this basic How-To, you will be empowered to use this design technique in countless other ways. See the 'Brainstorm' section of "Design Plan" for some ideas and feel free to add your own.
The following examples of designs I have made using this technique will give you some ideas about how you can create a variety of themes. I have also included an additional design (Green Dragonfly), that builds on this easy design concept.
The Craft Supplies Tote design was created using yarn and fabric. The lettering was applied after it was uploaded to the product design tool at Zazzle.
Virtual Quilt Block Shopping Bag
The Virtual Quilt Block Shopping bag design was created using remnant fabrics that have been left over from other projects I have worked on. Two were left over from skirts I made for my grand daughters and the others from small quilting projects.
Another idea I had recently, is to use children's favorite clothing (before it is donated) to make an heirloom bag. For example, your daughter has grown out of her favorite dresses, you can use them to make her a unique tote to carry to school or take to the library. That way she will still enjoy the essence of them long after they are passed along to other children.
Butterflies & Pearls Tote Bag
The Green Dragonfly Tote was created using a small remnant of lace, my favorite white dress and 3 dragonfly charms.
This technique has a few more steps than the others in this Easy Design Lens do. If you would like to explore the extra techniques used in this design, the workshop group will be creating a virtual quilt block project in July.
The Virtual Quilt will be composed of each member's blocks and will be displayed at the Group Headquarter's.
© 2008 Deb Bryan
Related

How to Make a Biscornu: Tutorial With Step-by-Step Instructions

How to Make a Reed Curtain, Step-by-Step Instructions

How to Make a Unique Gift for Your Boyfriend: A Step-by-Step Guide
")
How to Make a Clay Turtle (Easy Step-by-Step Instructions)

Create an Invitation Using Photoshop and Learn the Secrets of Inexpensive Printing


