- HubPages»
- Arts and Design»
- Drawing»
- Drawing Tutorials
Encouraging Children To Draw

Save Those One-of-a-Kind Projects!
Nurturing the Young Artist
Drawing is a skill that can be learned with practice, just like reading, writing, or riding a bike. Yes, some are more talented than others, but drawing is a basic communication skill everyone should learn. Sometimes drawing a picture is the best way to make your ideas understood.
To encourage children to practice drawing, only two things are necessary. First, provide them with drawing supplies. Then, show that you value the drawings they create. Drawing can be especially helpful when working with a shy or quiet child, although it can also be a good activity for helping more boisterous children settle down for a bit.
While art classes, expensive supplies, and drawing tables are certainly nice to have if you can afford them, children really just need opportunities and encouragement. Without your interest in their efforts, all the lessons and supplies in the world may be for naught. With your interest and participation, even a humble box of crayons can nurture a young artist.
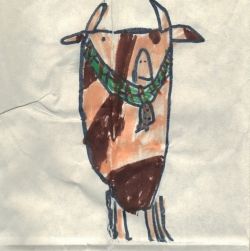
The cow above was done by Kathleen Schimmel in first grade.
Every child is an artist. The problem is how to remain an artist once we grow up.
~Pablo Picasso
Provide Opportunities to Draw
Most homes have limited space for art activities, but designate a spot to keep art supplies. A plastic bin or even a shoe box can hold crayons, pencils, sharpeners, a ruler, and erasers. Keep a variety of papers nearby as well: construction paper, a sketchbook, tracing paper, and a newsprint pad offer different effects with the same drawing medium.
Even parents who are not artists can help children by getting them to look at everyday objects and analyze the shapes that make up that object. Ask questions like, "What shape is the duck's body? His beak?" While a child may think he can't draw a duck, he can certainly draw an oval and a triangle. The more you practice, the easier it becomes to see the shapes.
If a child gets frustrated and asks for help, offer to erase a false start; then give the paper back to the child to show you have confidence in her ability to figure things out. Reluctant children can start with a shape drawn by you or traced from a stencil. Given a start, they can often go on to finish a drawing. Thumbprint pictures can be good starts, too. Turn a thumbprint into a turtle, a beetle, or anything else oval.
Tracing is not "cheating" at the primary level. Children can develop their motor skills by practicing the tracing of simple outline shapes and pictures. Anything that keep the child trying is a go until they develop some skill and confidence with pencil or crayon.
Proudly Display Your Childrens' Artwork
Once a drawing is done, let the child tell you about it. With very young children it helps to say, "Tell me about your picture." This avoids the embarrassment of saying, "What a lovely, bird!" when the child actually drew Aunt Betty. Find something to praise about the picture, such as the choice of color or the fact that that the child worked a very long time. Don't heap fake, over-the-top praise on the child, however. They know sincerity versus flattery, and you want them to be able to trust you when they come to you for opinions and advice in later years--about art and other matters!
The refrigerator is a natural place for some pictures. Really special work can be framed. The highly productive child will need a portfolio or scrapbook for drawings. If you become truly buried in artwork (meaning your encouragement worked!) then consider gifting art. Ask the child's permission, of course, but suggest that a special person might really enjoy some artwork for their home, office, or hospital room. I'm betting your young artists would love to know that they can brighten somebody's day with something they made themselves.
Your encouragement could plant the seeds for a lifetime of creativity.
Which is your favorite medium for drawing?
Transferring a Child's Drawing to Fabric
Creative T-Shirts and Textiles
Transfer Crayons
Iron-on crayons are available at most craft stores. Although colors are limited, this makes a simple way to transfer a design to a T-shirt or pillow cover.
Make a photocopy of the drawing on standard copy paper, making sure lines are dark enough to show through the back. Color the back of the copy. This ensures that any letters or numbers in the design are not backwards after transfer. Place the copy with the crayon side down on your fabric and press with iron as directed on the box of transfer crayons. You may want to protect your ironing board by placing an old sheet under the fabric to which you are transferring the design. If transferring to a T-shirt, put a piece of cardboard inside the shirt to make sure the transfer does not bleed through to the back of the shirt. Peel off paper, let design cool, and you are done. Save the design to be colored and transferred again.
Embroidery
Using tracing paper and pencil, trace the outlines of the child's drawing. Transfer this tracing to fabric using a transfer pencil or dressmaker's tracing paper. Another alternative is to trace the design onto water-soluble stabilizer, place the stabilizer over the fabric, and embroider through both stabilizer and fabric. Spray the finished project with water to dissolve the stabilizer, leaving only your embroidered design behind. Floss comes in a wide array of colors, giving you more flexibility than transfer crayons when trying to duplicate the child's color scheme. You may also use liquid embroidery pens if you are not handy with a needle.
Applique
A simple drawing with only a few large sections can make a fine applique design. For example, a cat face with an oval and two triangle ears would make a good design. A drawing of many stick figures would not.
Trace the outlines of the drawing onto tracing paper. Break the design down into components, e.g. two ears, head, nose and eyes. Trace each component separately to make applique templates. Trace these components onto freezer paper for freezer paper applique or onto fusible webbing for fusible applique. Choose fabrics that closely duplicate the colors in the child's drawing.
Quilting or Candlewicking
A simple line drawing may be used as a quilting or candlewicking design. Transfer the outline of the design onto card stock. Pierce the design with an awl at even intervals to make a pattern of dots. Use a water-soluble pen or chalk to mark the dotted lines on your fabric, then quilt or knot along the marked lines.
Ideas and Inspiration
- Fiberfrau: Fun with Fabrics and Fibers: Create a Designer's Idea Scrapbook
- Art With a Purpose
This course can greatly minimize the teacher's workload and give practical direction to art skills. - Drawing Development in Children
Timeline of drawing development in children from ages 2 through 16.


