High Dynamic Range Photography

So What's High Dynamic Range?
In photography when we are talking about dynamic range, we are talking about the range of brightness or luminosity between the brightest and darkest areas of an image. The range can be from pure white to pure black but what is important in a photograph is the amount of detail that can still be seen in the brightest and darkest areas.
Our Creator has given us eyes with the ability to see detail in a wide dynamic range. When we look at a landscape we can see detail in bright clouds and dark trees in the same scene. Cameras, whether film or digital, don't have the dynamic range that our eyes have. When taking a picture, if you want to see detail in bright clouds, you will have to expose for the clouds but, when you do that, the detail in the dark trees below will be lost. If you expose to capture the details in the dark trees, the detail in the clouds will be blown out, they will go to pure white with no detail. You can set the camera to average the light between the darkest and brightest areas of the scene but you will lose important details in both the brightest and darkest areas.
In this article we will be talking about how to capture much more of the detail in a scene with a wide dynamic range. With high dynamic range (HDR) photography you will be able to create an image that is much closer to what your eyes actually see.
All photographs are my own.
Why High Dynamic Range Photography?
")
Perhaps you've taken a picture of beautiful forest covered hills with a dramatic snow-capped mountain in the scene. When you look at your photo you may have great detail in the forested hills but the snow on the mountain has gone largely to white and lacks the details you can see with your eyes. Conversely, depending on how you set your camera, you may end up with great detail in the snow-capped mountain but the forested hills have gone dark and are missing all of the great detail you saw with your eyes.
A camera in a single shot can only capture a portion of the dynamic range we can see with our eyes. Consequently, when we take a picture of a scene with a wide dynamic range we have to compromise. We have to decide what is most important to the image, do we want to expose to capture the amazing detail in the bright clouds or is it the detail in the darker trees that is most important to the final picture. You can split the difference with an averaged exposure but you will lose detail in both the bright and dark regions.
HDR photography compensates for the limited dynamic range of the camera by taking multiple pictures of the same scene at different exposure levels to capture detail in the dark and light areas and everywhere in between. These multiple exposures are then combined using software that is able to pull the detail out of the bright, dark and in between areas and combine it all in one high dynamic range image.
The waterfall image above is a good example of the value of HDR photography. It was a dark and stormy day but if I had set my exposure on the dark foreground the clouds and waterfall would have been washed out, mostly white with little or no detail. If I had set my exposure on the waterfall or clouds the rocks and trees would be too dark to show much detail. By combining three separate exposures I was able to capture wonderful detail throughout the dynamic range of this particular scene.
Check Out Great Buys on Amazon

How To Take An HDR Picture
")
The picure above is HDR and because of that I was able to capture beautiful detail in the snow and clouds as well as the darker areas of the image.
Many modern cameras, especially digital SLR cameras have a setting for Auto Exposure Bracketing or AEB. If you aren't familiar with your camera, check your manual to see how to do it. Typically you will want to take three exposures, one with the camera's exposure sensor taking it's best guess and the proper overall exposure and then one two stops above and one two stops below. I set my camera for a 2 stop AEB and the next shutter release will be the camera's best guess at a proper overall exposure. The next shutter release will be with a slightly quicker shutter speed (equivalent to 2 stops) to hold back some of the light so the camera can capture detail in the bright areas of the scene. The next shutter release will be with the shutter speed slower than the first shot (the equivalent of 2 stops) in order to let in more light and capture the detail in the darker areas of the scene. Now you have three images of the same scene but with exposure setting that will likely capture detail in the brightest and darkest areas of the scene as well as everything in between.
Some tips that may help
1. You can take more than three images by adjusting your exposure compensation parameter.
2. You may want to use a tripod to hold the camera still for the three shots, especially the last shot with the slower shutter speed. HDR software will align the images but a tripod helps ensure good alignment as well as reduces camera shake to enhance sharpness. I have hand-held many HDR shots but use the tripod when I can.
3. You may want to use manual focus or turn auto-focus off after you set your focus so the camera won't refocus between shots which could change the dept of field. Since you are going to blend three or more shots together you want them to be identical in focus.
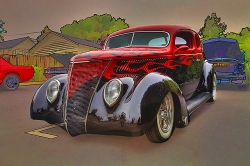
4. Don't bother with HDR unless your subject matter has a significantly wide dynamic range. There's no advantage to HDR if everything is equally well lit. When I shoot my vintage vehicles I often do it HDR because the car typically has shiny chrome and dark tires and a lot in between that I want to capture.
5. Scenes with moving objects, people or vehicles can be difficult to capture for HDR because you are combining three different images with objects in three different places. Some HDR software can deal with this to some degree but it's difficult to get a decent HDR image of a tree on a windy day because the leaves and branches are a little different in each image.
My Canon 5D Mark III has a setting that will automatically shoot three shots in a row with whatever settings you choose. It then processes the three images internally and creats an HDR JPEG image. It does a really good job but I often prefer to take the three images into my Photomatix software for more control over the final HDR image. See my article about choosing a great DSLR camera for more information on the Canon 5D Mark III.
Processing Your Bracketed Images Into a Single HDR Image
")
You will find that Paint Shop Pro and Photoshop are both able to combine multiple images to create a single HDR image. There are other software applications that will do it but my favorite and the one I use almost exclusively is Photomatix by HDRsoft. It does a great job; it's fairly intuitive and has passed along improved versions without cost. While there are other HDR programs out there that I haven't tried, I have tried and can recommend Photomatix which you can check out here. Each HDR software application functions a little differently so I won't bother trying to explain how they work, you can figure it out on the fly and with instructions provided by the software company.
HDR images look different from other photographs. They are closer to what we see with the human eye and some say they have and almost 3-dimensional look. I'll let you decide that but I say go for it, have fun and see what you can do with HDR.
One For The Road
.")
Here's one last HDR image to give you an idea of what you can do with HDR software combined with other photo editing applications.
The horse and rider were photographed in one location. The image isn't HDR because the subject was in motion. The background behind the horse and rider was drab and very uninteresting. I liked the horse and rider but not the background. Later that same day while driving through farm and ranch country looking for something to shoot I came upon the background scene you see in the image above. I liked the country feel of the scene and the dramatic clouds so I took three bracketed shots in order to create an HDR image where the clouds wouldn't be washed out. Now I had a nice background for the horse and rider.
I used a Topaz software application called ReMask to extract the horse and rider from the original image and used Photoshop to place him happily in his new setting. The horse and rider and background scene were photographed on the same day about 40 miles apart. Using Photomatix, Topaz and Photoshop software I was able to bring it all together in a more interesting and pleasing scene. You can see what I mean when I say taking the picture is just part of the fun. You can create wonderful, artistic images in your digital darkroom.
My Fine Art Photography Website
I have a fine art photography website where you can view my diverse photographic interests. I have a gallery dedicated to vintage vehicles and buildings, galleries for landscapes, waterfalls, birds, wildlife, painterly photography and a variety of other specialized subjects. Mount Shasta and various northern California scenes are prominent in many of my galleries. Most of the galleries have background music if you play them as a slideshow. This allows you to kick back and listen to the music as the images flow by. Whether you are looking for some interesting images or looking to purchase some photographic art, I think you will enjoy your visit to Chuck Nelson Photography.
Related

Photoshop Same Subject Multiple Times: Tutorial

Queen Seon Deok and the Challenge of TV Photography

Fall Photography - Images, Ideas and Tips

Minimalist Photography - the 8 Elements

How to Control a Nikon D200 Camera and Preview Pictures Full Screen with a Mac Computer Using Sofortbild and Tethering


