How to Create a Digital Background in Photoshop

You Can Save That Photo
Have you ever taken a great photograph of someone but the background (behind the subject) is so uninteresting or distracting that it detracts from the portrait? Don't be too quick to discard that image. In this article I'll show you how to save that photo by creating an artificial or digital background so that your portrait can be admired without distraction.
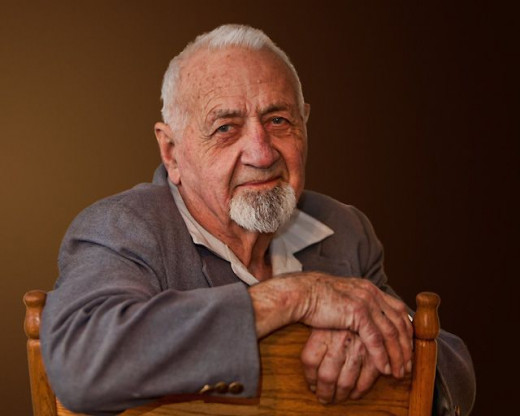
The image here is a photo I took of a friend. I didn't like the background in the original photo so I substituted a digital background. I'll show you how to do this in Photoshop but I have done the same thing in Paint Shop Pro. I'm sure there are other photo processing software applications that can do this so you may well be able to use this tutorial on the software you are using.
I am demonstrating how to do this with a portrait but you can do this with any virtually any subject in any photograph.
All images in this article are mine and I'm making this tutorial using Photoshop CS5.

FIRST STEP: Extract Your Subject From The Background
The first step is to isolate the subject from the background in the original photograph. In this case I wanted to remove my friend from the uninteresting background you see behind him. This is called extracting because I am extracting what I want to keep from what I want to discard.
By the way, you should be working on a copy of the original. You want to save your original image untouched so you can always go back to it if your project ends in disaster.
There are a number of ways to extract an element from a photograph. In this case I used a Topaz plug-in to Photoshop called Topaz ReMask. Topaz software applications plug into Photoshop or Paint Shop Pro and you can use them without leaving your primary software application.
In powerful software applications like Photoshop and Paint Shop Pro there are usually several ways to accomplish something. You can extract a subject from its background by making a selection and deleting the background, by using the eraser tool and erasing the background or by placing a layer mask over the image and using a black paintbrush to hide the background.
Your Extracted Subject
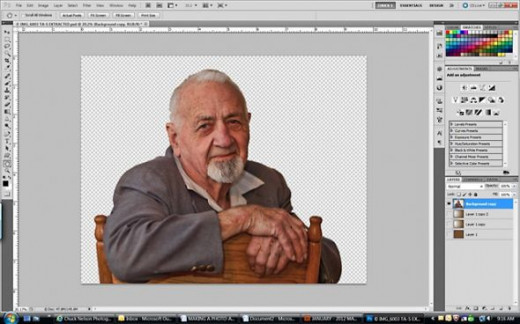
Once your subject has been extracted it should look something like this. This is a screen print of my Photoshop window after my friend has been extracted from the background. The checkered background is an indication that the pixels are missing or hidden. I can now place him on a background of my own making. I can use any picture in my inventory or I can create a digital background to my liking.
PAINTSHOP PRO AND PHOTOSHOP
I use Photoshop and/or PaintShop Pro almost daily. You will take your images to a new level with these products.
SECOND STEP: Creating a New Background Layer

In this case, I wanted to create a digital background in a color that I felt complimented the image. To do this I created a new background layer (FILE - NEW) and made it 8x10 inches at 300 pixels per inch. This is a standard print size so my friend can make prints without having to crop the image. The 300 pixels per inch is an optimum resolution for printing but would have to be sized down for web display.
I left the color of the background layer white because I am going to color it later.
THIRD STEP: Placing Your Extracted Subject on The New Background Layer

Now all I had to do was to use the MOVE TOOL to drag my extracted friend onto the new white background and use the transform tool to size and position him as I wanted him in the new background.
Now, as you can see in this screen print, I had my extracted friend as a layer on top of an 8x10 white background layer. My next objective was to make that background more interesting.
FOURTH STEP: Create the Background You Want

For me, the fun begins when I have a subject extracted and placed as a layer on top of a background layer. The sky is the limit. I can place any image in my inventory on the background behind my friend. I've shown an example below. In this case, however, I wanted to create a digital background. I'm not a portrait photographer so I don't have studio lighting and an assortment of backdrops so I must improvise and Photoshop or Paint Shop Pro gives me many options.
You can keep this simple by just selecting the background layer and filling it with any color you like. Select the background layer, click the PAINT BUCKET TOOL, click the FOREGROUND COLOR and select the color you want. I often click on a color in the image to select a color that is already working with the image. When you have the color you like, click on the background layer to fill it with that color. Alternatively, you can click on the GRADIENT TOOL and select a gradient to fill the background.
In this case, I felt a warm brown color worked well with my image so I filled the background with that color. I then added a bit of texture to the background layer (FILTER > TEXTURE > GRAIN) to give it some grit.
When I took the picture, I had used available light with a flash fill bounced from my left lighting the left side of my friend's face. Now, to make the background fit the actual lighting I wanted the right side of my background darker than the left side where the light was coming from. To do this I created a duplicate layer of my brown background layer (CTRL + J). Then, with my foreground color still brown and the background color set to white, I selected the FOREGROUND TO BACKGROUND GRADIENT clicked the REVERSE checkbox and drug on the background copy from left to right. This gave me a very light color on the left side and a dark color on the right side. To blend this layer with the all brown background layer below it, I selected the MULTIPLY blend mode and the result was a light brown color on the left and a dark brown color on the right. To tweak it a bit more I made another copy (CTRL + J) of the duplicate background gradient layer I just made and left it in the normal blend mode. This gave me the final result you see above. The background seems consistent with a primary light source from the left.
The Sky is Not The Limit

Above I said the fun begins after your have extracted your image and you get to create your own background. I said "the sky's the limit" but that's not true. I used the sky for a background in this image but I'm not limited to the sky, I could have put any photo I wanted behind him. It just happens I liked the sky, but it's not the limit.
NOW GO TRY THIS AND HAVE SOME FUN!
KELBYONE
If you find Photoshop tutorials helpful, you should seriously consider joining the KelbyOne. It used to be called the National Association of Photoshop Professionals or NAPP but, by whatever name, it's a great resource for Lightroom and Photoshop users at every level. In addition to video and narrative tutorials on the KelbyOne website, your membership includes a subscription to Photoshop User Magazine which is a wonderful resource with useful information and helpful tutorials.
Related Amazon Products
I use Adobe Photoshop Lightroom with almost every image and can recommend it highly.

My Fine Art Photography Website
I have a fine art photography website where you can view my diverse photographic interests. I have a gallery dedicated to vintage vehicles and buildings, galleries for landscapes, waterfalls, birds, wildlife, painterly photography and a variety of other specialized subjects. Mount Shasta and various northern California scenes are prominent in many of my galleries. Most of the galleries have background music if you play them as a slideshow. This allows you to kick back and listen to the music as the images flow by. Whether you are looking for some interesting images or looking to purchase some photographic art, I think you will enjoy your visit to Chuck Nelson Photography.
I have applied many of my photographs and digital art to a wide variety of products such as mugs, mouse pads, T-shirts, cards, etc. If you are looking for a one-stop location for unique gifts, be sure to visit my Zazzle website.


