How To Draw Some Fun Ninjas Step-By-Step

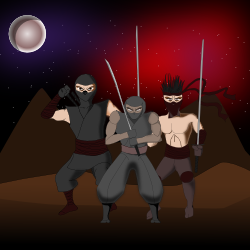
Drawing Your Ninja Army
Each year at my birthday, Christmas or whatever, my wife asks what I want. My answer is always, "A NINJA ARMY TO DO MY BIDDING!"
She laughs at that, and I'm beginning to get the picture that she'll never get me a ninja army. It kind of hurts my feelings, because that would be great, right. I could totally send them off on wild missions and stuff, to kill whoever was causing trouble in the neighborhood, or wherever.
I mean, I'm pretty sure I'd abuse it, and sic my ninja army on just about anybody until I held the entire neighborhood in my tightly clasped hand. Because, why not?
As it seems, I'll never get a ninja army, I've decided to draw one instead. And while I was at it, I thought, I bet there are others out there who'd love to have their own ninja army. So, here it is, step-by-step instructions on how to draw ninjas.
The pictures in this article were done in Inkscape, a vector based graphics tool that I think is awesome. But it's designed to be drawn in pencil and paper. Just follow along each step. The way it works is, the dashed lines are guidelines, the red lines are the new lines to be drawn, and the blue lines were lines drawn in previous steps.
So, whenever you're ready, let's get started!
Photo Credit: All images in this article were drawn by me in Inkscape.
Choose Your Weapon - Every ninja needs to be prepared, and so do you.


How To Draw Hooded Ninja With Baggy Pants
This guy has dark skin, a hood, baggy pants and the sword held right out in front.
This is a moderate to easy drawing to do, as the shapes are fairly simple. It can become difficult around the arms, but for the most part this one's a piece of cake.
Time required: 20
Difficulty: medium
Cost: 0.00
Tools:
- Pencil
- Paper
- Eraser
Instructions:
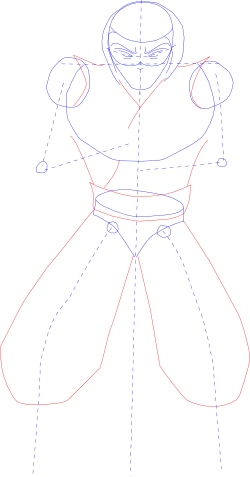
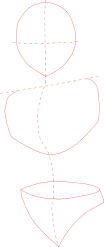
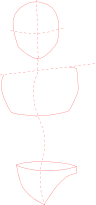
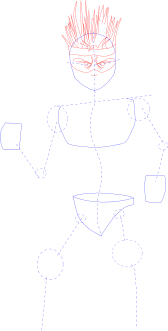
1. This is basically, a guy crouching down a bit, holding a sword just off to the side of his face. So, for guidance, start with a single line from top to bottom. This will be the guideline for the entire form. Next, draw another guideline for the shoulders, making it a T-shape. Add the head, in the shape of an egg hanging over the shoulders. Then give him a large puffed out chest with a large oval.
Below the chest, add the hips with a tight oval, to demonstrate that he's leaning forward. Then, for now, just drawn something like Daisy-Dukes, just to get the space blocked out for the lower body.
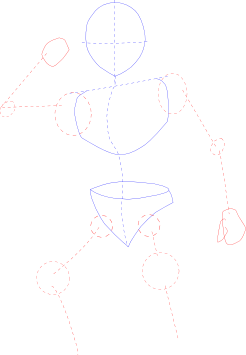
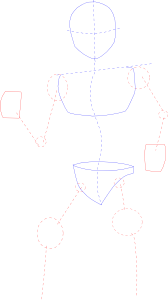
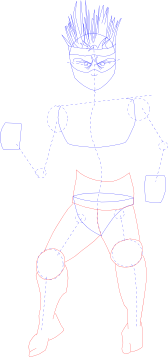
2. Add lines for the limbs. Give big bulging shoulders, because he's holding his sword up. Line them down to the bottom of the chest oval. This is where the elbows will be, add small circles here for elbows. And line those forward to the center of the chest, for the forearms. Make sure the right arm is hanging over the left.
For the legs, add small circles where the legs should move from the hips. This will serve as the joint for the drawing. Now, the legs will be longer than the entire upper body. Legs are about three heads long from hip joint to foot. So, use the egg-shaped head drawn above for the measurements. Now, the legs bow out, until about half way down, they straighten.
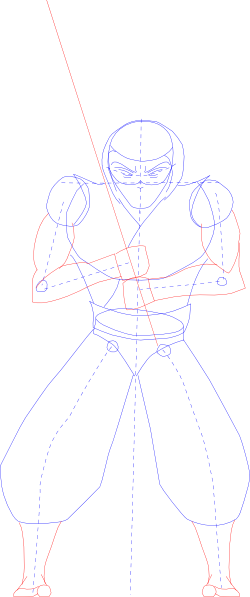
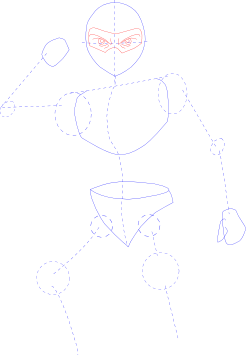
3. Add a face. About half way down the egg-shaped head, there needs to be an arcing guideline. Add the eyes right along here. Then, right about where the shoulders cross the head, is where the ninja mask needs to cross. This should be kind of a W-shape, so that it accounts for the nose. Just under the point, add a small U-shape to indicate the nose protruding.
And finally, wrap the entire head in a hood. Give it an oval around the entire head, kind of a bubble. Then inside that, have some fun with folds.
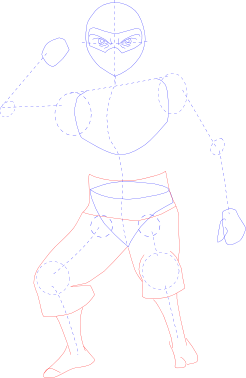
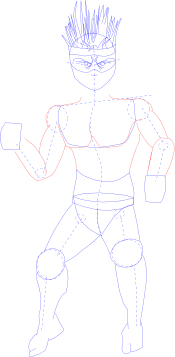
4. Add the clothing lines here. Give the shirt shoulders that poke up and just cover the shoulder balls. Have one side of the shirt cross through the middle and wrap to the other side, while the other side of the shirt will tuck under this, and create a V-shape around the collar.
Add a thick belt, and big billowing pants that taper off near the bottom. Think baggy thoughts.
5. Now, give him arms and feet.
Sculpt out the arm muscles. The biceps should be bulging footballs. The forearm should begin thick and then thin out near the wrist. Then drawn hands as just rectangles, for now. Add a line to indicate how the sword will be drawn.
Now add the cool ninja boots, with narrow angles, and always separate the big toe.
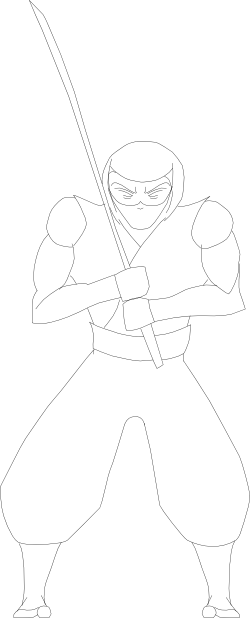
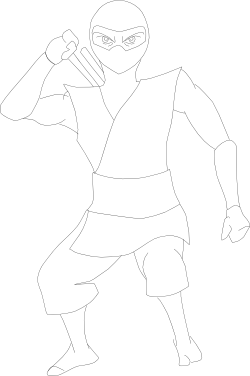
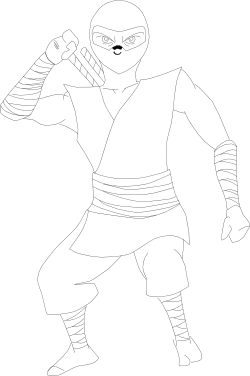
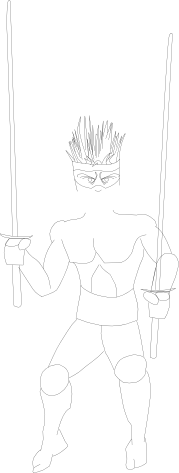
6. Clean up the guidelines and finish up the sword. It should be starting to get there.
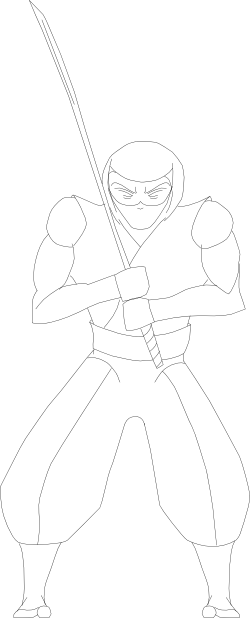
7. Add any final touches you feel you need, like lines going down the pants and sword. You can shade here, smudge it up, and add some definition in the face. Have fun, and enjoy!

How To Draw Over the Shoulder Sword Ninja
This next ninja is probably considered a bit more of the traditional look. He has a skin tight mask, average shirt, pants, and swords over his shoulders.
This one comes with slightly more difficulty, however, because he's reaching back for his sword. This creates a slight dip on the shoulders, and a turn in the torso, along with the same in the hips. This is called a 3/4-turn, along with him being slightly crouched.
It's not overly difficult, but just a little more to think about than the last.
Time required: 20
Difficulty: medium
Cost: 0.00
Tools:
- Pencil
- Paper
- Eraser
Instructions:
1. Begin with a straight line down the middle as before. The head is facing forward, so add the head as an egg-shape, with a line through the middle making a plus-sign for the facial features.
Now the previous ninja used a single straight line as the guideline because he was standing straight ahead. This ninja is not. So, the chest and hips need to bow just a bit to the left. At the top of the chest area, add a line angled down to the left to indicate the shoulder drooping that way.
Now, add the chest on the chest guideline. Drop just below the chest, and add the hips. Start with a tight oval for the top, to demonstrate that the ninja is leaning forward. Then add similar Daisy-Dukes, but make sure they adhere to the bowed guideline and the needed tilt to angle the ninja to the left.
2. Add the big shoulder balls and then line the arms from there. The elbows should be just at the bottom of the chest. And the hands need to be drawn at the bottom of the hips. The left arm, however, needs to be in sort of a triangle-shape to demonstrate that it's reaching for a sword.
Add ball joints for the hips, and line them as well. The closest leg should literally disappear, using foreshortening. The knee will cover most of the thigh, leaving just a short line and then the shin. The other leg should bend to the left, and then down.
3. Add the face. Begin the eyes, on the center guideline. Then wrap them in his ninja mask.
4. For his clothing, draw his pants first. Start with a thick belt, and then make the pants a little baggy. The baggy part should end just below the knees. And below that should be the narrow ninja boots.

5. Add the shirt. This is similar to the above ninjas, with the V-shaped neck and rising shoulders, but this one has some flowing material below the belt. Don't make it a straight line. Give it a flowing S-shape, so it has some depth.
Draw out the arms, and make sure the muscles are bulging. Ninjas are strong, right!
6. Now, clean up the guidelines, and add the sword handles behind his back. This is the clean up phase.
7. Go back and add the final details to make sure he's awesome. Give some shadowing around the nose. Some lines in his exposed palms. Line the forearms, like they're wrapped in cloth, as well as the belt and boots. Add more muscle definition. This can be a fun part, where the picture really comes to life.
![American Ninja [DVD]](https://m.media-amazon.com/images/I/41MJKkNKuKL._SL160_.jpg)
![Ninja Scroll [Blu-ray]](https://m.media-amazon.com/images/I/51AEwUZ6CaL._SL160_.jpg)

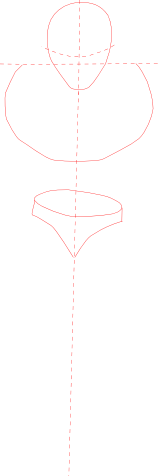
How To Draw a Rogue Ninja
This guy is definitely the rogue of the bunch. No head covering, a headband, two-swords, and NO SHIRT! You have to watch out for this guy. He's totally evil.
Anyway, this one will be more difficult. There's difficulties with the 3/4-turn, chest and hair. But if you made it through the other two, you can handle this one.
Time required: 30
Difficulty: hard
Cost: 0.00
Tools:
- Pencil
- Paper
- Eraser
Instructions:
1. Begin with the single line straight down the center, as before, but before getting to the chest and hips, give them each a little bump, to demonstrate that this guy is leaning a bit.
Add the head, as an egg-shape, facing forward. Add the arced center line for lining up the eyes.
Add an angled line for the top of the chest. Add an oval shape for the chest. Give him the Daisy-Dukes for his hips.
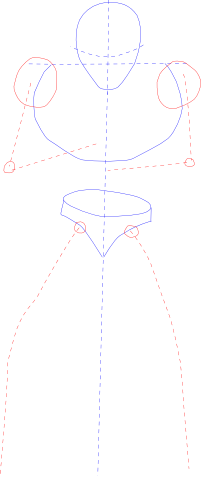
2. Line out his arms and legs. Make sure the joints each have circles to demonstrate the turn. Add his hands as large rectangles, for now.
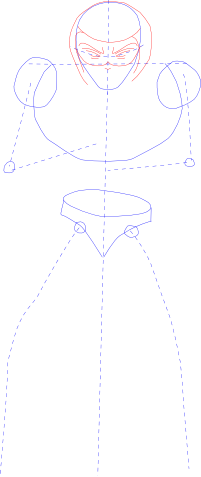
3. Now for his face. This one's a bit tricky. Add the eyes, on the arced line. Give him an evil brow that rises up his forehead. Add the head band, and now spend some time on the spiky hair. If this is done right, it can look real good. Otherwise, it can look real lame. Go all over. Get creative, and think asymmetrical. Now, add the ninja mask, with a curve for his nose.
4. Draw his pants. Give him a huge belt, because he doesn't have a shirt, so he'll need some kind of coverage. Give him tight pants, with some padding over his knees. Make sure to give him the ninja boots.
5. Next draw his chest and arms. His pecks need to overlap both arms, so draw them big. The back comes down behind the arm, but the pecks begin in front to give it some depth.
Now draw his bulging arms, from his neck.
6. Now, clean it up. Add the hands, the swords, and clean up any unnecessary lines.
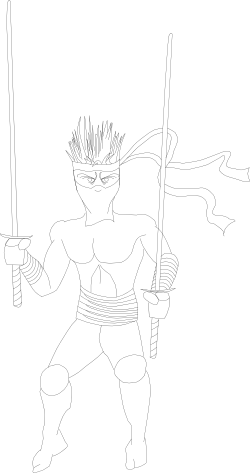
7. Add the final pieces. Add the mask. To make it real cool, I drew it dangling down over his chest, more squarish. Now add the rest of the head band. Make is wave all over the place in the wind. Line his forearm guards and his belt, as well as the handles on his duel swords, and there you go--a rogue ninja.
Take the Poll!
Which ninja did you like best?

Where To Find the Ninja Army
Did you like my ninja army? Well, if you don't want one of your own, you can have the one I've drawn.
You can take a look at prints at Boneworld on DeviantArt page.
OR
You could get the ninjas as a t-shirt at Boneworld's Zazzle Store.


