How To Edit A Photo In Photoshop

From Photo To Art In One Simple Screen
If you check online there are literally tons of tutorials on how to edit a photo in Photoshop. Various people do it so many different ways and I might be the odd one out there, but I haven't seen 'my way' shown in many places, so in this tutorial I will give you the basic steps I do to bring an average photo to something akin to art - even before you open Adobe Photoshop.
A caveat: I'm only a hobbyist photographer, no professional by any means, hence I'm pretty sure there are much better ways to do it. So try it my way and even if you don't agree with everything, you might find, hopefully, a tip or two that you are not yet using.
Also my photos will be anything but professional, but I'm not entering any competitions, I just want to have some nice photos to post to my Facebook wall, or send to my friends or pin on my Pinterest board that hopefully people will like.
All images copyright: kislanyk. Please do not copy.
Main Photo Shooting And Editing Tools
I believe that any beautiful photo is much more than craft, it's art, and it doesn't matter what the subject of the photo is - it could be food, a beautiful flower, a person's portrait or your own handmade jewelry.
Tools I Use To Take My Photos And Edit Them

My Tools Of The Trade

Before you take your photos, you need, of course, a good camera. Granted, you can take great shots with pretty much any digital camera, but personally I'm very comfortable with my Canon PowerShot SX 20 IS.
Granted, I took the photo of this camera with my older Canon model, Powershot G5, and that's a great model as well, but I'm really not using that older camera as much as I use my SX 20 IS model.
As for photo editing, because I'm also a jewelry artist and I can't afford to send my jewelry to be professionally shot and edited, I bought Adobe Photoshop. Right now I have the latest version CS6, but just because it has a few nifty features that I no longer can live without *grins*.
Granted it's not the cheapest software in the world, but it IS the leading standard and if you're really serious about starting with photography, GIMP will not favor you for a long time, once you're beyond the basics and need something more serious. Once you'll invest in Photoshop, you won't want to go back to anything less than that, I can guarantee it.
How Advanced Are You At Photography?
How Advanced Are You At Photography?
The Basic Steps To Edit A Photo In Photoshop
Now Onto The Fun Part

So you've taken your digital photos of that beautiful flower in the garden and you're ready to edit the best photo you've got. I hope you took more than one photo of it - afterall it's easy to delete the unwanted ones right from the camera.
After connecting the camera to the computer, I download all the photos to a folder on my pc. By default I have Adobe Bridge which I used before to open my photos, but not anymore, and below I'll explain why.
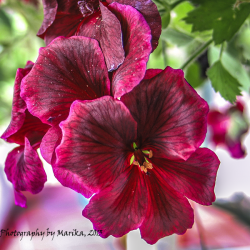
So let's get started. Here is the flower photo I want to edit. Right now it's kind of boring, a bit washed out and basically slightly overexposed. It needs a bit of fixing.
Open Your File In Camera RAW


Ok, this is where I differ from many others who open their files in Photoshop and this is why I don't use Adobe Bridge to do it.
Even though I don't shoot my photos in raw format (I do it in jpg), I edit all my photos in Camera Raw. Why? Because I can adjust a few basic settings directly within it that I find way more easier than fiddling around with them in the actual Photoshop. Basically I found that the more settings I adjust in Camera Raw, that much less I need to adjust in Photoshop afterwards.
So to open the file in Camera Raw in Photoshop click on File / Open As and from the drop down list select Camera Raw (see the image above for selecting the right one).

And here is the result, my flower photo opened in Camera Raw instead of directly in Adobe Photoshop. The Camera Raw opens in a new window, the menus are different and the actual Photoshop is in the background.
Setting The Auto Exposure

Once I opened the photo in Camera Raw format, here are the main settings I use before opening the file in Photoshop for further editing.
So the first thing we will talk about is Exposure. If you look at the menu on the right side, above Exposure you have 2 options: Auto and Default. The photo starts out with the Default settings. First thing I always check is the Auto setting. It might or might not look better, but for me in most cases there is already an improvement vs the original.
If the changes are worst than the original, all I need to do to restore the first version is simply to click on Default.
From the results above after clicking the Auto, the picture got much darker - from overexposed it became a bit underexposed. I will leave it at that, however, as I find I can work with this setting already much easier. Still lots of settings to tweak, but the after is already better than the before.
Adjusting The Shadows

Don't Forget
You can do most of your photo edits directly in Camera Raw!
Next you'll notice that the photo became a bit too dark, so we need to adjust the Shadows to lighten it up a bit.
The auto option for Exposure changed the Shadows values to +26, so I'll drag the slider more to the right to lighten up the picture a bit. I want to see the details, and right now the middle of the main flower is kind of dark and details are not so clear to see.
Note: you can enlarge the photo on your screen simply by clicking on it, or at the lower bottom area of your screen you have the + and - for a larger or smaller view of your photo
Changed the Shadows value to +100 and now I can see the veins of the flowers much better.
Adjusting The Clarity

One Of The Best Books On The Market On Learning About Camera Raw Settings
Using The Clarity Feature
Clarity is an awesome feature in Camera Raw. It is actually much better in the new version than in the previous ones. Apparently the code has been completely rewritten and now it works much, much better.
Basically this setting allows displaying much more details in an image without creating that halo effect which was quite annoying.
You can see in the picture above that the Clarity slider has gone all the way up to +100.
Now I might not keep it at such a high number, but I just wanted to demonstrate what a big different this setting makes in terms of bringing out all the nitty gritty details on the flower, and even a few details of the background.
Adjusting The Highlights

Using Highlights
Another setting I like to play with in Camera Raw is the one called Highlights. The Highlights basically control the brighter area of the image - in my case the background white, which I find a bit too white for my tastes.
So I'll adjust this value a bit pulling the slider towards the right so that the very white areas darken up a bit and show just a tad more detail.
Adjusting The Whites

I don't always use the Whites and Blacks, but today I'm going to adjust the Whites a bit, to make the whole photo a bit lighter, making the flower really pop. This particular setting is there for fine tuning the whitepoint, along with either reducing, or increasing the clipping.
A Few Extra Settings Worth Mentioning
Up till here are the main settings in Camera Raw that I use for my photos BEFORE going to Photoshop to do the usual stuff people do when editing their pictures. This is because achieving the same results within Photoshop would take many more steps and in most cases the same results are not even achievable.
This way when you transfer your photo to Photoshop, it has already a much better starting point to work from, leading to much less fiddling around in the many hundreds of setting that one can pretty easily get confused with.
Having said that, here are a few other options that I might touch, depending on the case.
But you know what - if I'm honest with myself, I do most of the edits here. There are cases when I do very little in Photoshop. I have a friend who does all his editing here, and only does final touches like cropping, etc in Photoshop.
Vibrance - this option basically targets colors that are less saturated
Saturation - works with every color in the panel adjusting them all
Sometimes I adjust both options by decreasing vibrance a bit and increasing the saturation just a bit. I find I get slightly richer colors this way.
Temperature - another setting that I might touch now and then (I know people who use this all the time, in fact they start the editing process by changing it first) is the Temperature. Basically this setting ajusts the blue yellow balance of the picture, so if you want a warmer picture, you set the slider towards the right to positive numbers, and for a 'colder' photo, you slide it towards the left.
Once You're Happy With The Changes Open The File In Photoshop

After I made all my changes in the Camera Raw settings and I'm happy with what I achieved, it's time to open the file in Photoshop. All you need to do this is simply click on Open Image. You can also save it with the option Save Image - this will not save your photo, but your Camera Raw changes.
Don't forget: You can't distort your original photo when working in Camera Raw, as that won't get touched at all. All your changes here are saved to a small file with the extenion .dng. If you want to get rid of all your changes in Camera Raw, all you need to do is simply browse to that folder when the image is saved and delete the .dng file.
The Final Photo

And here is the final result,retaining all the changes I've made previously in Camera Raw.
The only thing I've done once opened in Photoshop was to crop to size, resize the large file to 600x600 pixles and add a small watermark at the bottom.
Granted, it's not yet perfect, but isn't it better than the original one I've started out with? And all the changes I made were FROM ONE SCREEN, without having to move between menus, submenus, options, toolbar buttons, and so on. Quite handy, isn't it?
Once Again Here Is The Original Photo I Started Out With

Now you can go on doing the few things that are still left to edit - cropping the photo to right size, adding your own watermark or logo, and whatever else you still want to do to make it really perfect.
I won't go into those details because if you're even just starting out with photography, the main options in Photoshop will be known to you. I really wanted to write this short tutorial to highlight the new features of Camera Raw and to point you to the fact that Camera RAW does exist!
So many people have no idea that you can do the prelim stuff here, and actually you can make over 80% of your image edits right here, in Camera Raw, saving you time instead of trying to figure out all the hidden options of Adobe Photoshop.
Best Photography Books For Beginners
Here you will find some of my recommended best photography books for beginners that I've read or even own.
I am by no means a pro at photography, but these books can help anyone become much better at photography and editing their photos
And btw, does anyone know what this flower is named? I took the photo in my mom's garden, but neither she or I know what it is. Any help with this appreciated :)


