How to Make a Hollow Book

Step by step Hollow Book Construction
A hollow book makes a great gift for many reasons. First, you can give a gift within a gift, providing a surprise after someone is perplexed by the title you selected for them. Second, hollow books are reasonable as a security measure. I live in a city, and I know many people who have been robbed over the years. Sure, we have renter's insurance, but it is a pain to have to replace your personal documents. What robber is going to open every book on your shelf to see if any of them are hollow?
I decided that I wanted to give my Fiancé a hollowed out book for a Christmas present. I knew it was possible to make your own hollow book, and I thought it would be appropriate to write a lens as I went through my construction. This is a simple project which can easily be completed in an afternoon. I hope you enjoy making your own hollow books as much as I did!
Purchase Hollow Books
Not everyone is a do it yourself kind of person. You can always buy a hollow book as a gift. (The advantage to making it yourself is that you can choose a title that applies to the recipient.)

#1: Assemble Your Materials
You want to make sure you have all of the materials before you start creating your hollow book. The main items you will need are:
The Book - If you are going to create a hollow book, then you need a book to hollow out! I when to a local used book store to search for a thick, hard cover book that would fit my fiancé.
Cutting Apparatus - A box cutter or utility knife would be perfect for this job. You will need something sharp to cut out the inside of the pages.
Glue - Standard white glue will work for this.
Paintbrush - We will water down the glue, and then use the paint brush to apply it to the pages of the book.
Ruler - Any strait edge would work for this task. We want to make lines to define the area where we will hollow the book.
Misc - You will need plastic wrap (to protect parts of the book from glue), a disposable cup to water down the glue, a heavy object (so the book dries flat), a pencil to mark the book, and a place to hide your project!

#2: Securing the Outside of the Book
With plastic wrap, select the first few pages of the book, and wrap them up with the front cover. This is to protect these pages so the book will open in the end. (One page will go on top of the book cavity to cover up pencil marks and make it look neater. A few extra pages at the beginning are to make the book seem "real") Tape the plastic wrap to itself so it is secure.

#3: Gluing the outside edges of the book
Water down some glue until you have a runny solution (about half water, half glue should work fine). With your paintbrush, paint the glue along the outside edge of the book pages (not the ones that you saved!) This will make the pages stick together so they stay in place when we start cutting.
Close the book (put an additional piece of plastic wrap in between the saved pages and the glued pages if you're nervous about them sticking), place a heavy object on top, and let the glue dry. We're on our way to the hollow book!
Wash the glue out of the brush bristles if you ever want to use it again!
The heavy object helping my book dry straight


#4: Plan out Your Hollow Area
Now that the edges are mostly dry, you are ready to prepare you cutting area.
Look at your book, and decide what width you think you'd want around the edge of the book. I chose to have a 3/4" border around the hollow opening of the book. Using a ruler, draw lines where you want these edges to be.
You don't want the edges to be too thin, or else you are in danger of cutting through the edge of the book.

#5: Start Cutting
Using your ruler/straight edge as a guide, start cutting out the inside of the pages with your box cutter. Only try to cut through a few pages at a time. Eventually your cuts will be deep enough that you won't need to use the ruler as a guide anymore.
Remove the pages from the inside of the book with care. The first round of cuts that I made removed about six pages. After that I found myself removing 1 page at a time even if more were cut. As you get deeper, it gets harder to get the pages out. Therefore, I started cutting the middle of the page to help get them out.
The corners are the hardest part to work around. You may need tweezers to remove any extra little bits.
Stop cutting just before you reach the back cover of the book.
Slow and Steady Makes a Great Hollow Book
Be careful while cutting so you don't stain it red...
Halfway through the pages!

The cutting is complete! Now on to the final steps...


#6: Glue the Inside of the Hollow Book
Like you did with the outside edges, make a watered down glue solution, and paint this along the 4 edges of your hollowed out book. Don't worry if you get some glue on the top page of the hollowed section, since we are going to attach one of the saved pages on top of the hollowed section as we allow the glue to set.
Remove the plastic wrap from the cover and early pages that you saved. Paint the top of the hollow portion with the glue solution and then carefully close the book so the pages are even. Wait 30 min or so to let the glue set.
Once again, don't forget to wash your your brush!
Don't forget to recycle the pages!

#7: One Final Cut
Carefully cut the center out of the top glued page. If it looks like things are sticking well, leave it open so the book can finish drying.
If you'd like, you can also use this as an opportunity to coat the inside and outside edges with another coat of glue.

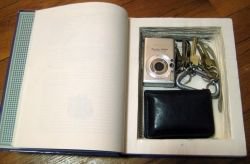
#8: Enjoy your hollow book!
Fill your (now dry) hollowed out book with valuables, surprises or whatever you desire. Place on your bookshelf and enjoy your secret!
Can you tell that this book contains my camera, wallet and keys?

Other Hollow Book Resources - Some tips from other resources
- How to make a secret hollow book
"Make sure this is a book your own, and not one belonging to the library, or your family. " - Make a Hollow Book
"A hollow book can be a nifty way to hide something, whether it's a spare key, a secret note, or even money. Most people wouldn't think to browse your library for private or personal things. It's also a great way to pass something to someone discreet


