How-to Make a Kitchen Vertical Rack for Aluminium Foil and Greaseproof Paper


Utilising Wasted Space With a Vertical Kitchen Foil Rack
A simple space saving Idea utilising dead space in the kitchen; those silly little gaps at the end of kitchen units and between kitchen appliances, where often you might be able to squeeze in a pull-out kitchen towel rail or fit a vertical wine rack.
This project was done on a no cost bases using scrap wood, off cuts which you may have laying around in your garden shed, garage or workshop. If you need to buy the wood new, such small pieces of plywood are required that if you shop around you ought to be able to pick up what you need quite cheaply.
Time required: 3 hours
Difficulty: easy
Cost: $0
Materials:
- One piece of 12mm (1/2 inch) plywood about 15 inches by 16 inches
- One piece of 6mm (1/4 inch) plywood about 12 inches by 16 inches.
- Wood glue
- 12 x screws 4x30mm
- 4 screws 4x40mm
- 4 wall plugs
- varnish
- 8 x panel pins 25mm
- 1 foot decorative beading 6mm depth
Tools:
- saw
- Screwdriver
- Drill
- 4mm wood drill bit
- 7mm masonry drill bit
- Tape measure
- Square
- Pencil
- Hammer
- Paintbrush
- Spirit level.

Instructions:
1. Having taken all the vital measurements, making a few calculations and taking all considerations mentioned above into account, and having looked around my workshop to see what scrap wood was available, I concluded that all I needed (from what was available) was a piece of 12mm (1/2 inch) plywood about 15 inches by 16 inches and a piece of 6mm (1/4 inch) plywood about 12 inches by 16 inches. Therefore I was able to do this simple DIY project at no cost.
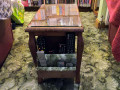
As the picture shows, it was just a simple case of cutting the thicker plywood into 2 3/4 inch strips with four (for individual shelves) being 16 inches long and one about 12 inches high as a back stop. The thinner plywood is then cut to size so that the shelf supports and back stop can be screwed to it with additional screws from the back of the back stop into the far end of each shelf support; a simple job that took less than an hour. All that was then needed was a couple of licks of quick drying varnish, so that with the 1 hour waiting time between coats the foil rack was ready for hanging within just a few hours from the start of the project. One final finishing touch was just to add a thin strip of decorative beading to the front edge of each shelf.

2. The thicker wood was used for the shelves for strength while the thinner plywood was used for the side to maximise on available space, making it possible to achieve a 2 3/4 inch square opening for each shelf without the fridge being pushed tight against the foil rack; when installed, there is still a few millimetres gap to help aid airflow and reduce the risk of starching the fridge. The other advantage of not boxing in the foil rack with side supports on both sides is that it provides easy access for drilling through the side of the foil rack to fix it firmly to the wall.
As can be seen from the photo, there is plenty of room to store a number of rolls of tin foil, Clingfilm and greaseproof paper, and since even a roll of bin liners. In practice it is easy to store these various packets of kitchen rolls so that they are all to hand in one place, when needed; and it saves space elsewhere in the kitchen.
Since, I have done a similar thing with the space below, just above the kitchen base unit; this time just adding one base shelf with a height of about 18 inches high and a stop back at about a foot deep, so that we are able to store a couple of cheeseboards and cooling trays when not needed.

The Concept and Design Idea
How do you utilize those little spaces in your kitchen e.g. a few spare inches at the end of the base units and between kitchen appliances where you might conveniently fit a tea towel rail or wine rack etc.
In our case, because we have our fridge/freezer in a recess there was an unusable gap of about 3 inches wide and a foot tall between the top of the fridge and the side of a kitchen wall cupboard. It was one of those inspirational moments while making myself a cup of coffee seeing the gap while getting the milk for my cup, and in seeing various packets of tin-foil, food rap (Clingfilm) and greaseproof paper resident on the top of our microwave, that I thought of a wine-rack type design might be the ideal solution to storing all these homeless boxes.
So I took some measurements, and with my cup of freshly made coffee made headway towards my workshop at the end of the garden to contemplate my design. The gap in question is just under 3 inches wide and one foot high. All the packets I wanted to accommodate in this new rack, although varying lengths from about 16 inches to one foot, are all a similar size at the end, about 2 inches square. The considerations in designing this rack was that the length should not be too long so that smaller packets which may get pushed back too far are too difficult to reach with the fingers and retrieve, and the maximum width so that you can get your fingers in and pull out any packets which have been pushed back a little too far.
Some simple tests, and a few calculations, told me that with a gap of 2 3/4 inches it is possible to reach in about 4 inches to retrieve smaller packets which may have been pushed back too far. The other considerations included a design for easy fixing to the wall and something that would not press up hard against the side of the fridge, with a risk of scratching it, and to allow a small gap to allow a little airflow around the fridge at that point.
It’s the finishing touches that turn a good project into a great one e.g. the sanding down, painting, wood staining or varnishing. In our case we chose oak wood stain to match the oak theme of our kitchen.
Other Vertical Storage Solutions
Utilising every inch of a small kitchen makes the best use of limited space.
The obvious ones are vertical wine racks and pull out towel rails in small gaps at the end of base units.
However, utilising a few inches at the end of wall units is a little more difficult e.g. they are too high for small compartmental storage like wine racks and too high to use a towel rail.
The simple solution is small shelving, and if it’s at the end of a wall unit, if decoratively designed can make a good display shelf as well as being functional.
My solution in our kitchen was a couple of small shelves made from pine:-
- The edges were made decorative with a router, and
- The wood finished with three coats of oak coloured varnish to match the existing oak wood units.
We use the bespoke corner shelving for open display storage of a few of our more decorative mugs.


Making use of wasted kitchen Space
Do you make use of wasted kitchen space, such as gaps at the end of kitchen cupboards?
This content is accurate and true to the best of the author’s knowledge and is not meant to substitute for formal and individualized advice from a qualified professional.
© 2014 Arthur Russ