How to Make Fabric Yoyos

Little Puffs of Fabric Joy!
Fabric Yoyos (or yo yos) are not cloth versions of the toy on a string! I'm not even sure how that would work...
Anyway, Fabric Yoyos are funky little puffed circles that you can use to decorate the surface of your textiles pieces.
Not only that but you can piece them together to make throws and blankets, bags and cushions etc.
I've become a little obsessed with making Fabric Yoyos recently so I thought I'd collect together some information on how to make them, what they can be used for and some neat little yoyo tricks.
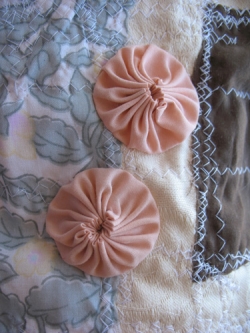
Above: A couple of yoyos on a patched together skirt.
A Little Bit about my Yoyo Background
The first time I ever saw a yoyo (or ever noticed seeing one) was inside Colette Wolff's book "The Art of Manipulating Fabric".
This book is absolutely fabulous and has some incredibly inventive ways of manipulating fabric using pleating, shirring, cording, stuffing etc.
I've had this book since around 2003 and haven't yet given it the full attention it deserves - mainly because a lot of the techniques are things that would be fabulous on plain, single layered fabrics whereas I use layered, heavy, melted fabrics which are harder to manipulate in this way.
My favourite part of The Art of Manipulating Fabric are the Creative Combinations at the back where a lot of the effects have been fit onto one piece - sort of like a sampler for Fabric Manipulation.
Anyway, back to yoyos - there are some interesting ideas for playing around with the size of the central gap of the yoyo, furrowed yoyos and stitching the yoyos onto your background fabric before gathering the edges.
The Art of Manipulating Fabric

My First Attempt!
So, armed with Colette Wolff's book "The Art of Manipulating Fabric" I set about trying to make some of these yoyo things I'd never heard of before.
At the time I was very much inspired by microscopic biological images and used images of cell structures to inspire my textiles work.
The two images in this section were inspired by a microscopic image of knotweed pollen.
Yoyos sounded like they'd make some great little cell structures.
The only problem is that although I have a lot of books I don't tend to read them properly and thus decided I knew how to make yoyos without reading the instructions.
My fake yoyos, below, were made by cutting a circle out of my chosen fabric and then cutting another circle out from the centre of that.
I then tucked in the raw edges of both the outside of the circle and the inside (very tricky!) as I sewed the fabric down onto my textiles background - whilst simultaneously gathering up the fabric to make sure the "yoyo" would be ruffled! The benefit of this was that I did have a nice central opening that showed off my textiles background - which I wouldn't have got with a proper yoyo.
Above: My first attempt at making "yoyos".
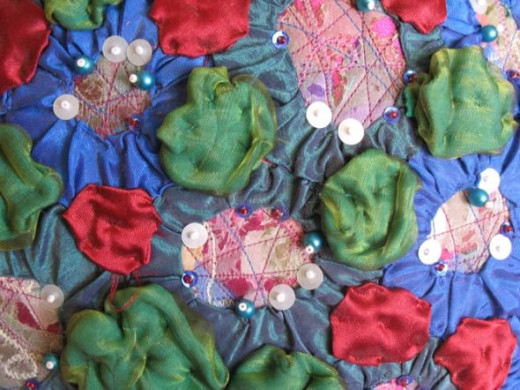
Below you can see the overall effect of my fake yoyos on this round bag.
I don't think I'd ever make these fake yoyos again because they were a real pain to make!
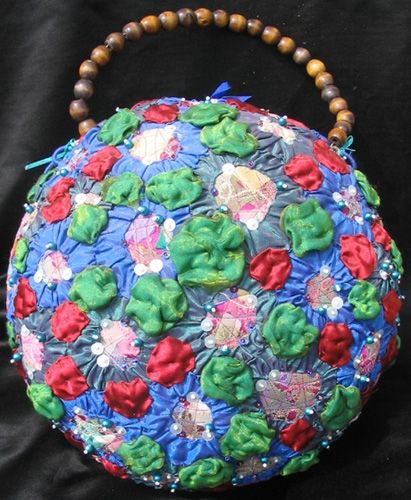
Above: Green Knotweed Pollen Bag covered in fake yoyos!
How to Make a Basic Yoyo
Yoyos really are very simple to make.
The yoyo I've made below is just a simple yoyo made by gathering the centre stitches so that they meet in the middle. The yoyo can then be sewn onto textiles pieces later or it can be attached to more yoyos.
1. Find a circle to draw around.
I used a roll of tape as a guide for my circle. Experiment with sizes. How about using a dinner plate to make a larger yoyo.
Use a compass to make a specific size. Remember that your circle will shrink!
2. Draw your circle in place on your fabric.
I used a coloured pencil to draw my circle in place because it was the nearest thing to hand. It really doesn’t matter what you use because when you cut your circle out you can cut inside your drawn line. Just don’t use anything that’s likely to bleed.
3. Cut out the circle.
This is a simple enough task – no explanation needed!
4. Fold the edge of the circle over and stitch in place.
Remember big stitches will make a tighter centre, smaller closer together stitches will make more of a gap at the centre of your yoyo.
5. Carry on stitching the edge over until you've gone all the way around your circle.
Make sure that your stitches are going to be even at the point where you started and finished your stitching – otherwise that part of your gathers might look a bit odd.
6. Gather your stitches.
Gently pull on your active thread, pushing the gathers back around the thread so that they’re equal all around your yoyo.


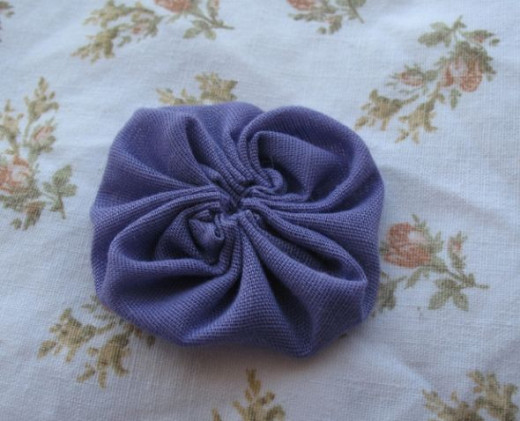
Above: A yoyo made from a dinner plate sized circle.
Using Yoyos as Surface Decoration
Yoyos are one of my current favourite things to decorate textiles pieces with.
Whilst I was creating instructions for the Mystery Textiles Challenge I researched different ideas for surface decoration and yoyos were one of the ideas I came up with.
I ended up using yoyos to add a little decoration to my own Mystery Textiles piece.
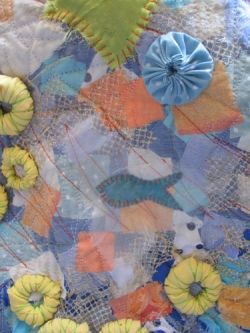
My Mystery Textiles piece had been influenced by an image of a coral reef and to me yoyos looked like little sea creatures.
The yellow things are wrapped fabric beads - I call them donut beads.

Above: My Mystery Textiles Piece.
This piece was made over the course of ten weeks, using ten sets of instructions.
I had no idea what the final piece would look like.
Whilst I was making a skirt for another project I decided that it needed something added to it to make it more interesting.
Yoyos seemed the perfect answer for adding a little interest to my patched skirt.
I love how yoyos can be used to decorate fabrics instead of beads - this is especially useful when you're decorating a whimsical skirt and don't fancy sitting down on hard beads!
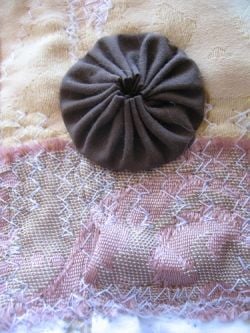
I love how the darker yoyo (opposite) looks on the paler background.
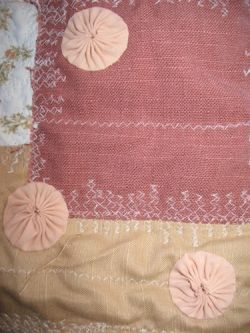
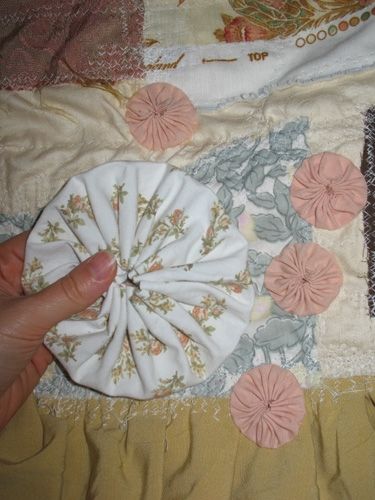
In the picture below you can see how I've made yoyos in a peach colour to decorate other areas on my wrap around skirt.
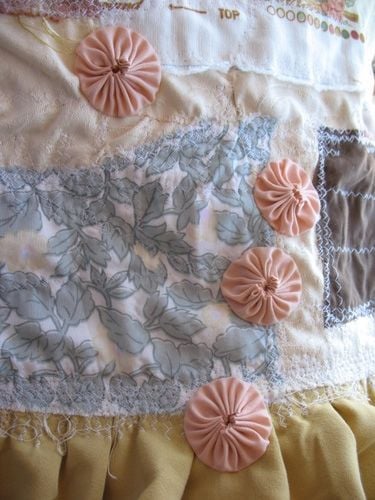
Above: A close-up of four peach yoyos on my wrap around skirt.
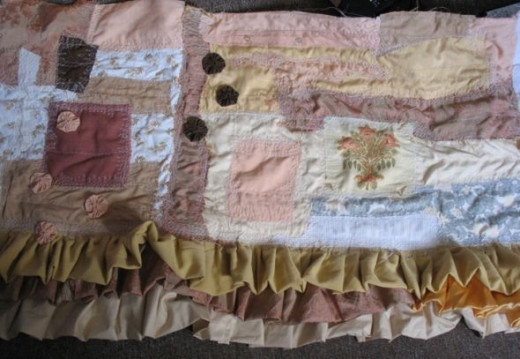
Above: My wrap-around skirt in progress.
This photo was taken before I sewed the yoyos to the background.
Different Effects
To make a yoyo with a wider opening (like the one shown below) you need to use tinier and closer together stitches around the edge of the circle.
Think about the sort of fabric you're using. Do you want the inside of it to be visible in your yoyo?
The fabric I used in the piece below didn't have a great back - it was just a faded version of the print on the front of the fabric - so the fabric wasn't a great choice for a yoyo with a wider opening.
You could also think about adding inserts into the centre of your yoyo so that the centre is a contrasting colour or pattern.
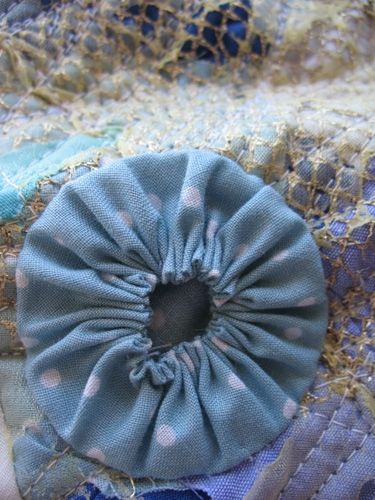
Above: This yoyo was sewn with smaller stitches which have given it a wider opening at the centre.
The yoyo below was a mistake from when I was just learning to make yoyos.
I pulled the thread really tight when I was gathering the fabric and the ruffled edges stood up on end.
This could be a really interesting effect in your textiles pieces, however, especially if you're interested in starting to add 3D elements and texture into your textiles pieces.
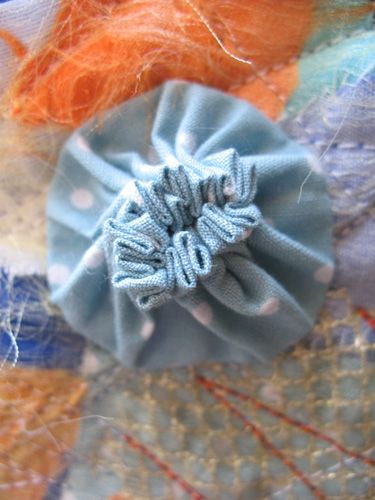
Above: The centre of this yoyo was pulled up tight so that it stood up rather than lay flat.
This raised centre could make an interesting texture and could also be used to depict poppy heads.
Stuffed Yoyos

The stuffed yoyo opposite is the first one I've made and as of writing this lens the only stuffed yoyo I've made but I already love this idea.
I love this effect and want to make a whole load more.
These would be so cute as poppy heads on a textiles piece - or even pieced together to make a squashy quilt!
I used toy stuffing to stuff my yoyo.
All you need to do to make your own stuffed yoyo is follow my basic instructions (making sure you use larger stictches so that the gathered ruffles will meet in the centre) and stuff the yoyo right before you gather it completely at the centre.
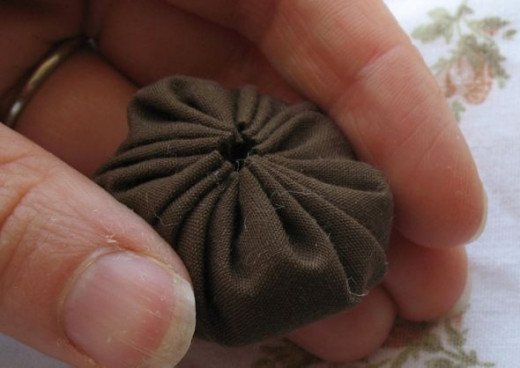
Above: A yoyo stuffed with toy stuffing.
Stuffing

Different Shapes
Yoyos come in more shapes than just circles!
The yoyo shown below is one I made from a square piece of fabric. I sewed around the edges (being mindful of the corners) just as I would a circular yoyo and then gathered the centre, making sure I pulled out the corners a little.
Square yoyos would be great for making quilts that don't have holes in them!
Above: A Yoyo made from a square piece of fabric.
Yoyo Makers
Yoyos are really simple to make and yet I keep coming across these yoyo makers!
I guess if you want to make sure your yoyos are as neat as possible then these are the tools for you.
I love the other yoyo shapes though - hearts and butterflies etc - I'm not sure how you could make those without one of these yoyo makers.


")
")